The Heart Stitch in Crochet – Tutorial is one of the most delightful ways to add a touch of love and texture to your handmade projects. Whether you are looking to create a romantic baby blanket, a cute scarf, or a decorative pillow, mastering this specific technique allows you to weave literal hearts into the fabric of your work. This guide is designed to take you from a beginner’s curiosity to a confident creator of beautiful, rhythmic patterns that stand out in any crochet collection.
Crochet is more than just a hobby; it is an expressive art form where every loop and pull tells a story. When you follow a Heart Stitch in Crochet – Tutorial, you are learning to manipulate standard stitches like the double crochet and puff stitch to form recognizable shapes. The beauty of this design lies in its versatility, as it looks stunning in solid vibrant reds or soft, variegated pastels that give each heart a unique personality.
In the world of fiber arts, staying updated with the latest trends and techniques is essential for growth. This Heart Stitch in Crochet – Tutorial focuses on clarity and “humanized” instructions, ensuring that you don’t just follow steps, but actually understand the mechanics of the stitch. By the end of this comprehensive guide, you will have the skills needed to implement these romantic motifs into any project you can imagine, making your gifts and home decor truly one-of-a-kind.
1. Understanding the Essentials of the Heart Stitch in Crochet – Tutorial
The foundation of any successful project starts with selecting the right materials. To begin your Heart Stitch in Crochet – Tutorial, you will need a medium-weight yarn (worsted weight is usually best for visibility) and a crochet hook that matches your yarn’s recommended gauge. Choosing a smooth yarn helps the hearts pop against the background.
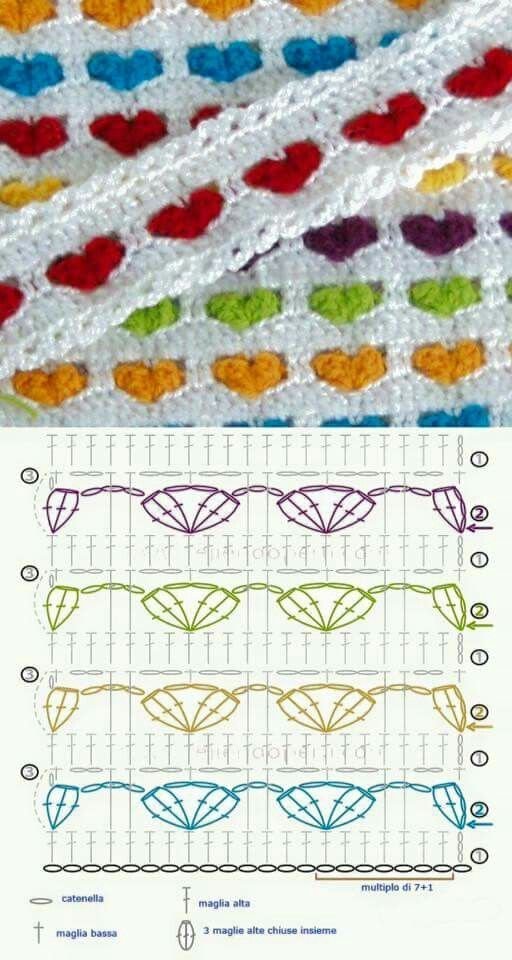
When we talk about the Heart Stitch in Crochet – Tutorial, we are often referring to a combination of clusters or bobble stitches arranged in a specific sequence. These stitches create the rounded tops and the pointed bottom of the heart shape. Understanding how to manage your tension is key to keeping the hearts uniform throughout your work.
One of the primary crochet terms you will encounter is the foundation chain. For this specific pattern, you typically need a multiple of stitches plus a few extra for the turning chain. This ensures that each heart is perfectly centered and spaced within the rows of your garment or accessory.
In this Heart Stitch in Crochet – Tutorial, the “heart” itself is usually worked over two or three rows. The first row sets the base, the second builds the “lobes” of the heart, and the third row often acts as a finishing or anchoring row to prepare for the next set of motifs. Mastery of the double crochet (dc) is vital here.
Another important element is the use of color changes. While you can work the Heart Stitch in Crochet – Tutorial in a single color for a subtle, textured look, using a contrasting color for the hearts makes the pattern truly “sing.” Learning to carry yarn or join new colors neatly is a skill that elevates the finished piece.
Lastly, always remember to use stitch markers. When you are deep into a complex Heart Stitch in Crochet – Tutorial, it is easy to lose track of where one heart ends and the next begins. Marking the start of your repeats will save you time and prevent the frustration of having to frog (rip out) your hard work.
2. Step-by-Step Execution of the Heart Motif
To start the actual construction in this Heart Stitch in Crochet – Tutorial, you will create a base of single crochet (sc) or half-double crochet (hdc). This provides a stable “canvas” for your hearts to sit upon. A solid base prevents the fabric from becoming too holey or losing its structural integrity.
The magic happens when you reach the heart row. In a standard Heart Stitch in Crochet – Tutorial, you will skip a few stitches and then work a series of incomplete double crochets into a single stitch, closing them together to form a cluster. This creates the bottom point of the heart that anchors the shape.
Moving upward, the next row involves working into the top of that cluster. By placing multiple stitches—often treble crochets (tr) or puff stitches—into specific spaces, you create the rounded “ears” of the heart. This Heart Stitch in Crochet – Tutorial emphasizes the importance of stitch placement for a symmetrical look.
Spacing is another critical factor in a professional-looking result. Between each heart, you will usually work a few standard stitches to give the eyes a place to rest. This Heart Stitch in Crochet – Tutorial suggests a gap of 3 to 5 stitches to ensure the hearts don’t look crowded or distorted.
As you progress through the Heart Stitch in Crochet – Tutorial, you will notice the rhythm of the pattern. Crochet is very mathematical, and once you see how the v-stitches and clusters interact, you won’t need to look at the pattern as often. This “flow state” is where the most enjoyment in crafting is found.
Finishing the row correctly is just as important as starting it. Always ensure your turning chain counts as a stitch if the pattern specifies so. In this Heart Stitch in Crochet – Tutorial, a neat edge is maintained by working a final double crochet into the last stitch of the row, keeping your project rectangular and straight.
3. Advanced Tips for Perfecting Your Crochet Hearts
Once you have mastered the basics of the Heart Stitch in Crochet – Tutorial, you can begin experimenting with yarn weights. Using a thinner, lace-weight yarn with a small hook can create delicate, tiny hearts perfect for a wedding veil or a sophisticated shawl, while bulky yarn creates “chunky” hearts for cozy rugs.
The Heart Stitch in Crochet – Tutorial also works beautifully with ombre or gradient yarns. Because the heart motifs are distinct, the color changes in the yarn can create a stunning visual effect where each heart is a slightly different shade than the one before it, adding depth to the design.
Blocking is a “secret” step that many beginners skip, but it is highly recommended in this Heart Stitch in Crochet – Tutorial. By wetting your finished piece and pinning it to shape, you allow the stitches to settle and the hearts to open up fully. This makes the stitch definition much clearer and more professional.
If you find that your hearts are looking a bit “floppy,” consider using a slightly smaller hook than recommended. In this Heart Stitch in Crochet – Tutorial, a tighter tension often results in a more defined heart shape. A stiff stitch holds the geometry of the heart better than a loose, airy one.
Incorporating beads into your Heart Stitch in Crochet – Tutorial is another way to add flair. You can thread beads onto your yarn before starting and slide them into place at the center of each heart. This adds a bit of weight and a lot of sparkle, making the project suitable for high-end decor or gifts.
Don’t forget the importance of the wrong side (WS) vs. the right side (RS). In the Heart Stitch in Crochet – Tutorial, the hearts usually look best on one side. Make sure you are consistent with which side you consider the “front” so that all your hearts are facing the same direction throughout the project.
4. Troubleshooting Common Issues in Heart Stitching
One common struggle when following a Heart Stitch in Crochet – Tutorial is the fabric “pulling in” or becoming too tight at the heart rows. This usually happens if the cluster stitches are pulled too tightly. Try to keep your loops consistent and elongated to give the heart enough room to expand.
Conversely, if the fabric is “ruffling” or waving, you might be adding too many stitches within the heart motif. Re-read the Heart Stitch in Crochet – Tutorial carefully to ensure you aren’t accidentally doubling your increases. Accuracy in the stitch count is the best defense against a warped project.
Sometimes the hearts look lopsided. This often occurs if the hook is inserted into the wrong part of the stitch below. In this Heart Stitch in Crochet – Tutorial, we emphasize “working into the space” rather than the “v” of the stitch when creating the heart’s lobes to achieve that perfect, rounded symmetry.
If you are using two colors and the background color is “peeking through” the heart, you may need to adjust your yarn carrying technique. This Heart Stitch in Crochet – Tutorial suggests “tapping” the yarn or using the tapestry crochet method to keep the unused color hidden behind the active stitches.
Managing yarn tails can be a nightmare in a multi-color Heart Stitch in Crochet – Tutorial. To make the process easier, weave in your ends as you go. This prevents a mountain of work at the end and ensures that your hearts remain secure and don’t unravel over time.
Finally, if the pattern just isn’t “clicking,” take a break. The Heart Stitch in Crochet – Tutorial is meant to be a fun, creative outlet. Sometimes stepping away for a few minutes allows your brain to process the visual instructions, making the next row much easier to conquer.
FAQ: Heart Stitch in Crochet – Tutorial
What is the best yarn for the heart stitch?
For the best results in this Heart Stitch in Crochet – Tutorial, use a smooth, mercerized cotton or a high-quality acrylic. These yarns have excellent stitch definition, which is crucial for making the heart shape clearly visible to the eye.
Can a beginner do the heart stitch?
Yes! While it is slightly more advanced than a basic granny square, any beginner who knows how to double crochet and work clusters can successfully complete this Heart Stitch in Crochet – Tutorial with a bit of patience and practice.
How do I calculate how much yarn I need?
The heart stitch is a “yarn eater” because of the dense bobbles or clusters. If you are following this Heart Stitch in Crochet – Tutorial for a large blanket, expect to use about 20-30% more yarn than you would for a standard solid double crochet project.
Is this stitch reversible?
Most versions of the Heart Stitch in Crochet – Tutorial are not perfectly reversible. The hearts will have a distinct “pop” on the right side, while the back will look more like standard textured rows. This makes it ideal for blankets or clothing where one side is primarily displayed.
How do I wash a project made with the heart stitch?
Because the heart motifs involve raised stitches, it is best to hand wash or use a delicate cycle in a laundry bag. This protects the clusters from snagging and keeps the hearts looking plump and well-defined for years to come.
Conclusion
In this Heart Stitch in Crochet – Tutorial, we have explored everything from the basic materials needed to the advanced tips that make your work shine. We covered how to build the foundation, the mechanics of creating the heart lobes through clusters and treble crochets, and how to troubleshoot common tension issues. Crochet is a journey of continuous learning, and adding this romantic stitch to your repertoire opens up a world of creative possibilities for gifts, fashion, and home styling.
The most important takeaway from this tutorial is that practice leads to perfection. Your first few hearts might look a little quirky, but by the time you finish your first row, you will find a rhythm that makes the process meditative and rewarding. Remember to play with colors and textures to make the design uniquely yours.