This Heart-shaped Crochet Coaster – Tutorial is designed to help you create a charming, functional piece of handmade decor that adds a touch of love to any coffee table. Whether you are looking for a thoughtful DIY gift idea or simply want to practice your crochet stitches, a heart-shaped coaster is the perfect project because it is quick to complete and incredibly satisfying. In this guide, we will walk through every step of the process, ensuring that even those new to the craft can follow along and produce a beautiful, professional-looking result.
The beauty of a Heart-shaped Crochet Coaster – Tutorial lies in its versatility, as you can customize the size and color to match your home aesthetic or the specific season. For instance, vibrant reds and pinks are classic for Valentine’s Day crochet, while neutral tones like cream or sage green offer a modern, boho-chic vibe for year-round use. Beyond their visual appeal, these crocheted coasters serve a practical purpose by protecting your furniture from heat and moisture, making them a staple in any handmade home.
As we dive into this Heart-shaped Crochet Coaster – Tutorial, it is important to remember that the quality of your finished piece depends largely on your yarn selection and tension control. Using a cotton yarn is highly recommended for coasters because it is durable, heat-resistant, and absorbent compared to acrylic alternatives. By mastering the magic ring and basic increases, you will be able to shape the curves of the heart perfectly. Let’s gather our materials and prepare to transform a simple ball of yarn into a work of art.
1 Understanding the Heart-shaped Crochet Coaster – Tutorial Basics
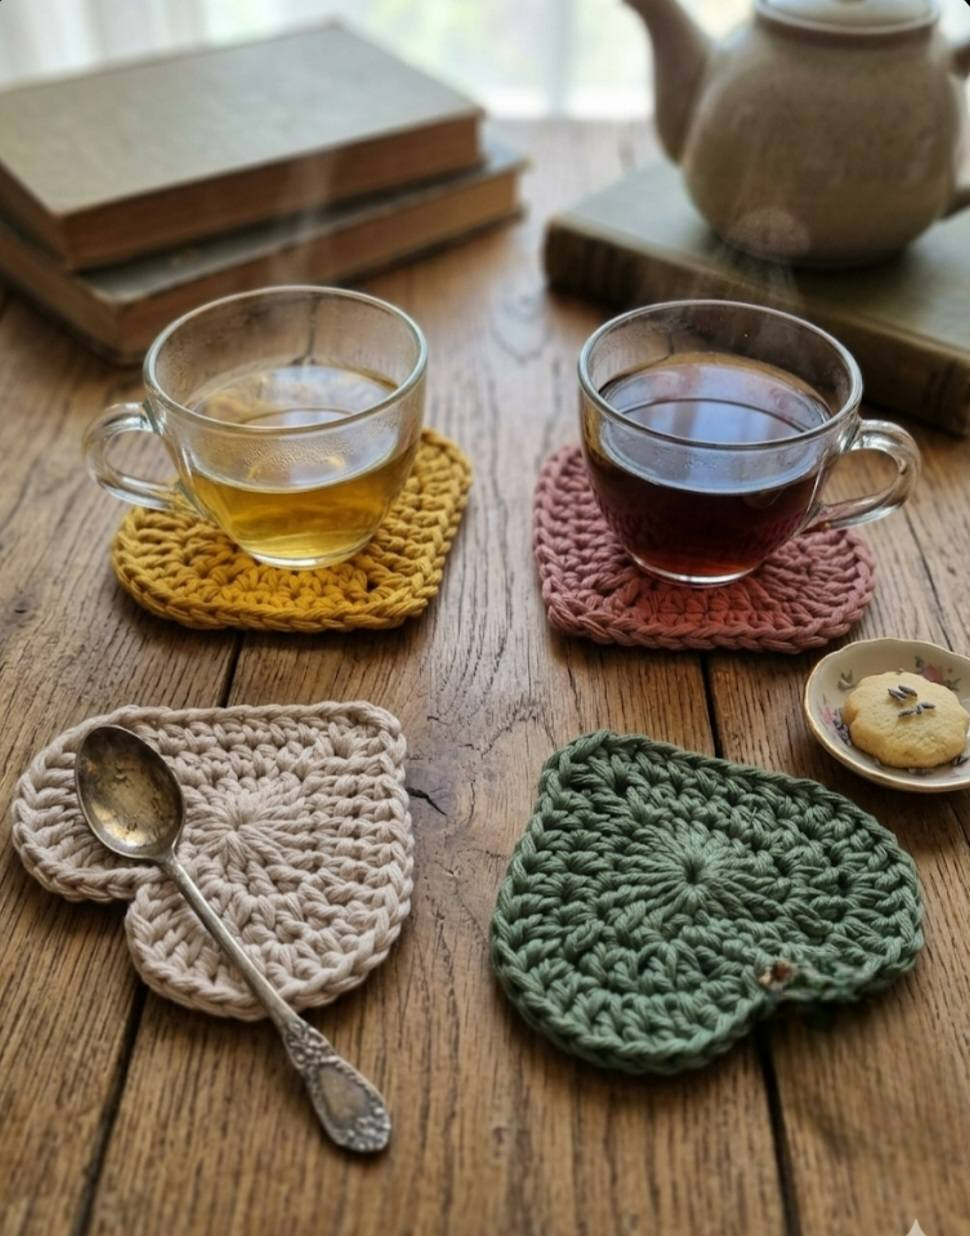
The Heart-shaped Crochet Coaster – Tutorial is a comprehensive guide focused on creating a symmetrical, heart-shaped mat using specialized crochet techniques. To succeed, you must first understand the anatomy of the pattern, which usually starts from the center and expands outward. This specific crochet pattern utilizes a combination of short and tall stitches to create the iconic dip at the top and the point at the bottom.
When we talk about a Heart-shaped Crochet Coaster – Tutorial, we are referring to the instructional breakdown of chain stitches, double crochets, and slip stitches. Each step is calculated to ensure the heart doesn’t curl at the edges, a common issue in circular crochet projects. By following the tutorial closely, you ensure that the dimensions are consistent across a full set of coasters.
The term crochet coaster defines the functional category of this project, which is a small mat intended to sit under a beverage. Unlike decorative doilies, a sturdy coaster needs a bit of thickness to be effective. This is why many tutorials suggest using a 4mm crochet hook or even a double strand of yarn to provide the necessary density for surface protection.
A tutorial in the context of fiber arts is more than just a list of instructions; it is a roadmap for skill development. It explains the “why” behind the “how,” such as why we use a triple crochet at the peaks of the heart to create that rounded “hump” effect. This educational approach helps beginners transition from simple rows to complex shaping techniques.
The heart shape itself is a universal symbol, making this project a top search for crochet enthusiasts globally. It involves a specific sequence of stitch increases and decreases. Mastering this shape allows you to branch out into other projects, like heart-shaped pillows, bunting, or even appliqués for clothing and blankets.
Ultimately, the goal of this Heart-shaped Crochet Coaster – Tutorial is to empower you to create something with your own two hands. There is a unique joy in the slow fashion movement and handmade movement, where the focus is on quality over quantity. By the end of this guide, you will have a functional piece of art and a new set of skills to brag about.
2 Selecting the Best Materials for Your Crochet Project
To get the most out of this Heart-shaped Crochet Coaster – Tutorial, you need to start with the right crochet supplies. The most critical component is your yarn choice. For coasters, 100% cotton yarn (worsted weight or aran) is the gold standard because it handles moisture from condensation without becoming soggy or losing its structural integrity.
Next, you must pair your yarn with the correct crochet hook size. Most cotton yarns work best with a G/4.0mm or H/5.0mm hook. Using a hook that is slightly smaller than what the yarn label recommends can help create a tighter stitch, which prevents liquid from leaking through the coaster onto your wooden surfaces.
You will also need a pair of sharp embroidery scissors and a yarn needle (also known as a tapestry needle). These tools are essential for the finishing stages of the Heart-shaped Crochet Coaster – Tutorial, specifically for weaving in ends. A clean finish is what separates an amateur project from a high-quality handmade gift.
Stitch markers are another invaluable tool, especially when working in the round. Since the heart-shaped pattern requires specific placement of increases to maintain symmetry, marking the first stitch of each round ensures you don’t lose your place. This simple habit prevents the frustration of having to “frog” or rip out your work later.
Don’t forget the importance of blocked crochet. Blocking involves pinning your finished coaster to a board and lightly steaming it or misting it with water to “set” the shape. While optional, it makes your Heart-shaped Crochet Coaster – Tutorial results look much more professional, ensuring the heart lies perfectly flat and crisp.
Lastly, consider the color palette. While red is the traditional choice, using variegated yarn can create a beautiful “marbled” look without needing to change yarn colors manually. If you are making a set, choosing complementary colors like shades of blue or earth tones can make your crochet coaster set look like a high-end boutique find.
3 Step-by-Step Stitch Guide for Heart Shapes
The core of the Heart-shaped Crochet Coaster – Tutorial begins with the Magic Ring (or Magic Circle). This technique allows you to start crocheting in the round without leaving a hole in the center of your heart. It provides a clean, tight start that is much more aesthetic than the traditional “chain and join” method used in older crochet patterns.
Round one typically involves a series of tall stitches worked directly into the ring. You will likely use Treble Crochets (tr) to create the height needed for the top lobes of the heart, followed by Double Crochets (dc) and a Half Double Crochet (hdc) to taper down toward the bottom point. This variation in stitch height is the secret to the heart geometry.
In the second round of this Heart-shaped Crochet Coaster – Tutorial, you will focus on increasing. This means putting two or three stitches into a single stitch from the previous row. Focusing your increases on the “shoulders” of the heart ensures they expand outward, creating that lovely, rounded fullness that defines a classic heart shape.
To create the sharp point at the bottom, the Heart-shaped Crochet Coaster – Tutorial usually calls for a “Ch 2, slip stitch” or a “Tr, Ch 1, Tr” combination in the very bottom stitch. This creates a defined peak. Without this specific stitch sequence, your heart might end up looking more like a rounded triangle or a lumpy circle.
The “cleavage” or the dip at the top of the heart is achieved by using a slip stitch or a single crochet directly into the center of the initial ring. This pulls the fabric downward, creating the indentation. It is a simple move, but it is the most crucial part of defining the heart silhouette in your crochet coaster.
Once the final round is complete, you will perform a fasten off maneuver. Leave a tail of about six inches. Using your yarn needle, you will perform an invisible join to create a seamless edge. This attention to detail is what makes the Heart-shaped Crochet Coaster – Tutorial so effective for those wanting to sell their crafts on platforms like Etsy.
4 Tips for Customizing and Selling Your Coasters
Once you have mastered the basic Heart-shaped Crochet Coaster – Tutorial, you can begin to experiment with embellishments. Adding a scalloped border (using shells of 5 dc) around the edge can give the coaster a vintage, lacey appearance. This is a great way to add value if you are looking to create a “Premium” version of your handmade coasters.
Customization also comes through embroidery. You can use a contrasting yarn color and a surface slip stitch to “draw” initials or small flowers onto the surface of the finished coaster. This transforms a simple Heart-shaped Crochet Coaster – Tutorial project into a personalized keepsake for weddings, anniversaries, or housewarming parties.
For those interested in monetizing crochet, packaging is key. Bundling a set of four or six heart coasters with a beautiful ribbon and a “Handmade with Love” tag significantly increases the perceived value. Many crafters find success selling these at local craft fairs or through social media shops by highlighting the eco-friendly nature of cotton.
To ensure your Heart-shaped Crochet Coaster – Tutorial creations last a long time, provide care instructions to your customers. Remind them that while cotton is washable, air-drying is best to prevent shrinkage. Including a small “Care Card” adds a professional touch that buyers appreciate and helps build brand loyalty.
Scaling your production is the next step for a crochet business. Once you have the heart pattern memorized, you will find that you can finish one coaster in about 15 to 20 minutes. This high “speed-to-product” ratio makes the Heart-shaped Crochet Coaster – Tutorial one of the most profitable designs for low-cost crochet items.
Finally, don’t be afraid to experiment with mixed media. You can sew a piece of felt backing onto the bottom of the coaster to provide extra grip and a “premium” heavy feel. This prevents the coaster from sliding on glass tables and hides any minor imperfections on the back of your crochet work, ensuring a flawless presentation.
FAQ: Common Questions About Heart-shaped Crochet Coasters
1. What is the best yarn for a Heart-shaped Crochet Coaster – Tutorial?
The best yarn is definitely 100% cotton. It is highly absorbent, which is necessary for a coaster, and it holds its shape better than wool or acrylic. Brands like Lily Sugar ‘n Cream or 24/7 Cotton are popular choices for this specific crochet project.
2. How long does it take to complete one coaster?
For an intermediate crocheter, one coaster takes approximately 15 to 30 minutes. Beginners might take up to an hour as they learn the specific stitch placements required for the heart shape.
3. Can I use a different hook size than what the tutorial suggests?
Yes, but be careful. A larger hook will result in a larger, floppier coaster with more gaps. A smaller hook will create a tiny, stiff coaster. It is best to stick to the size recommended in the Heart-shaped Crochet Coaster – Tutorial for the best results.
4. How do I stop my crochet heart from curling?
Curling usually happens because your tension is too tight or you haven’t added enough increases in the rounded sections. Try to relax your hands, or add an extra stitch in the areas where the heart begins to “cup” upward.
5. Are these coasters heat resistant?
If made with cotton yarn, yes! Cotton can withstand the heat from a hot mug of coffee or tea. However, acrylic yarn can melt if exposed to very high temperatures, so it is not recommended for functional coasters.
6. Is this Heart-shaped Crochet Coaster – Tutorial suitable for absolute beginners?
Yes, as long as you know the basic stitches (chain, single, double, and treble crochet). It is a great “first shaped project” because it teaches you how to manipulate stitch height to create curves.
Conclusion
In this Heart-shaped Crochet Coaster – Tutorial, we have covered everything from the initial yarn selection and essential tools to the intricate stitch techniques needed to create a perfect heart. We explored how to start with a magic ring, how to use varying stitch heights for the lobes, and the importance of blocking for a professional finish.
These coasters are not just practical items; they are a gateway into the world of creative crochet and personalized home decor. By following these steps, you now have the skills to produce a beautiful, durable, and heartfelt set of coasters that will brighten any room.