Crochet Bracelet with Butterflies – Tutorial is a delightful project that combines delicate handiwork with a touch of whimsical nature, making it a favorite for both beginners and experienced crafters alike. This Crocheted Bracelet with Butterflies – Tutorial is designed to guide you through the process of creating a wearable piece of art that serves as a perfect accessory or a heartfelt handmade gift. By focusing on lightweight yarn and precise stitching, you can produce a professional-looking piece that captures the elegance of a butterfly in flight right on your wrist.
As you embark on this creative journey, keep in mind that the Crocheted Bracelet with Butterflies – Tutorial isn’t just about following steps; it is about mastering the tension and texture of your stitches. Using vibrant colors or soft pastels can completely change the mood of the accessory, allowing for endless customization. This article will provide the structural foundation you need to build your skills while ensuring your final product is both durable and beautiful, utilizing standard US crochet terminology to keep the instructions clear and accessible for an international audience.
In the world of DIY fashion, small details make a massive difference, and that is exactly why this Crocheted Bracelet with Butterflies – Tutorial emphasizes the importance of finishing touches. Whether you are looking to monetize your craft blog through Google AdSense or simply want to expand your personal collection of patterns, understanding the mechanics of 3D crochet elements is essential. Let’s dive into the specifics of materials, techniques, and the step-by-step process required to bring these enchanting butterflies to life.
1. Understanding the Crocheted Bracelet with Butterflies – Tutorial
The Crocheted Bracelet with Butterflies – Tutorial serves as a comprehensive roadmap for creating a flexible, lace-like band adorned with miniature butterfly motifs. This specific tutorial focuses on the synergy between the base strap and the decorative elements, ensuring they are integrated seamlessly rather than just tacked on.
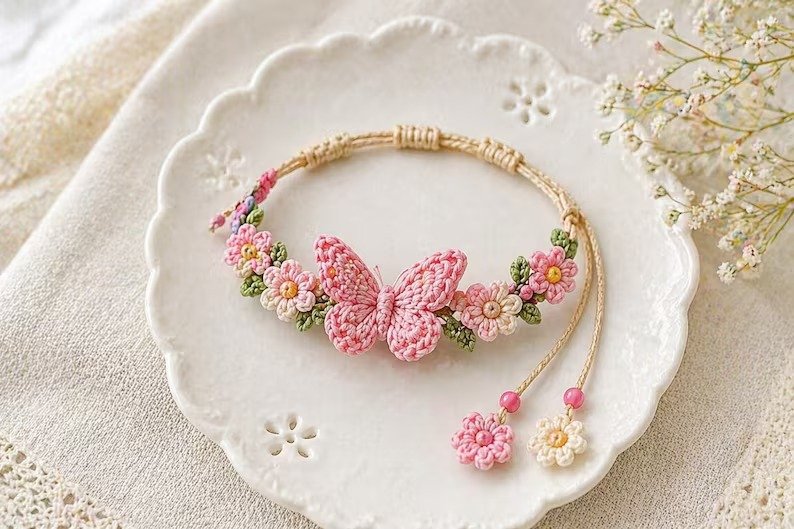
When we speak of a Crocheted Bracelet with Butterflies – Tutorial, we are looking at a project that utilizes fine cotton thread or fingering weight yarn. These materials are chosen specifically because they allow for the high level of detail required to define the wings of a butterfly without making the bracelet feel bulky or uncomfortable.
Key terms within this Crocheted Bracelet with Butterflies – Tutorial include the “magic ring,” which is the starting point for most butterfly patterns. This technique allows you to pull the center of your work tight, leaving no hole in the middle of the butterfly’s body, resulting in a much cleaner and more professional handmade finish.
Another essential component of this Crocheted Bracelet with Butterflies – Tutorial is the use of chain stitches and slip stitches to create the antennae and the delicate edges of the wings. Mastering these basic maneuvers is what gives the butterfly its iconic silhouette, turning a simple circle of yarn into a recognizable creature.
For those following the Crocheted Bracelet with Butterflies – Tutorial, it is important to understand the concept of “stitch height.” By varying between single crochet, half-double crochet, and double crochet, you create the natural curves of the butterfly wings, which is a fundamental skill in sculptural crochet.
Finally, this Crocheted Bracelet with Butterflies – Tutorial highlights the importance of blocking your finished piece. Because crochet can sometimes twist or curl, using a bit of moisture and pinning the bracelet into place ensures that your butterflies lay flat and your crochet jewelry maintains its shape over time.
2. Essential Materials and Tools for Success
Before starting the Crocheted Bracelet with Butterflies – Tutorial, you must gather the right tools to ensure your stitches are uniform and your tension remains consistent. A size B (2.25mm) or C (2.75mm) crochet hook is usually recommended for this type of work, as it works well with thinner threads.
The choice of mercerized cotton yarn is a recurring recommendation in the Crocheted Bracelet with Butterflies – Tutorial. Mercerization is a treatment that gives the cotton a slight sheen and makes it stronger, which is vital for an item like a bracelet that will experience frequent movement and friction.
You will also need a tapestry needle for weaving in your ends, a step that this Crocheted Bracelet with Butterflies – Tutorial considers non-negotiable for a clean look. Since the butterflies are small, hiding the yarn tails properly ensures that the “magic” of the construction isn’t interrupted by loose threads.
Adding jewelry findings such as lobster claws, jump rings, or even a simple button closure is another aspect covered in this Crocheted Bracelet with Butterflies – Tutorial. Choosing high-quality, nickel-free metal components will prevent skin irritation and give your crocheted accessory a commercial-grade quality.
In this Crocheted Bracelet with Butterflies – Tutorial, we also suggest having a pair of sharp embroidery scissors on hand. Working with fine thread requires precise cuts to avoid fraying, which can be difficult to manage if you are using bulky household scissors that aren’t meant for delicate fiber arts.
Lastly, consider using stitch markers to keep track of your repeats if you are making a long band. While the butterflies themselves are quick to make, the Crocheted Bracelet with Butterflies – Tutorial emphasizes accuracy in the length of the base strap to ensure a perfect fit for any wrist size.
3. Step-by-Step Construction of the Butterfly Motif
The core of the Crocheted Bracelet with Butterflies – Tutorial lies in the butterfly motif itself, which is typically worked in just two or three rounds. You begin by creating a central loop, then working clusters of treble crochet stitches to form the larger upper wings and shorter stitches for the lower wings.
As you follow the Crocheted Bracelet with Butterflies – Tutorial, you will notice that the symmetry is created by mirroring the stitch count on both sides of the center. This balance is what makes the butterfly crochet pattern look realistic and aesthetically pleasing to the eye.
In the second round of the Crocheted Bracelet with Butterflies – Tutorial, you will likely add a contrasting color for the border. Using a picot stitch at the tips of the wings adds a pointed, delicate detail that mimics the natural variety found in real-world butterfly species.
The body of the butterfly in this Crocheted Bracelet with Butterflies – Tutorial is often formed by a long chain that is wrapped around the center of the wings and tied at the top. This simple technique cinches the “wings” together, instantly giving the piece its three-dimensional, fluttering appearance.
Integrating the butterflies into the bracelet strap is a crucial phase of the Crocheted Bracelet with Butterflies – Tutorial. You can either crochet them directly onto the chain as you go or create them separately and use a blind stitch to attach them afterward for more control over placement.
Precision is key throughout this Crocheted Bracelet with Butterflies – Tutorial, especially when working the antennae. A tiny slip stitch or a small knot at the end of a short thread can represent the sensors of the butterfly, adding that final layer of detail that elevates your DIY jewelry project.
4. SEO Tips and Customization for Your Craft Blog
If you are sharing this Crocheted Bracelet with Butterflies – Tutorial on your own website, optimizing for search engines is vital. Using alt-text for images that describes the crochet process and including the primary keyword in your headers will help more crafters find your content.
In this Crocheted Bracelet with Butterflies – Tutorial, we encourage you to experiment with ombré yarn or variegated threads. These yarns automatically change color, giving your butterflies a natural, multicolored look without requiring you to switch yarn balls and weave in extra ends manually.
Another great tip from the Crocheted Bracelet with Butterflies – Tutorial is to add seed beads to the edges of the wings. By sliding beads onto your thread before you start crocheting, you can drop them into your stitches to add sparkle and weight to the butterfly bracelet.
To make your Crocheted Bracelet with Butterflies – Tutorial stand out, consider offering different sizes. Providing a “Stitch Count Chart” for toddlers, teens, and adults ensures that your tutorial is inclusive and useful for a wider variety of users looking for handmade gift ideas.
Packaging is the final “SEO for the soul” mentioned in this Crocheted Bracelet with Butterflies – Tutorial. Presenting your finished work on a custom cardstock holder makes the item feel like a luxury product, which is a great way to increase its value if you plan to sell your crochet creations online.
By following every step of this Crocheted Bracelet with Butterflies – Tutorial, you are building a foundation of skills that can be applied to other projects, like headbands or even earrings. The versatility of the butterfly motif makes it a staple in any fiber artist’s repertoire, ensuring your time spent learning is well rewarded.
Frequently Asked Questions (FAQ)
What is the best yarn for a crochet bracelet?
For a Crocheted Bracelet with Butterflies – Tutorial, it is best to use size 10 crochet thread or a 100% mercerized cotton fingering weight yarn. This ensures the bracelet is durable, holds its shape, and feels comfortable against the skin.
How long does it take to finish this project?
Most crafters find that completing a Crocheted Bracelet with Butterflies – Tutorial takes between 1 to 2 hours, depending on your speed and how many butterflies you choose to add to the strap.
Can I wash my crochet bracelet?
Yes, but you should do so carefully. Since this Crocheted Bracelet with Butterflies – Tutorial uses delicate thread, hand-washing in cool water with a mild detergent and laying it flat to dry is the best way to preserve the shape of the butterflies.
Is this tutorial suitable for absolute beginners?
While it helps to know the basic stitches, this Crocheted Bracelet with Butterflies – Tutorial is very beginner-friendly. The most challenging part is working with a smaller hook, but once you get used to the scale, the stitches are very straightforward.
How do I adjust the size of the bracelet?
Adjusting the size in this Crocheted Bracelet with Butterflies – Tutorial is easy. Simply increase or decrease the number of starting chains in your base strap to match the circumference of your wrist, leaving about half an inch for the clasp.
Conclusion
This Crocheted Bracelet with Butterflies – Tutorial has covered everything from selecting the perfect mercerized cotton to the intricate details of the wing construction and SEO optimization for your craft.
We have explored how to use chain stitches, magic rings, and stitch height to create a beautiful, wearable accessory that captures the essence of spring. By following these structured steps, you can create a professional handmade bracelet that is as sturdy as it is beautiful.