Fabric Chair Cover – Tutorial: Transforming your dining space or revitalizing an old piece of furniture has never been easier than with a custom DIY project. Learning how to create a high-quality fabric chair cover allows you to protect your investment while infusing your personal style into your home decor. Whether you are dealing with worn-out upholstery or simply want to change the aesthetic of a room for a special occasion, this tutorial provides the professional guidance needed to achieve a tailored, high-end look without the designer price tag.
In the world of interior design, the Fabric Chair Cover – Tutorial serves as a bridge between functionality and creativity. Using durable materials and precise measurements ensures that your furniture remains safe from spills, dust, and pet hair. Beyond protection, a fabric chair cover offers a versatile way to experiment with textures and patterns, allowing you to rotate styles seasonally or update your palette whenever inspiration strikes. By following a structured tutorial, even beginners can master the art of sewing custom slips that fit like a glove.
Choosing to engage with a Fabric Chair Cover – Tutorial is an excellent step toward sustainable living and smart home management. Instead of discarding chairs that have minor surface damage or outdated colors, you can give them a second life with a fresh fabric chair cover. This approach not only saves money but also reduces waste, making it a favorite project for those who value eco-friendly crafting. Throughout this comprehensive tutorial, we will explore the essential steps, from selecting the right textile to the final finishing stitches, ensuring your fabric chair cover looks professional and stays secure.
1. Selecting Materials for Your Fabric Chair Cover – Tutorial
The foundation of any successful Fabric Chair Cover – Tutorial begins with selecting the appropriate textile. For a durable fabric chair cover, you should look for medium-to-heavyweight materials like cotton duck, canvas, or upholstery-grade linen. These choices ensure that your fabric chair cover can withstand daily use and frequent washing.
When following this tutorial, consider the drape and stretch of your chosen material. A fabric chair cover made from a slight blend of spandex might be easier to fit over rounded edges, while 100% natural fibers provide a classic, crisp look. Always pre-wash your materials before starting the tutorial to prevent future shrinkage after the cover is sewn.
Color and pattern play a vital role in how your fabric chair cover integrates with your room. If you are a beginner using this tutorial, solid colors or small, non-directional prints are easier to work with because you won’t have to worry about pattern matching at the seams. This simplifies the Fabric Chair Cover – Tutorial process significantly.
Essential tools are the next step in our tutorial. You will need sharp fabric shears, a reliable sewing machine, high-quality polyester thread, and plenty of quilting pins. Having these items ready before you begin the Fabric Chair Cover – Tutorial ensures a smooth workflow and prevents interruptions during the assembly phase.
Don’t forget the importance of measuring tapes and marking chalk in this Fabric Chair Cover – Tutorial. Accurate dimensions are the secret to a professional-looking fabric chair cover. Marking your cut lines clearly on the reverse side of the material is a key technique emphasized in every expert tutorial.
Finally, consider the closures for your fabric chair cover. This tutorial suggests using hidden zippers, Velcro, or elegant fabric ties to keep the cover in place. Including these details in your Fabric Chair Cover – Tutorial plan will ensure the finished product doesn’t slip or bunch when someone sits down.
2. Measuring and Cutting for a Custom Fit
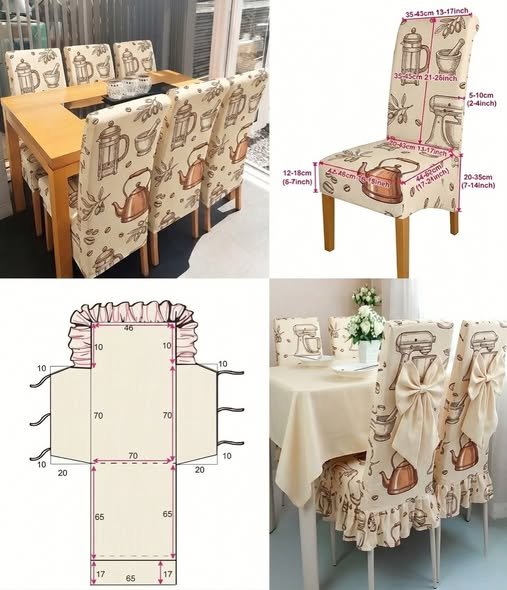
To start the practical phase of the Fabric Chair Cover – Tutorial, you must measure every plane of your chair. Start with the height of the backrest, the width of the seat, and the distance from the seat to the floor. Recording these numbers accurately is the most critical part of the Fabric Chair Cover – Tutorial.
In this tutorial, we recommend adding a seam allowance of at least one inch to every measurement. This extra space in your fabric chair cover pattern allows for errors and ensures that the seams are strong enough to handle tension. A tight fabric chair cover is prone to ripping, so follow the tutorial guidelines for ease.
Creating a paper template is a professional tip often included in a high-level Fabric Chair Cover – Tutorial. By tracing the shape of the chair back and seat onto craft paper, you create a blueprint for your fabric chair cover. This step in the tutorial helps you visualize the final product before you cut into your expensive textile.
When you are ready to cut, lay your material flat on a large table as instructed by this tutorial. Place your templates on the grain of the fabric to ensure the fabric chair cover hangs correctly. Following the grainline is a fundamental SEO-friendly sewing tip included in this Fabric Chair Cover – Tutorial.
Carefully cut out each panel for your fabric chair cover. You will typically have a front back, a back back, a seat panel, and side skirts. Labeling each piece with chalk as you progress through the tutorial will save you from confusion during the sewing stage of the Fabric Chair Cover – Tutorial.
Safety is paramount during any tutorial. Keep your shears away from the edge of the table and ensure your workspace is well-lit. As you finish cutting the pieces for your fabric chair cover, double-check them against your chair one last time to confirm the proportions match the Fabric Chair Cover – Tutorial goals.
3. Sewing the Panels of Your Fabric Chair Cover
Now we move into the assembly phase of the Fabric Chair Cover – Tutorial. Start by pinning the front back panel to the back back panel, with the “right sides” facing each other. This tutorial emphasizes using a straight stitch with a medium length for the most secure fabric chair cover seams.
As you sew the top and sides of the backrest, remember to reinforce the corners. This Fabric Chair Cover – Tutorial technique involves backstitching at the start and end of every seam. A well-constructed fabric chair cover needs this extra strength to survive the constant movement of a busy household.
The next step in the tutorial is attaching the seat panel to the backrest. Align the center marks of your pieces to ensure the fabric chair cover isn’t crooked. Many people find this the most challenging part of the Fabric Chair Cover – Tutorial, so take your time and use plenty of pins.
Once the main body of the fabric chair cover is joined, try it on the chair. This “fitting” stage of the tutorial allows you to make adjustments before adding the skirts or hems. If the fabric chair cover is too loose, use the tutorial methods to take in the side seams slightly for a sleeker profile.
Adding the skirt or flounce is a great way to personalize your fabric chair cover. Whether you prefer a pleated look or a simple straight hem, this Fabric Chair Cover – Tutorial covers the basics of finishing the bottom edge. A clean hem at the base of your fabric chair cover provides a polished, store-bought appearance.
Finally, iron every seam flat as you go. This tutorial secret distinguishes an amateur fabric chair cover from a professional one. Pressing your seams according to the Fabric Chair Cover – Tutorial instructions makes the final assembly much easier and ensures the cover sits perfectly on the furniture frame.
4. Finishing Touches and Maintenance Tips
The final sub-topic of our Fabric Chair Cover – Tutorial focuses on the details that make your project shine. Trimming excess threads and checking for any loose stitches ensures your fabric chair cover is durable. Quality control is an essential habit taught in every comprehensive tutorial.
Applying a fabric protector spray is a smart move after completing your Fabric Chair Cover – Tutorial. This adds a layer of invisible protection to your new fabric chair cover, making it resistant to liquid stains. Most experts in this tutorial niche recommend this step for kitchen and dining room chairs.
To keep your fabric chair cover looking new, follow the specific laundering instructions for your textile. If you used cotton for this tutorial, you can likely machine wash it on a cold cycle. Regular maintenance prolongs the life of the work you put into the Fabric Chair Cover – Tutorial.
If you notice any sagging over time, this tutorial suggests using “tuck grips” or foam strips. Inserting these into the crevices of the chair helps hold the fabric chair cover in place. It is a simple fix that keeps your Fabric Chair Cover – Tutorial project looking sharp for years.
Consider making multiple sets of covers using this tutorial. Having a spare fabric chair cover allows you to wash one set while the other is in use. It’s also a fun way to use the Fabric Chair Cover – Tutorial skills to change your room’s decor for holidays or different seasons.
Congratulations on completing the Fabric Chair Cover – Tutorial! By following these steps, you have mastered the ability to create a custom fabric chair cover that is both beautiful and functional. Share your success and use this tutorial as a guide for all your future furniture makeover projects.
FAQ – Frequently Asked Questions
How much fabric do I need for a standard chair?
For most standard dining chairs, you will need approximately 2 yards of material. However, if your fabric chair cover includes a long skirt or if you are following a tutorial for an armchair, you may need up to 4 or 5 yards. Always measure twice before purchasing.
What is the best fabric for a chair cover that will be used daily?
Upholstery-grade cotton or polyester blends are best. They offer the durability required for a fabric chair cover and are usually easier to handle for those following a tutorial for the first time.
Can I make a fabric chair cover without a sewing machine?
While a sewing machine is recommended in this tutorial for speed and strength, you can use fabric glue or iron-on hem tape for a “no-sew” version. However, a sewn fabric chair cover will always be more durable and long-lasting.
How do I prevent the cover from sliding off the chair?
Using ties at the back legs or adding a non-slip liner underneath the fabric chair cover are effective methods. This tutorial also recommends ensuring a snug fit during the measuring phase to minimize movement.
Is it cheaper to make or buy a chair cover?
Making your own fabric chair cover using this tutorial is usually much cheaper, especially if you want high-quality fabric or a custom design. It also allows you to perfectly match your existing decor.
Conclusion
This Fabric Chair Cover – Tutorial has guided you through the entire process of revitalizing your furniture with style and precision. We have covered everything from selecting the right weight of material and taking accurate measurements to the technical aspects of sewing panels and adding professional finishing touches.
By creating your own fabric chair cover, you have not only saved money but also gained a valuable skill in home textile creation. The result is a custom, durable, and beautiful fabric chair cover that reflects your unique taste.