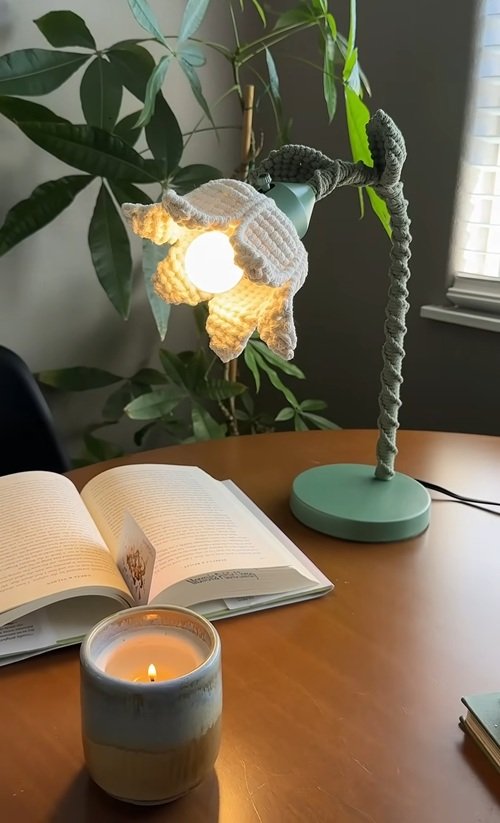
A Macrame lamp in the shape of a flower – Tutorial is the perfect way to combine bohemian elegance with functional home decor. If you have been looking for a project that blends artistic expression with practical utility, this Macrame lamp in the shape of a flower is an ideal choice for both beginners and experienced crafters. Creating a handmade flower lamp allows you to customize your lighting to fit your specific aesthetic, whether that is a rustic farmhouse vibe or a modern botanical retreat.
Incorporating a Macrame lamp in the shape of a flower into your interior design adds a layer of texture and warmth that mass-produced lighting simply cannot replicate. The intricate knotting techniques used in this Tutorial result in a beautiful play of light and shadow, casting floral patterns across your walls. In this guide, we will dive deep into the materials and steps required to master this DIY macrame project, ensuring you have all the knowledge needed to succeed.
Beyond the visual appeal, following a Macrame lamp in the shape of a flower – Tutorial provides a sense of accomplishment and mindfulness. The repetitive nature of macrame knots is known to be therapeutic, making this crafting session a great way to de-stress. By the end of this article, you will understand how to transform simple cotton cords and a metal frame into a stunning piece of botanical-inspired art that brightens any room in your home.
1. Essential materials for your Macrame lamp in the shape of a flower – Tutorial
To begin your Macrame lamp in the shape of a flower, you will need high-quality 3mm or 4mm single twist cotton cord. This specific type of cord is preferred for flower designs because it allows for soft, brushed edges that mimic the delicate texture of real petals. Make sure to choose a color that complements your room’s palette, such as cream, sage green, or a soft terracotta.
Next, you will require a circular metal hoop and a specialized lampshade frame that has a fitting for a light bulb. The size of the hoop will determine the overall diameter of your macrame flower. For this Tutorial, a 10-inch ring is usually the standard size for a medium-sized boho pendant light that makes a statement without overpowering the space.
Sharp fabric scissors are non-negotiable for achieving clean cuts on your macrame strings. Dull blades can fray the ends prematurely, making it difficult to maintain the precision needed for a flower-shaped lamp. Keeping your tools sharp ensures that every petal looks uniform and professionally finished throughout the creative process.
You will also need a measuring tape to ensure all your cord lengths are consistent before you start knotting. In a Macrame lamp in the shape of a flower – Tutorial, symmetry is key to making the final product look like a balanced blossom. Cutting your cords to the correct length at the start prevents wasted material and frustration later on.
A comb or a pet brush is a secret weapon for any macrame artist working on floral shapes. Once you have finished the knotting patterns, you will use the brush to fringe the edges of the petals. This creates the soft, organic look that characterizes a Macrame lamp in the shape of a flower and gives it that professional, “boutique” appearance.
Finally, ensure you have a UL-listed pendant light cord kit with an LED bulb. It is vital to use LED bulbs because they remain cool to the touch, which is a safety requirement when working with textile materials like cotton. Safety should always be your priority when following a Macrame lamp in the shape of a flower – Tutorial to ensure your art is as safe as it is beautiful.
2. Mastering the basic knots for a Macrame lamp in the shape of a flower
The foundation of any Macrame lamp in the shape of a flower – Tutorial is the Lark’s Head Knot. This is the knot used to attach your cotton cords to the metal hoop at the very beginning. It creates a clean, secure base from which your petals will grow, providing the structural integrity needed for a functional lamp.
The Square Knot is the most versatile technique you will use in this DIY tutorial. By grouping these knots together, you can create the solid “body” of each flower petal. Mastering the tension of your Square Knots is essential; you want them tight enough to hold their shape, but flexible enough to curve into a floral silhouette.
Another crucial element in a Macrame lamp in the shape of a flower is the Double Half Hitch Knot. This knot is used to create the outlines and borders of the petals. It acts like a drawing tool, allowing you to define the curved edges of the blossom and giving the macrame piece its distinct, recognizable flower shape.
As you progress through the Tutorial, you will learn how to increase and decrease the number of knots to create the tapering effect of a petal. This shaping technique is what separates a basic macrame wall hanging from a complex 3D flower lamp. It requires patience and a bit of practice, but the visual reward is well worth the effort.
Creating the flower center often involves a spiral stitch or a series of clover knots. This central point is where the light will emanate from, so the density of the knotting here will affect how much light filters through. In this Macrame lamp in the shape of a flower – Tutorial, we focus on a balance between dense knotting and open spaces.
Lastly, finishing your knots with a gathering knot or a hidden tuck ensures that your handmade lamp doesn’t unravel over time. Attention to detail during the finishing stages is what makes your Macrame lamp in the shape of a flower look like a high-end designer item. Consistent practice of these knots will make the entire tutorial much more enjoyable.
3. Step-by-step assembly of the petals and frame
The first step in the assembly phase of our Macrame lamp in the shape of a flower – Tutorial is to cut your cords into equal lengths—usually around 3 meters each. Fold them in half and attach them to the inner ring of your frame using the Lark’s Head Knot. Ensure they are spaced evenly to represent the start of five or six distinct petals.
Once the base is set, begin working on the individual petals using a series of diagonal double half hitch knots. This creates the “spine” or the outer rim of the flower petal. In this Macrame lamp in the shape of a flower, you want each petal to slightly overlap the next to create a lush, full-bodied blossom effect once the light is turned on.
Fill the interior of each petal with alternating square knots. This creates a mesh-like texture that is perfect for a lamp shade because it allows light to “leak” through the gaps, creating a warm and inviting glow. This Tutorial emphasizes maintaining even tension so that all petals look identical in size and density.
After the main body of the petal is finished, it is time for the fringe technique. This is where your Macrame lamp in the shape of a flower truly starts to look like a plant. You will cut the remaining cord ends to a uniform length and then use your comb to brush them out, creating a soft, feathery edge around the light fixture.
To give the petals their 3D shape, you may need to use a small amount of fabric stiffener. This is an optional step in our Tutorial, but it helps the cotton petals maintain their “bloom” against gravity. Apply it lightly to the back of the knots to ensure the Macrame lamp in the shape of a flower keeps its structure for years to come.
The final assembly step involves mounting the macrame flower onto the light cord kit. Carefully thread the socket through the center of your knotwork, making sure it is centered and secure. Once the LED bulb is installed, your Macrame lamp in the shape of a flower – Tutorial is complete, and you are ready to hang your new masterpiece.
4. Maintenance and styling tips for your handmade lamp
Once you have completed your Macrame lamp in the shape of a flower, maintaining its beauty is simple but important. Because cotton is a natural fiber, it can attract dust over time. Use a soft-bristled brush or a hairdryer on a cool setting to gently blow away any debris without disturbing the delicate knot patterns or the fringe.
Avoid hanging your Macrame lamp in the shape of a flower in areas with high humidity, such as a bathroom without proper ventilation. Moisture can cause the natural cords to lose their shape or develop a musty smell. Following this Tutorial‘s advice on placement will ensure the longevity of your hand-knotted light fixture.
Styling your Macrame lamp in the shape of a flower is the most fun part! It looks stunning as a nursery light, a focal point in a boho living room, or even as a pair of bedside lamps. The organic floral shape brings a touch of nature indoors, making any space feel more tranquil and curated.
If you want to add a bit of extra flair, you can incorporate wooden beads into the cord ends during the Tutorial process. This adds a “seed” or “pollen” element to the center of the flower, enhancing the botanical theme. Experimenting with different bead sizes can change the entire character of your Macrame lamp in the shape of a flower.
Another styling tip is to play with the height of the lamp. Because it is a pendant light, adjusting how low it hangs can change the light distribution in the room. A lower hang emphasizes the flower shape from above, while a higher hang spreads the floral shadows across the ceiling, showcasing the success of your Macrame tutorial.
Remember to always use low-heat bulbs to protect the integrity of the cotton fibers. Overheating can cause the cord to yellow or become brittle over time. By following the safety guidelines in this Macrame lamp in the shape of a flower – Tutorial, you ensure that your beautiful creation remains a safe and stunning part of your home decor.
FAQ – Frequently Asked Questions
How long does it take to finish a Macrame lamp in the shape of a flower?
For a beginner, completing this Macrame lamp in the shape of a flower – Tutorial typically takes between 4 to 8 hours. This includes the time spent measuring, knotting, and fringing the petals. Experienced crafters may be able to finish it in a single afternoon.
Can I use synthetic cord for this tutorial?
While you can use synthetic cords, 100% cotton cord is highly recommended for a Macrame lamp in the shape of a flower. Cotton allows for a much better fringe and has a matte finish that looks more premium for interior lighting.
Is this project safe for children’s rooms?
Yes, as long as the lamp is securely hung out of reach and you use a cool-running LED bulb. The soft materials and organic design make a Macrame lamp in the shape of a flower a very popular choice for nurseries and kids’ playrooms.
How do I clean the fringe if it gets tangled?
If the fringe on your flower lamp becomes messy, simply use a fine-tooth comb to gently brush it out again. You can also use a tiny bit of hairspray or fabric stiffener to keep the fringe neatly in place after brushing.
What is the best bulb to use for a macrame lamp?
Always use an LED bulb. LEDs do not emit much heat, which is essential when the bulb is in close proximity to flammable materials like cotton cord. Additionally, a “warm white” LED bulb enhances the natural tones of the macrame cord.
Do I need a special frame for the flower shape?
You can use a standard circular lampshade frame, but some crafters prefer to use a double-ring frame to give the petals more support. Our Tutorial focuses on using a single ring and shaping the petals through knot tension and structure.
Conclusion
In this Macrame lamp in the shape of a flower – Tutorial, we have covered everything from the essential materials to the intricate knotting techniques required to create your own boho lighting.
By following these steps, you have learned how to transform simple cord into a functional piece of art that brings a touch of the outdoors into your home. This DIY project is not just about the final product; it is about the joy of creating something unique with your own hands.