Crochet Bracelet – Tutorial: If you are looking for a creative, relaxing, and incredibly rewarding DIY project, learning how to craft your own jewelry is the perfect place to start. A Crochet Bracelet – Tutorial offers a fantastic way to dive into the world of fiber arts while producing something stylish that you can actually wear or gift to friends. Whether you are a seasoned pro with a hook or a complete beginner who just bought their first ball of cotton yarn, making a crochet bracelet is a quick win that builds your confidence and refines your tension control.
The beauty of following a Crochet Bracelet – Tutorial lies in its versatility and the minimal investment required to get started. Unlike larger projects like blankets or sweaters that take weeks to finish, a crochet bracelet can often be completed in under thirty minutes. This makes it an ideal “palette cleanser” project between larger tasks. You only need a small amount of embroidery floss or lace-weight yarn, a small crochet hook, and perhaps a few decorative beads to transform a simple strand of thread into a sophisticated piece of handmade jewelry.
In this comprehensive guide, we are going to explore everything you need to know about creating stunning wristwear. We will cover the essential crochet stitches, the best materials to use for durability and comfort, and the step-by-step process of assembling your piece. By the end of this Crochet Bracelet – Tutorial, you will have the skills to design custom accessories that match any outfit in your wardrobe. Let’s pick up our hooks and get ready to create something beautiful, one loop at a time.
1. Essential Materials for Your Crochet Bracelet – Tutorial
Choosing the right yarn is the foundation of any successful crochet jewelry project. For a crochet bracelet, I highly recommend using mercerized cotton because it has a lovely sheen and doesn’t fray easily over time. The “mercerization” process makes the fiber stronger and helps it hold its shape, which is vital for an accessory that will be stretched over your hand frequently.
Your hook size is the next critical component in this Crochet Bracelet – Tutorial. Generally, you want to use a steel crochet hook ranging from 1.5mm to 2.25mm. Using a smaller hook than what is usually recommended for your yarn creates a tight stitch definition, ensuring that your bracelet looks professional and doesn’t appear “holey” or flimsy when worn on the wrist.
Don’t forget the importance of closures and jewelry findings. While you can simply crochet a buttonhole or use ties, adding lobster claws, jump rings, or toggle clasps can elevate your crochet bracelet from a simple craft to a piece of high-end boutique jewelry. Having a pair of needle-nose pliers nearby will make the process of attaching these metal elements much smoother.
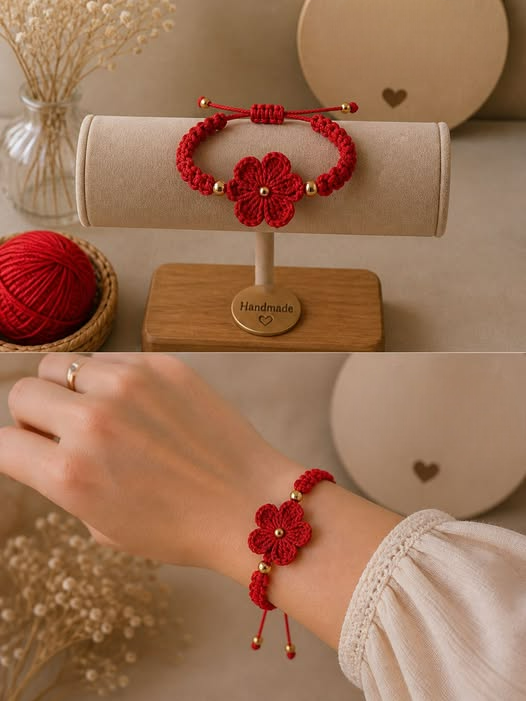
Embellishments like seed beads or charms can add a personal touch to your work. If you decide to include beads, remember that you often need to string them onto your yarn before you start your Crochet Bracelet – Tutorial steps. This allows you to slide the beads into your stitches as you work, creating a seamless integration of sparkle and texture throughout the design.
Comfort is key when designing something that sits against the skin all day. Avoid scratchy synthetic fibers that might cause irritation, especially in humid weather. Stick to natural fibers like silk blends, bamboo yarn, or high-quality Egyptian cotton. These materials are breathable and become softer with every wash, making your handmade bracelet a joy to wear.
Lastly, make sure you have a sharp pair of embroidery scissors and a fine tapestry needle. You will need these to weave in your ends securely. In a small project like a crochet bracelet, there is nowhere to hide messy knots, so learning to weave your yarn tails invisibly back into the foundation chain is a skill we will emphasize throughout this tutorial.
2. Mastering the Basic Stitches for Jewelry Making
The heart of our Crochet Bracelet – Tutorial begins with the slip knot and the foundation chain. Most bracelets start with a series of chain stitches (ch) that determine the length of the piece. It is important to measure your wrist beforehand; a standard adult female wrist is about 6 to 7 inches, but you should adjust your stitch count to ensure a snug yet comfortable fit.
The single crochet (sc) is the workhorse of the crochet bracelet. It creates a dense, sturdy fabric that provides excellent structure. When working with thin thread, the single crochet allows you to build width quickly without losing the delicate look that characterizes crochet lace. It is the perfect stitch for beginners to practice their stitch consistency.
For those who want a bit more texture, the half double crochet (hdc) is a wonderful addition to your Crochet Bracelet – Tutorial. It provides a slightly more ribbed appearance and adds a bit of “stretch” to the fabric. This is particularly useful if you are making a “bangle” style bracelet that needs to slide over the widest part of your hand without a clasp.
If you are looking for a more “boho” or vintage aesthetic, the picot stitch is your best friend. Created by chaining three and slipping back into the first chain, it creates tiny decorative points along the edge of your crochet bracelet. These small details are what separate a generic project from a truly custom jewelry piece that looks like it came from an artisan market.
The slip stitch (sl st) is often overlooked but is vital for finishing and joining. In this Crochet Bracelet – Tutorial, we use the slip stitch to move across rows without adding height or to join the ends of a circular bracelet. It’s also the secret to creating a clean, reinforced edge along the perimeter of your work, preventing the yarn from stretching out of shape.
Advanced crafters might enjoy incorporating the puff stitch or bullion stitch for a 3D effect. While these require more yarn and a bit more patience, they add a luxurious weight to the crochet bracelet. Experimenting with these textures allows you to play with light and shadow, making a single-color yarn look much more complex and visually interesting.
3. Step-by-Step Guide to Assembling Your Bracelet
To begin the construction phase of our Crochet Bracelet – Tutorial, start by making a slip knot and chaining enough stitches to wrap around your wrist, minus half an inch for the clasp. Make sure your tension is even; if your chains are too tight, the bracelet will curl, and if they are too loose, the finished product will look sloppy and lack the necessary structure.
Once your foundation is set, work back across the chain using single crochet stitches. For a thin, minimalist look, one or two rows might be enough. However, for a “cuff” style crochet bracelet, you may want to work five to ten rows. Always count your stitches at the end of every row to ensure you aren’t accidentally increasing or decreasing, which would result in a crooked accessory.
Integrating beads is the next exciting step in our Crochet Bracelet – Tutorial. As you reach the spot where you want a bead, slide one up from your yarn supply so it sits right against your hook. Complete your next stitch as usual, trapping the bead on the “right side” of your work. This technique creates a beautiful beaded crochet effect that is very popular in modern fashion.
Adding a buttonhole is a simple way to finish your piece without metal hardware. Near the end of your final row, chain 3 or 4 (depending on the size of your button) and skip a few stitches before slip stitching into the next one. This creates a loop. On the opposite end of the crochet bracelet, you will sew on a matching button using the same yarn for a cohesive, monochromatic look.
If you prefer a professional metal finish, fasten off your yarn and leave a long tail. Use your tapestry needle to sew a jump ring through the last stitch of the bracelet. Open the jump ring with your pliers, slide on a lobster clasp, and close it securely. Repeat this on the other side with just a jump ring, ensuring your Crochet Bracelet – Tutorial results in a functional piece of jewelry.
The final step is blocking. While often skipped in small projects, lightly steaming your crochet bracelet with an iron (don’t touch the iron to the yarn!) helps the stitches “settle” and lay flat. This gives the cotton a crisp finish and ensures the edges don’t roll. Once it’s dry and cool, your handmade accessory is ready to be worn or packaged as a thoughtful gift.
4. Customizing and Styling Your Crochet Creations
One of the best parts of finishing a Crochet Bracelet – Tutorial is deciding how to style it. These pieces look incredible when “stacked.” Try making three or four bracelets in coordinating colors—perhaps a mix of neutrals and metallics—and wearing them all at once. This “arm candy” trend is a staple in bohemian fashion and highlights your handiwork beautifully.
Color theory plays a huge role in the success of your project. Using variegated yarn can create a complex, multi-colored look with zero extra effort. Alternatively, using a solid bold color like turquoise or coral can make a simple crochet bracelet pop against a summer dress. Don’t be afraid to experiment with ombré effects by switching yarn colors mid-way through your rows.
Consider the season when choosing your designs. For summer, thin cotton lace bracelets feel light and airy. For winter, you can use slightly thicker wool blends and add wooden beads for a cozy, earthy vibe. This Crochet Bracelet – Tutorial is adaptable enough that you can change the “mood” of the jewelry simply by swapping out the fiber type and color palette.
You can also use this Crochet Bracelet – Tutorial as a base for mixed-media art. Try weaving thin leather strips through the crochet stitches or attaching small fabric flowers. The crochet fabric acts as a grid, making it very easy to sew on extra decorations. This turns your bracelet into a unique piece of wearable art that can’t be found in any retail store.
For those interested in selling their crafts, branding is important. Adding a small metal “handmade” tag to the clasp area adds a level of professionalism that customers love. Because a crochet bracelet is so fast to make, they are excellent items for craft fairs or Etsy shops, allowing you to offer a high-quality handmade product at an accessible price point.
Finally, think about the gift-giving potential. A crochet bracelet is a “one size fits most” item if you use adjustable ties or an extension chain. They make wonderful stocking stuffers, bridesmaid gifts, or “friendship bracelets” for all ages. Sharing the joy of a Crochet Bracelet – Tutorial by teaching a friend how to make one is also a great way to spread the love for this timeless craft.
FAQ – Frequently Asked Questions
1. What is the best yarn for a crochet bracelet?
The best choice is usually size 10 crochet thread or mercerized cotton. These materials are thin enough for jewelry but strong enough to withstand daily wear without losing their shape or becoming fuzzy.
2. Can I make a bracelet if I am a total beginner?
Absolutely! This Crochet Bracelet – Tutorial is designed for all skill levels. If you can make a chain and a single crochet, you can make a beautiful bracelet in your very first sitting.
3. How do I wash my handmade crochet bracelet?
It is best to hand wash your bracelet in cool water with a drop of mild detergent. Lay it flat on a towel to air dry. Avoid the washing machine, as the agitation can distort the stitches and damage any metal clasps.
4. How do I make the bracelet adjustable?
Instead of a clasp, you can finish each end with a long braided tail or a long chain. You can then tie these together in a bow or use a sliding knot (macramé style) to make the bracelet fit any wrist size.
5. How long does it take to complete one bracelet?
Depending on the complexity of the pattern and your speed, a simple crochet bracelet can take anywhere from 15 to 45 minutes. It is one of the fastest crochet projects you can undertake.
Conclusion
In this Crochet Bracelet – Tutorial, we have journeyed through the essential tools, the foundational stitches, and the creative styling techniques needed to create your own line of handmade jewelry.
We learned that with just a small amount of cotton thread and a tiny hook, you can produce elegant, durable, and deeply personal accessories. Whether you choose to add beads, use professional metal clasps, or keep it simple with a button closure, the result is a testament to your creativity and skill in the world of crochet.