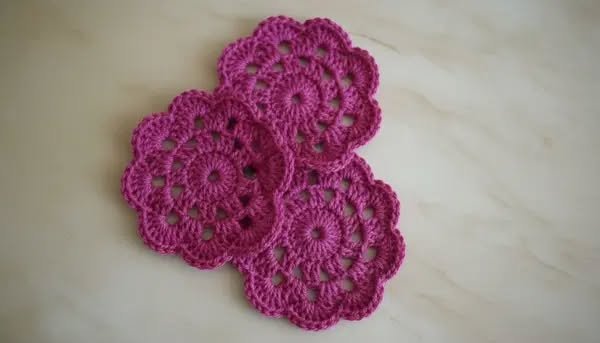
The Crochet Coaster Flower- Tutorial is a wonderful way to bring a touch of nature and handmade charm into your living space while protecting your furniture from heat and moisture. Whether you are an experienced crafter or a beginner looking for a rewarding weekend project, creating floral-themed home decor allows you to experiment with vibrant colors and intricate textures. These small yet functional pieces are perfect for gifting, selling at craft fairs, or simply brightening up your coffee table with a personalized touch.
Working through a Crochet Coaster Flower- Tutorial helps you master essential stitches while producing a practical item in a short amount of time. The beauty of the flower design lies in its versatility; you can adapt the petal shapes and color combinations to match any season or interior design style. By following a structured guide, you ensure that your tension remains consistent, resulting in a flat, professional-looking coaster that serves its purpose beautifully.
In this comprehensive Crochet Coaster Flower- Tutorial, we will dive deep into the materials, techniques, and finishing touches required to create high-quality handmade crochet coasters. We will focus on SEO-optimized crochet patterns and durable cotton yarn selection to ensure your final product is both beautiful and long-lasting. Get your hooks ready as we explore the artistic world of textile arts and functional floral crochet patterns designed for modern homes.
1. Choosing Materials for Your Crochet Coaster Flower- Tutorial
The first step in any successful Crochet Coaster Flower- Tutorial is selecting the right crochet supplies. For coasters, 100% cotton yarn is the gold standard because it is highly absorbent, heat-resistant, and holds its shape better than acrylic. Using a natural fiber yarn ensures that condensation from cold drinks is soaked up rather than sliding off onto your wooden surfaces.
Selecting the correct crochet hook size is equally vital for achieving the right density. Most flower coaster patterns suggest a 3.5mm (E) or 4.0mm (G) hook to create tight, sturdy stitches that prevent the coaster from being too floppy. A tighter gauge ensures the floral design remains distinct and the coaster stays flat under the weight of a mug.
When considering the aesthetic of your Crochet Coaster Flower- Tutorial, think about color theory in crochet. You might choose a bright yellow center with white petals for a classic daisy look, or perhaps deep teals and soft greys for a more contemporary, boho-chic crochet vibe. High-quality mercerized cotton can add a slight sheen that makes the flower petals pop.
Don’t forget the essential notions for crocheting that make the process smoother. You will need a sharp pair of embroidery scissors and a tapestry needle (also known as a yarn needle) to weave in those pesky ends. Securing your yarn tails properly is a hallmark of a professional crochet tutorial and ensures the flower won’t unravel after a few trips through the laundry.
If you are planning to sell these items, consider the packaging for handmade items. Adding a small card explaining the care instructions for crochet adds value to your work. Mentioning that the item is machine washable or needs to be laid flat to dry helps the customer maintain the beauty of their new floral crochet accessory.
Lastly, prepare your workspace for the Crochet Coaster Flower- Tutorial by ensuring you have good lighting. Working with dark yarn colors or intricate petal stitches can be straining on the eyes. A comfortable chair and a clear pattern or video guide will make your crafting experience much more enjoyable and productive as you create your DIY home decor.
2. Master the Stitches in the Crochet Coaster Flower- Tutorial
The core of this Crochet Coaster Flower- Tutorial relies on a few fundamental crochet stitches that create the circular center and the radiating petals. You will likely start with a magic ring (or magic circle), which is the best way to begin a project in the round because it allows you to pull the center tight, leaving no visible hole in the middle of your flower.
The foundation of the flower center usually involves double crochet (dc) or half double crochet (hdc) stitches. These stitches provide the necessary height and surface area to form a stable base for your drinks. Learning to increase stitches in the round is a critical skill in this Crochet Coaster Flower- Tutorial to keep the work from curling into a bowl shape.
To create the “petals,” this Crochet Coaster Flower- Tutorial often utilizes treble crochet (tr) or puff stitches. These taller stitches create the volume and scalloped edges that define a floral shape. By grouping multiple stitches into a single space, you create that lovely 3D effect that makes handmade flower coasters so visually appealing and unique.
Proper stitch tension is something we emphasize throughout this Crochet Coaster Flower- Tutorial. If your stitches are too loose, the coaster will be flimsy; if they are too tight, the edges might ruffle or flip upward. Practicing your yarn over technique and maintaining a consistent pull will lead to a much more symmetrical and functional crochet flower.
Another important technique covered in this Crochet Coaster Flower- Tutorial is the invisible join. When finishing a round, instead of a standard slip stitch, an invisible join creates a seamless edge that is hard to detect. This is especially useful when you are changing colors between the flower center and the petals to maintain a clean, professional craft finish.
Advanced makers might want to add surface slip stitches or a picot border to their flower for extra detail. These decorative crochet techniques can be added at the end of the Crochet Coaster Flower- Tutorial to give the item a “boutique” look. Customizing the edges allows you to turn a simple pattern into a signature piece of textile art.
3. Step-by-Step Construction of the Flower Pattern
In the initial phase of the Crochet Coaster Flower- Tutorial, you will create the “heart” of the blossom. Start by making 12 double crochets into a magic ring, then close the round with a slip stitch. This small circle acts as the sturdy base where the cup will sit, ensuring the crochet coaster is balanced and functional for daily use.
As we progress through the Crochet Coaster Flower- Tutorial, the second round usually involves doubling the number of stitches. By placing two stitches into every stitch from the previous row, you expand the diameter of the circle. This mathematical approach to crochet ensures the coaster grows outward perfectly flat, which is essential for any DIY drink mat.
Transitioning to the petals is the most exciting part of the Crochet Coaster Flower- Tutorial. You will typically skip a stitch, then work a shell of 5 or 6 treble crochets into the next stitch, followed by another skip and a slip stitch. This repeating sequence creates the iconic scalloped flower edge that looks beautiful under a clear glass or a ceramic mug.
Consistency is key during this stage of the Crochet Coaster Flower- Tutorial. Ensure that each petal has the exact same count of stitches so the flower looks symmetrical. If you find your petals are overlapping too much, you may need to adjust your hook size or the number of stitches you skip between the petal “shells.”
For those following this Crochet Coaster Flower- Tutorial who want a larger coaster, you can simply add another round of single crochet or crab stitch (reverse single crochet) around the very edge. A contrasting yarn color for the border can make the petal shapes stand out even more, adding a layer of depth to your crochet project.
Once the crochet work is done, the Crochet Coaster Flower- Tutorial isn’t quite finished until you weave in the ends. Use your yarn needle to thread the tails back through the bulk of the stitches, following the direction of the yarn to keep the ends hidden. This final step ensures your handmade gift is durable and can withstand regular handling and washing.
4. Blocking and Caring for Your Crochet Flower Coasters
The final secret to a perfect result in this Crochet Coaster Flower- Tutorial is blocking your crochet. Blocking involves wetting the finished coaster and pinning it into the desired shape on a foam mat until it dries. This process relaxes the fibers and ensures that your flower petals lie perfectly flat and uniform, giving it a polished look.
Since these items will likely encounter coffee or tea spills, knowing the washability of crochet yarn is vital. If you used the recommended cotton in this Crochet Coaster Flower- Tutorial, you can gently hand wash them in cool water with a mild detergent. Avoid wringing them out; instead, roll them in a towel to remove excess moisture to protect the stitch definition.
Over time, cotton can lose its stiffness. A tip often shared in a Crochet Coaster Flower- Tutorial is to use a light spray of fabric starch during the blocking process. This gives the coaster a bit more “body” and helps it resist stains, keeping your floral kitchen decor looking brand new for much longer.
If you are making a set of four or six, consistency in size is paramount. Using a blocking template after finishing your Crochet Coaster Flower- Tutorial ensures that every flower in the set is the exact same diameter. This attention to detail is what separates a hobbyist from a professional fiber artist or successful Etsy seller.
Storing your coasters is also a consideration. You can crochet a small coaster holder or use a ribbon to tie them together as a set. Sharing your finished work from the Crochet Coaster Flower- Tutorial on social media with relevant crafting hashtags like #CrochetFlower or #HandmadeHome is a great way to connect with the global crochet community.
We hope this Crochet Coaster Flower- Tutorial has inspired you to pick up your hook and start creating. The combination of utility and beauty makes these flowers a joy to craft. Remember that every stitch is a learning opportunity, and soon you will be designing your own unique crochet patterns and variations of this delightful floral theme.
FAQ: Frequently Asked Questions
What is the best yarn for a Crochet Coaster Flower- Tutorial?
The best yarn is definitely 100% cotton. Cotton is durable, absorbent, and handles heat well. Unlike synthetic fibers, it won’t melt if a very hot mug is placed on it, and it won’t become fuzzy over time with repeated use.
Can a beginner finish this Crochet Coaster Flower- Tutorial?
Yes! This project is very beginner-friendly. It uses basic stitches like the single crochet, double crochet, and slip stitch. The small size of the project means you can see results quickly, which is very encouraging for those new to the art of crochet.
How long does it take to crochet one flower coaster?
Depending on your speed and the complexity of the petals, one coaster usually takes between 20 to 45 minutes. It is a perfect “one-sitting” project that provides instant gratification and a sense of accomplishment.
Do I really need to block my coasters?
While not strictly mandatory, blocking is highly recommended. It fixes any minor tension issues and ensures the coaster is a perfect circle that stays flat. If your coaster curls at the edges, blocking is the best solution to make it functional.
How many yards of yarn do I need for a set?
A single flower coaster usually uses about 15-20 yards of yarn. A standard 50g ball of cotton yarn is typically enough to make a full set of four to six coasters, making this an extremely budget-friendly crochet project.
Can I use these as appliques instead of coasters?
Absolutely! The design from this Crochet Coaster Flower- Tutorial is very versatile. You can sew these flowers onto blankets, bags, or hats as crochet appliques. If using them as appliques, you might choose a lighter weight yarn to keep them from being too bulky.
Conclusion
In this Crochet Coaster Flower- Tutorial, we have covered everything from selecting the best absorbent cotton yarns to mastering the petal stitches and the importance of blocking your final piece.
Creating these coasters is more than just a craft; it is a way to practice mindful making and produce something that adds both beauty and utility to your daily life. We have explored how the magic ring, stitch tension, and invisible joins contribute to a professional-grade finished product that you can be proud to display or gift.