Coffee Cup Bookmark Crochet – Tutorial is a delightful project that combines the warmth of your favorite beverage with the joy of getting lost in a good book. If you are looking for a creative way to use up small scraps of yarn while making something functional and adorable, this crochet pattern is the perfect solution. Whether you are a seasoned crafter or a beginner looking for a quick win, creating a handmade bookmark allows you to practice essential stitches while producing a charming gift for the bookworms in your life.
The beauty of a Coffee Cup Bookmark Crochet – Tutorial lies in its versatility and the endless possibilities for customization. You can play with different yarn colors to mimic various coffee blends, from a dark espresso to a creamy latte, or even add “steam” coming out of the cup using thin embroidery thread. This project is not only satisfying to complete but also serves as a great conversation starter when tucked into your latest read or displayed on a library shelf.
Mastering the Coffee Cup Bookmark Crochet – Tutorial requires just a few basic materials and a little bit of patience. In this comprehensive guide, we will walk through every step needed to create a high-quality, SEO-optimized crochet project that looks professional and holds its shape over time. By following the techniques outlined below, you will learn how to structure your stitches for durability and aesthetic appeal, ensuring your crochet coffee cup remains a cherished accessory for years to come.
1. Essential Materials for Your Coffee Cup Bookmark Crochet – Tutorial
To begin your journey with this Coffee Cup Bookmark Crochet – Tutorial, you first need to gather the right supplies to ensure a smooth crafting experience. Selecting the correct yarn weight is crucial; we recommend using a light worsted or DK weight cotton yarn because it provides excellent stitch definition and won’t stretch too much when pulled. Cotton is also heat-resistant and durable, making it the ideal choice for a crochet bookmark that will be handled frequently.
Next, you must pair your yarn with the appropriate crochet hook size. Usually, a 2.5mm or 3.0mm hook works best for this specific crochet tutorial to keep the stitches tight so that the stuffing or the shape of the cup doesn’t warp. A tighter tension ensures that your miniature coffee cup maintains its iconic silhouette without looking floppy or lose, giving it that professional “boutique” finish.
Don’t forget the small details that make a big difference in a Coffee Cup Bookmark Crochet – Tutorial. You will need a tapestry needle for weaving in your ends and a pair of sharp embroidery scissors. Since we are making a bookmark, you might also want a thin ribbon or a long crochet chain to act as the “tail” that sits between the pages, allowing the cute coffee cup to peek out from the top of the book.
Safety eyes or black embroidery floss are also necessary if you want to add a “Kawaii” face to your coffee cup bookmark. Adding a small smile and blushing cheeks can transform a simple accessory into a character with personality. In this step-by-step crochet guide, we emphasize the importance of secure attachments, especially if the bookmark is intended for a child or will be used daily in a backpack.
A small amount of polyester fiberfill is another key component for this Coffee Cup Bookmark Crochet – Tutorial. While the bookmark tail remains flat to avoid damaging the book’s spine, the cup portion is usually worked in the round and lightly stuffed to give it a 3D effect. This contrast between the flat tail and the 3D topper is what makes this handmade crochet gift stand out from traditional flat bookmarks.
Finally, consider using stitch markers to keep track of your rounds. When working on small-scale amigurumi-style projects, it is very easy to lose count of your increases and decreases. Using markers ensures that your crochet coffee cup is perfectly symmetrical and follows the pattern instructions exactly as intended, saving you the frustration of having to frog your work and start over.
2. Step-by-Step Stitch Guide for the Coffee Cup Bookmark Crochet – Tutorial
The foundation of the Coffee Cup Bookmark Crochet – Tutorial starts with the magic ring, a technique essential for any circular crochet work. By starting with a magic circle, you ensure there is no hole at the bottom of your cup, creating a solid base for your coffee cup bookmark. From there, you will work in continuous rounds of single crochet stitches, gradually increasing to create the flared shape of a real disposable coffee cup.
As you progress through the Coffee Cup Bookmark Crochet – Tutorial, you will encounter the “Back Loop Only” (BLO) technique. Using BLO stitches is a clever way to create a sharp edge or a “lip” on the cup, mimicking the lid of a coffee house beverage. This textural detail adds a layer of realism to your crochet art, making the final product look much more intricate than it actually is to create.
Color changes are where the Coffee Cup Bookmark Crochet – Tutorial truly comes to life. To simulate the cardboard sleeve or the coffee itself, you will need to switch yarn colors mid-round. We recommend the “seamless color change” method, where you pull the new color through the last two loops of the previous stitch. This keeps your crochet pattern looking clean and prevents those jagged lines that can distract from the overall design.
Once the main body of the cup is finished, this crochet tutorial moves on to the “tail” or the bookmark strand. This is typically a long series of chain stitches followed by a row of slip stitches or half double crochets to add thickness. The length of this tail should be approximately 10 to 12 inches to ensure it fits comfortably in standard-sized novels without slipping out during transport.
Finishing the top of the cup in your Coffee Cup Bookmark Crochet – Tutorial involves a flat circle that acts as the “lid.” You can choose to make a white lid for a classic look or a dark brown lid to represent a cup without a cover. Joining the lid to the body using a whip stitch or a slip stitch join provides a sturdy closure that keeps the stuffing inside while maintaining the flat top surface of the cup.
The final decorative touch in this crochet project is the handle or the “sleeve” detail. Some makers prefer to crochet a small rectangle and sew it around the middle of the cup to resemble a heat protector. This added layer not only adds visual interest but also provides extra stability to the crochet coffee cup, making it feel more substantial and high-quality when held in the hand.
3. Customization and Creative Variations for Your Crochet Project
One of the most exciting aspects of the Coffee Cup Bookmark Crochet – Tutorial is the ability to personalize it for different seasons or personalities. For a festive twist, you can use red and green yarn to create a “holiday blend” cup, or even add a tiny crochet holly leaf to the side. These small adjustments turn a simple yarn project into a seasonal bestseller if you plan on selling your items at craft fairs or online shops.
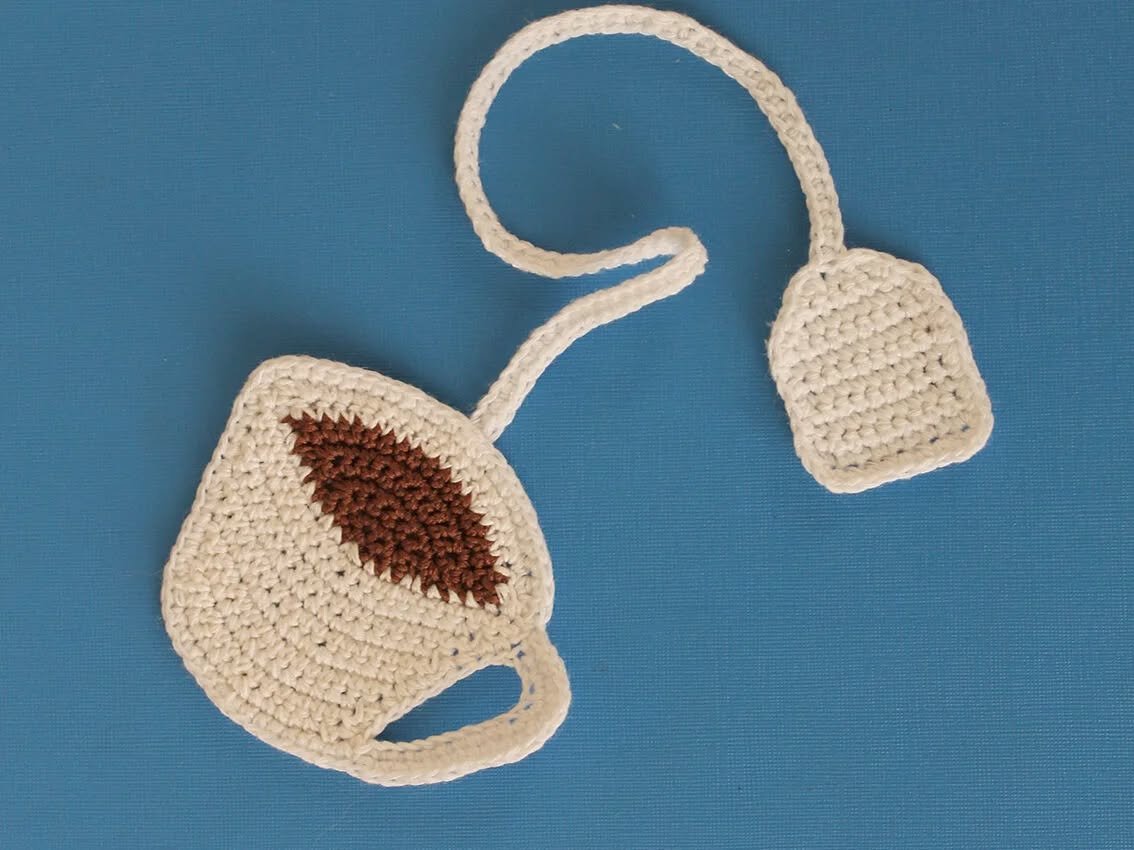
If you are a fan of tea rather than coffee, you can easily adapt this Coffee Cup Bookmark Crochet – Tutorial into a teacup bookmark. Simply change the shape of the cup to be wider and shorter, and add a small “tea bag” tag at the end of the bookmark tail. This flexibility is why crochet patterns are so popular among creators; one base design can lead to dozens of unique outcomes with just a few minor tweaks.
Texture plays a big role in the visual appeal of your Coffee Cup Bookmark Crochet – Tutorial. You can experiment with textured stitches like the bobble stitch to represent “foam” or “bubbles” on top of the drink. Using a fuzzy or velvet yarn for the lid can also add a tactile element that makes the crochet bookmark feel luxurious and soft, enhancing the cozy experience of reading a book.
For those looking to optimize their Coffee Cup Bookmark Crochet – Tutorial for social media or a blog, consider making a set of “Coffee Flavors.” Create a “Pumpkin Spice” version with orange tones or a “Matcha Latte” version with soft greens. Documenting these variations provides excellent SEO content for your craft blog, as you can target specific keywords related to seasonal trends and popular beverage flavors.
You can also integrate beads or charms into the tail of your Coffee Cup Bookmark Crochet – Tutorial. Adding a wooden bead or a small metal charm at the very end of the bookmark strand adds weight, helping the bookmark stay in place. This functional addition also makes your handmade crochet accessory feel like a piece of jewelry for books, increasing its perceived value as a gift or a retail item.
Finally, don’t be afraid to experiment with size. While this Coffee Cup Bookmark Crochet – Tutorial focuses on a standard size, you could use embroidery thread and a tiny hook to create a “micro-crochet” version for pocket-sized books. Alternatively, using chunky yarn could result in a large coffee cup plushie that doubles as a pin cushion. The skills you learn here are transferable to many other creative crochet endeavors.
4. Tips for Success and Maintaining Your Handmade Bookmark
To ensure your Coffee Cup Bookmark Crochet – Tutorial results in a long-lasting item, tension consistency is your best friend. If your tension is too loose, the bookmark will stretch out over time; if it’s too tight, it may curl uncomfortably. Practicing your crochet gauge before starting the main project ensures that every bookmark you make is uniform, which is especially important if you are building a brand around your handcrafted goods.
Blocking is a secret weapon often overlooked in a Coffee Cup Bookmark Crochet – Tutorial. Even though it’s a small item, lightly steaming the flat “tail” of the bookmark can help it lay perfectly flat inside a book. For the 3D cup portion, ensure you don’t overstuff it, as too much pressure can cause the stitches to pull apart, revealing the white fiberfill inside and ruining the aesthetic of the crochet work.
When it comes to cleaning your Coffee Cup Bookmark Crochet – Tutorial, hand washing is always the safest bet. Since these items are small and often have delicate details like embroidery or safety eyes, a quick soak in lukewarm water with mild soap will keep them fresh. Lay them flat to dry on a towel to prevent the yarn from losing its shape or the colors from bleeding, especially if you used vibrant mercerized cotton.
Sustainability is a growing trend in the crafting community, and your Coffee Cup Bookmark Crochet – Tutorial fits perfectly into this movement. By using leftover yarn from larger projects, you are practicing zero-waste crafting. You can even mention this in your product descriptions or blog posts to appeal to eco-conscious customers who are looking for sustainable handmade gifts that are both beautiful and functional.
If you are following this Coffee Cup Bookmark Crochet – Tutorial to create items for sale, presentation is key. Attaching your bookmark to a cardstock backing with a “hand-stamped” logo or a “handmade with love” message adds a professional touch. This makes the crochet coffee cup look like a high-end retail product, allowing you to charge a fair price for the time and skill required to produce it.
Lastly, stay inspired by joining online crochet communities and sharing your progress. Seeing how others have interpreted the Coffee Cup Bookmark Crochet – Tutorial can give you new ideas for colorways and techniques. Engaging with other crafters also helps you stay updated on the latest crochet trends and SEO strategies, ensuring that your passion for fiber arts continues to grow along with your technical skills.
FAQ: Common Questions About Crochet Coffee Cup Bookmarks
What is the best yarn for a crochet bookmark?
The best choice for a crochet bookmark is 100% cotton yarn. It is thin, durable, and holds its shape well without stretching. Unlike acrylic or wool, cotton provides the “flatness” needed for the tail of the bookmark so it won’t damage the book’s binding.
Is this project suitable for absolute beginners?
Yes! This Coffee Cup Bookmark Crochet – Tutorial is designed for those who know the basic stitches (chain, single crochet, increases, and decreases). It is a great “first amigurumi” project because it is small and doesn’t require complex limb attachments.
How long does it take to make one coffee cup bookmark?
On average, a skilled crocheter can finish one handmade bookmark in about 45 to 60 minutes. Beginners might take a bit longer, perhaps 90 minutes, as they navigate the color changes and the magic ring for the first time.
Can I wash my crochet bookmark?
Yes, but hand washing is highly recommended. Submerge the crochet coffee cup in cool, soapy water, rinse gently, and reshape it while damp. Avoid the dryer, as the heat can shrink the cotton or cause the stuffing to clump.
Do I need safety eyes for this tutorial?
Safety eyes are optional but they add a lot of charm. If the bookmark is for a very young child, we recommend embroidering the eyes with black yarn or thread instead to prevent any potential choking hazards.
How can I make the bookmark tail longer?
Simply add more chain stitches to your starting row for the tail. A standard length is 10 inches, but for large textbooks or coffee table books, you might want to extend the crochet tail to 14 or 15 inches.
Conclusion
In this Coffee Cup Bookmark Crochet – Tutorial, we have explored everything from the essential materials and basic stitches to creative variations and maintenance tips. We learned that using cotton yarn and a small hook size is the secret to a professional-looking handmade accessory.
By mastering the magic ring and color changes, you can create a variety of “flavors” that make perfect gifts for teachers, students, and bibliophiles. This project is a wonderful way to improve your crochet skills while producing something that is both useful and aesthetically pleasing.