A Crochet Soccer Ball – Tutorial is the perfect weekend project for anyone looking to combine a love for sports with the timeless art of amigurumi. Whether you are making a soft toy for a toddler, a decorative piece for a sports-themed bedroom, or a unique gift for a football fanatic, this guide provides everything you need to succeed. Crafting a crochet soccer ball is not just about following a pattern; it is about mastering the geometry of pentagons and hexagons to create a perfectly spherical shape that mimics the iconic look of a professional ball.
In this comprehensive Crochet Soccer Ball – Tutorial, we will dive deep into the specific techniques required to ensure your project looks polished and professional. Many beginners struggle with getting the proportions right, but by focusing on consistent tension and high-quality cotton yarn, you can create a durable toy that stands the test of time. This project is highly rewarding because it allows you to play with colors, moving beyond the traditional black and white to create vibrant, personalized versions of the classic soccer ball.
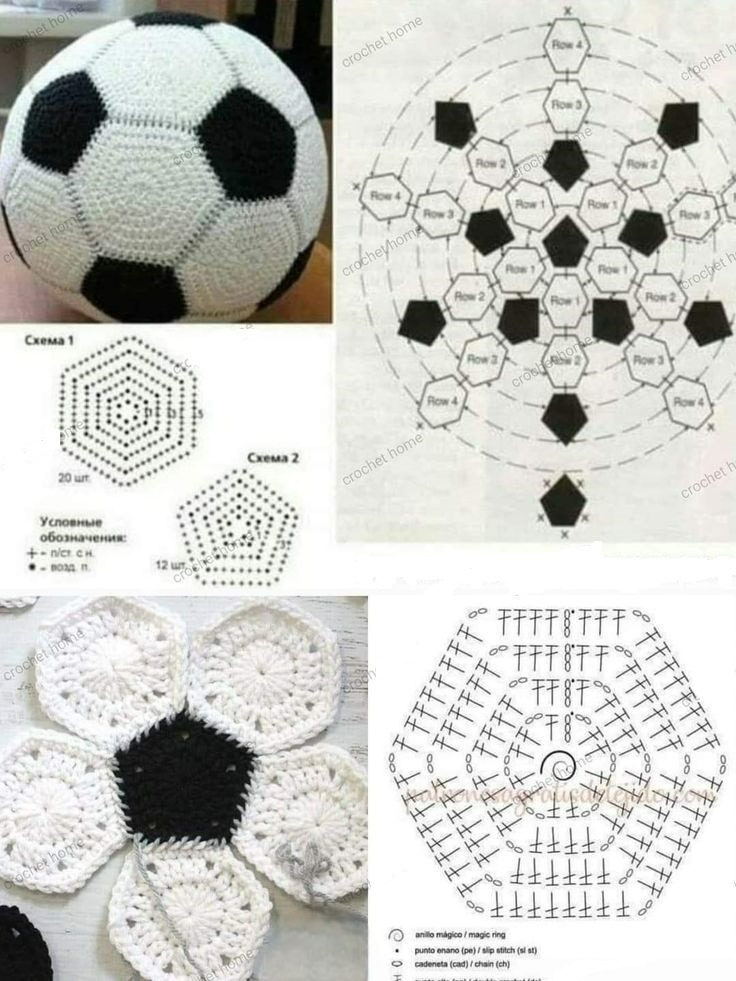
Before we pick up the hook, it is important to understand the structure of what we are building. A standard soccer ball is a truncated icosahedron, which in the world of crochet translates to 12 pentagons and 20 hexagons. This Crochet Soccer Ball – Tutorial will walk you through the step-by-step process of creating these individual motifs and joining them together using a tapestry needle. With a little patience and the right stitch markers, you will have a handmade masterpiece ready for the pitch in no time.
1. Essential Materials for Your Crochet Soccer Ball – Tutorial
To begin your journey with this Crochet Soccer Ball – Tutorial, you must first select the right yarn weight. Most crafters prefer a worsted weight cotton or an acrylic blend because these materials offer the structural integrity needed to hold the ball’s shape once it is stuffed. You will need two contrasting colors—traditionally black and white—to achieve that classic look, though neon colors are becoming a popular trend in the crochet community.
Choosing the correct crochet hook size is the next vital step. For amigurumi projects like this, it is generally recommended to use a hook that is one size smaller than what the yarn label suggests. This creates a tighter stitch density, ensuring that the polyester fiberfill stuffing does not peek through the gaps. A 3.5mm (E) or 4.0mm (G) hook is usually the “sweet spot” for most medium-weight yarns used in a soccer ball pattern.
Don’t forget the small but mighty tools that make a Crochet Soccer Ball – Tutorial much easier to follow. Stitch markers are non-negotiable when working in rounds, as they help you keep track of your increases and decreases. You will also need a sharp pair of scissors and a large-eye yarn needle for the assembly phase. Having these items organized before you start will prevent frustration and keep your creative flow steady.
Quality stuffing is what gives your ball its “kick.” Look for high-loft polyester stuffing that is washable and hypoallergenic. Since soccer balls are handled frequently, you want a material that won’t clump over time. Some makers even choose to insert a small chime or rattle inside the stuffing if the ball is intended for a baby, adding a sensory element to the finished handcrafted toy.
Understanding the stitch terminology used in this Crochet Soccer Ball – Tutorial is crucial for success. We will primarily be using the single crochet (sc) stitch, which is the foundation of most amigurumi. You should also be comfortable with the magic ring (or magic circle) technique, as this allows you to start your pentagons and hexagons without leaving a hole in the center of the piece.
Finally, ensure you have a clean workspace with good lighting. Working with black yarn can be notoriously difficult because it is hard to see the definition of the stitches. A bright desk lamp or a neck light can save you from eye strain while you work on the darker panels of your ball. With your kit ready, you are prepared to move on to the actual construction of the motifs.
2. Crafting the Pentagons and Hexagons
The core of any Crochet Soccer Ball – Tutorial lies in the geometry of the shapes. You will need to crochet exactly 12 pentagons (five-sided shapes). In a traditional design, these are usually made with the darker color. Each pentagon starts with a magic ring and expands over a few rounds of single crochet increases. The goal is to keep the edges flat so they can be easily seamed later.
Next, you will create the 20 hexagons (six-sided shapes). These are typically done in the lighter or white yarn. The process is very similar to the pentagons, but you will be adding an extra increase point in each round to create the sixth side. Consistency is key here; ensure that the final round of your hexagons has the same number of stitches per side as the final round of your pentagons to ensure a perfect fit.
In this Crochet Soccer Ball – Tutorial, we emphasize the importance of weaving in ends as you go. With 32 total shapes to manage, leaving all the yarn tails until the end can be overwhelming. As you finish each piece, use your yarn needle to secure the starting tail. However, leave a long tail on the ending side of each shape—you can use these long strands to sew the pieces together, reducing the need for extra knots.
While working on these shapes, pay close attention to your tension. If some shapes are tighter than others, your soccer ball will turn out lopsided or “bumpy.” If you notice your hexagons are significantly larger than your pentagons, you may need to adjust your hook size for one of the shapes. The beauty of this Crochet Soccer Ball – Tutorial is that it teaches you how to troubleshoot these common crochet mistakes early on.
Once all 32 pieces are finished, lay them out on a flat surface to visualize the assembly. This is a great “halfway” milestone in the Crochet Soccer Ball – Tutorial. Seeing the pile of shapes transition into a pile of panels is very satisfying. Take a moment to count them one last time—12 black pentagons and 20 white hexagons—to ensure you haven’t missed a single piece before the assembly phase begins.
For those looking to add a bit of flair, you can experiment with variegated yarn for the hexagons. This creates a “galaxy” or “tie-dye” effect that kids absolutely love. However, for your first attempt following this Crochet Soccer Ball – Tutorial, sticking to two solid colors is highly recommended so you can clearly see the construction and the way the seams interact with each other.
3. Assembling the Pieces and Seaming Techniques
Now comes the most critical part of the Crochet Soccer Ball – Tutorial: the assembly. The rule of thumb for a soccer ball is that every pentagon must be completely surrounded by hexagons. No two pentagons should ever touch each other. You will start by taking one pentagon and sewing five hexagons to its five sides. This creates a small “bowl” shape that forms the top of the ball.
Using a whip stitch or a slip stitch join is the best way to connect the panels. In this Crochet Soccer Ball – Tutorial, we recommend the whip stitch using a yarn needle because it creates a flatter, more seamless look that mimics the panels of a real ball. Insert the needle through the back loops only of both pieces to create a hidden seam that looks professional and clean.
As you continue to add pieces, you will see the spherical shape begin to take form. It is helpful to use locking stitch markers to pin the pieces together before you sew them. This acts as a “mock-up” and ensures that you don’t accidentally sew a pentagon where a hexagon should be. Following the geometric logic is the most challenging part of the Crochet Soccer Ball – Tutorial, but it is also the most rewarding.
Continue joining the middle section of the ball by alternating the remaining hexagons and pentagons. At this stage, the project will look like a strange, floppy hat. Don’t worry—the stuffing will fix that! Make sure your stitches are tight and secure. Since a crochet soccer ball is meant to be handled, loose seams can lead to the stuffing leaking out or the ball losing its shape during play.
When you have only a few panels left to attach, it is time to start the stuffing process. This part of the Crochet Soccer Ball – Tutorial requires a bit of finesse. You want the ball to be firm enough to bounce slightly but soft enough to be safe for indoor play. Tear your fiberfill into small clumps and distribute them evenly, making sure to push the stuffing into the “corners” where the panels meet.
Finally, sew the last panel (usually a pentagon) nearly all the way shut. Add a final handful of stuffing to ensure there are no hollow spots, then use a surgical knot to secure your yarn and weave the tail deep into the center of the ball. Congratulations, you have successfully followed the assembly portion of the Crochet Soccer Ball – Tutorial! Your flat shapes have now become a 3D object.
4. Maintenance and Customization Tips
After finishing your Crochet Soccer Ball – Tutorial, you might wonder how to keep your creation looking new. Since most handmade toys get a lot of love, it’s important to use washable yarn. If the ball gets dirty, hand washing in cold water with a mild detergent is the safest route. Avoid the dryer, as the high heat can melt synthetic fibers or cause the cotton yarn to shrink unevenly.
If you want to take your skills further after completing this Crochet Soccer Ball – Tutorial, consider making different sizes. By simply changing the yarn weight and hook size, you can create a tiny keychain version or a giant floor pillow version of the same ball. The pattern of 12 pentagons and 20 hexagons remains the same regardless of the scale, which is the beauty of mathematical crochet.
Customization is where your personality shines. You can embroider a name or a team logo onto one of the white hexagons before sewing it into the ball. This Crochet Soccer Ball – Tutorial can be adapted for world cup themes, school colors, or even holiday-themed ornaments. Some crafters use glow-in-the-dark yarn for the white sections, creating a fun toy for nighttime play.
For those interested in selling their work, a well-made crochet soccer ball is a high-value item at craft fairs. Because it requires significant assembly time, you can price it higher than simpler amigurumi projects. Be sure to mention that it is a handmade item and provide care instructions to your customers. Quality photography of your finished ball will help highlight the neatness of your seams.
Another great tip from this Crochet Soccer Ball – Tutorial is to experiment with texture. Using a fuzzy “velvet” yarn can make a very soft, cuddly ball for infants, while a sturdy cord yarn can make a ball that is actually tough enough for a light game of “soccer” in the hallway. Just remember that thicker yarns will result in a much larger finished product.
In conclusion, the Crochet Soccer Ball – Tutorial is a journey through geometry, patience, and creativity. While the 32 pieces might seem daunting at first, the rhythmic nature of the single crochet makes it a relaxing project once you get into the flow. You now have a unique, durable, and thoughtful gift that showcases the incredible versatility of modern crochet techniques.
FAQ – Frequently Asked Questions
1. How long does it take to finish a Crochet Soccer Ball?
Depending on your speed, it usually takes between 8 to 12 hours. Making the 32 individual shapes is the fastest part, while the assembly and seaming require the most focus and time.
2. What is the best yarn for a soccer ball?
A 100% cotton yarn is usually the best choice because it doesn’t stretch too much, helping the ball maintain its spherical shape even when stuffed firmly.
3. Can I make this ball without a magic ring?
Yes, you can chain 2 and work your first round of stitches into the second chain from the hook. However, the magic ring provides a much tighter center, which is preferred for amigurumi.
4. Why is my soccer ball looking more like an oval?
This is usually due to uneven stuffing or inconsistent tension between the pentagons and hexagons. Make sure you stuff the ball very firmly and massage it into a circle with your hands.
5. How many stitches should each side of the shapes have?
In a standard pattern, each side of the pentagon and hexagon should have the same number of stitches (usually 5 or 6) so they line up perfectly during the seaming process.
6. Is this project suitable for beginners?
If you know the basics of single crochet and increasing, you can do this! The “hard” part is just the organization and keeping track of the 32 different pieces.
Conclusion
This Crochet Soccer Ball – Tutorial has covered everything from selecting the right worsted weight yarn to the final whip stitch assembly. We have explored the mathematical balance of 12 pentagons and 20 hexagons, and how they come together to create a classic sports icon. By following these steps, you have transformed simple yarn into a durable, soft, and impressive piece of crochet art.
We hope this guide has been helpful and inspiring for your next crafting session! Did you find the assembly easier or harder than expected? Which colors did you choose for your project?