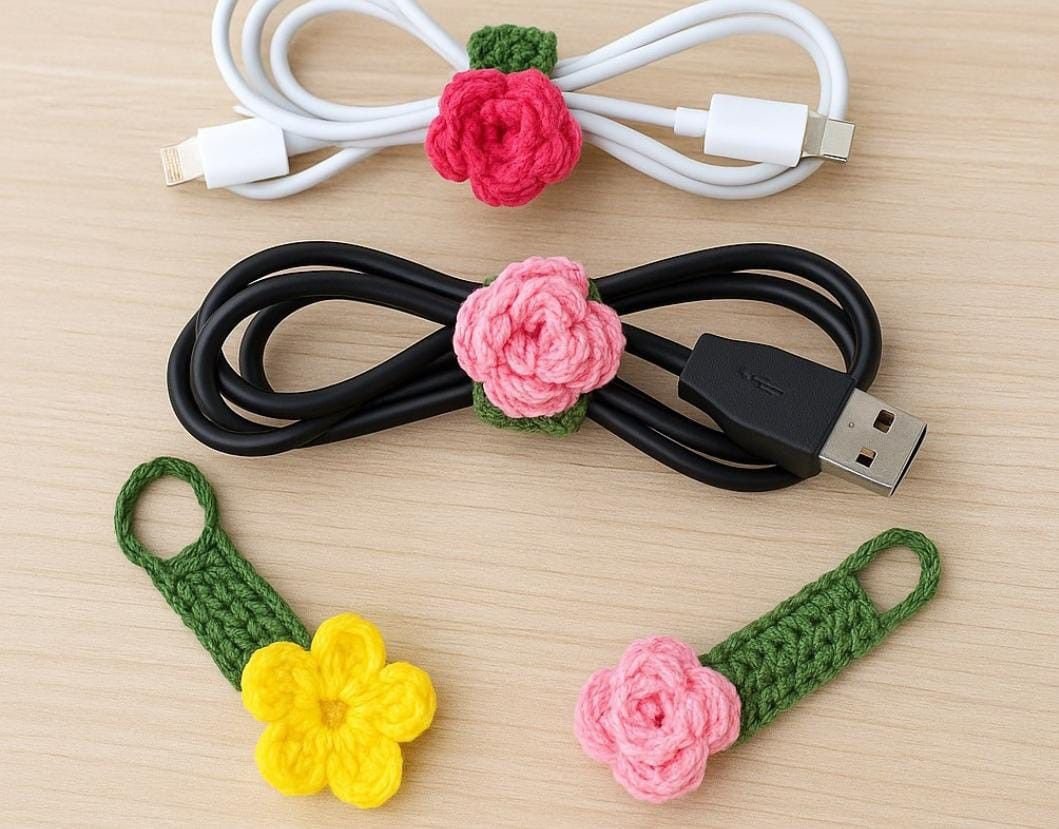
Crochet Cable Organizer – Tutorial is the perfect solution for anyone looking to combine functionality with handmade charm in their daily organization. In an era where digital devices dominate our workspaces and travel bags, managing the chaos of tangled wires can become a constant struggle. This Crochet Cable Organizer – Tutorial will guide you through the process of creating a stylish, eco-friendly, and highly effective tool to keep your USB cables, headphones, and chargers neatly stored. By choosing to crochet your own accessories, you are not only practicing a mindful hobby but also creating a durable product that far outlasts plastic alternatives.
When we talk about a Crochet Cable Organizer – Tutorial, we are focusing on a versatile project that is accessible to both beginners and seasoned crafters. The beauty of this specific crochet piece lies in its simplicity; it typically requires only small amounts of yarn, making it an excellent scrap buster project. Whether you prefer a minimalist wrap or a multi-slot pouch, the techniques used in this tutorial are foundational, ensuring that your finished handcrafted item is as sturdy as it is beautiful. Beyond the practical benefits, these organizers make thoughtful, personalized gifts for friends and family who appreciate unique handmade goods.
To get the most out of this Crochet Cable Organizer – Tutorial, it is essential to focus on the quality of your materials and the consistency of your tension. Using a cotton yarn is often recommended for these projects because it offers the structural integrity needed to hold heavy cables without stretching excessively over time. As you follow along with this crochet tutorial, you will learn how to integrate functional elements like buttons, velcro, or elastic bands to secure your cords safely. Let’s dive into the specifics of crafting your very own cable management solution that reflects your personal style and keeps your tech gear tidy.
1. Essential Materials for Your Crochet Cable Organizer – Tutorial
Selecting the right yarn is the first step in ensuring your Crochet Cable Organizer – Tutorial results in a professional-looking product. For items that will be handled frequently, like a cable wrap, a medium-weight (worsted) cotton yarn is the gold standard because it is less prone to pilling and offers great definition for your crochet stitches.
You will also need a crochet hook that matches your yarn choice, typically ranging from 3.5mm to 4.5mm. Choosing a slightly smaller hook than recommended on the yarn label can help create a tighter, more “fabric-like” density. This ensures that the crochet cable organizer maintains its shape even when tightly wrapped around thick power bricks or long laptop cords.
Don’t forget the notions that provide the “lock” for your organizer. In this Crochet Cable Organizer – Tutorial, we suggest using wooden buttons or heavy-duty snaps for a rustic and secure finish. Having a sharp tapestry needle on hand is crucial for weaving in your ends securely, which prevents the project from unraveling during daily use in your backpack or desk drawer.
A pair of high-quality craft scissors and a measuring tape are also indispensable tools for this crochet project. Precision is key when you are customizing the size of your organizer to fit specific tech accessories. Measuring your cables beforehand allows you to adjust the length of your foundation chain to create a custom-fit sleeve or wrap.
For those interested in sustainable crafting, this Crochet Cable Organizer – Tutorial is a fantastic way to upcycle. You can use leftover yarn scraps from larger projects like blankets or sweaters to create a colorful, multi-toned cable holder. This approach not only saves money but also reduces textile waste, aligning with modern eco-friendly lifestyle trends.
Lastly, consider adding a stitch marker to your kit, especially if you are working in continuous rounds or complex patterns. While many cable organizers use simple rows, keeping track of your turnings ensures the edges remain straight and professional. Preparation is half the battle in any DIY crochet tutorial, and having these items ready will make the crafting process smooth and enjoyable.
2. Understanding the Crochet Stitches and Techniques
The core of any Crochet Cable Organizer – Tutorial involves mastering a few basic but effective crochet stitches. The single crochet (sc) is the most common stitch used here because it creates a solid, thick texture that protects the wires inside. It provides a flat surface that is easy to fold and roll, which is exactly what you want for portable cable management.
In addition to the single crochet, learning the half double crochet (hdc) can add a bit of height and flexibility to your work. This stitch is particularly useful if you want a slightly softer wrap that can accommodate bulkier cables. Throughout this Crochet Cable Organizer – Tutorial, we emphasize the importance of maintaining an even stitch tension to prevent the organizer from looking lopsided.
Another vital technique is the slip stitch (sl st), which is used for joining pieces or creating finished edges. When you reach the end of your crochet pattern, a row of slip stitches around the perimeter can provide a decorative and reinforced border. This small detail elevates the handmade look into something that looks like a high-end boutique accessory.
Creating a buttonhole is a specific skill highlighted in this Crochet Cable Organizer – Tutorial. By using a series of chain stitches and skipping a few stitches in the previous row, you create a gap perfectly sized for your fastener. This functional element is what transforms a simple strip of crochet fabric into a working cable organizer.
For those who want to add some flair, the moss stitch or waistcoat stitch can provide a woven appearance that mimics store-bought fabric. These techniques are still beginner-friendly but offer a more sophisticated aesthetic for your Crochet Cable Organizer – Tutorial. Experimenting with different stitch patterns allows you to express your creativity while staying organized.
Finally, we must discuss the importance of blocking your finished piece. Once you complete the crochet portion of the tutorial, pinning your organizer to the correct dimensions and lightly steaming it will set the stitches. This ensures the Crochet Cable Organizer – Tutorial results in a flat, crisp accessory that won’t curl at the corners when you try to use it.
3. Step-by-Step Construction of the Cable Wrap
To begin the actual construction phase of our Crochet Cable Organizer – Tutorial, you will start by making a slip knot and creating a foundation chain. For a standard USB cord, a chain of about 15 to 20 stitches is usually sufficient. This length determines the width of the wrap, so feel free to adjust it based on the specific electronics you intend to organize.
Once your chain is ready, you will work rows of single crochet until the piece reaches the desired length to wrap around your cord at least twice. This Crochet Cable Organizer – Tutorial focuses on a rectangular design because it is the most space-efficient. As you work through the rows, count your stitches regularly to ensure you aren’t accidentally increasing or decreasing at the ends.
As you approach the end of the strip, it’s time to incorporate the fastening mechanism. In this Crochet Cable Organizer – Tutorial, we recommend tapering the final two rows by using decreases (sc2tog). This creates a pointed tab where the buttonhole will reside, giving the crochet wrap a sleek, finished appearance that is easy to grip and pull.
After completing the body of the cable holder, cut your yarn, leaving a long tail for sewing. This tail will be used to attach your button to the opposite end of the wrap. This Crochet Cable Organizer – Tutorial suggests placing the button about an inch from the edge to allow for a tight, secure fit once the crochet fabric is stretched slightly around the wires.
If you prefer a multi-cable solution, you can create a wider base and sew “dividers” using a surface slip stitch. This variation of the Crochet Cable Organizer – Tutorial allows you to store three or four cords in one flat unit. Simply fold the bottom third of a longer rectangle up and sew vertical lines to create individual pockets for each USB cable.
The final touch in the construction process is the finishing work. Use your tapestry needle to weave the ends of the yarn deep into the crochet stitches. This is a step often skipped by beginners, but in this Crochet Cable Organizer – Tutorial, we insist on it because the frequent opening and closing of the wrap puts stress on the yarn ends.
4. Maintenance and Customization for Long-Term Use
One of the best things about following this Crochet Cable Organizer – Tutorial is that your finished product is easily washable. Since tech gear can often get dusty, being able to toss your crochet organizer into a mesh laundry bag and wash it on a gentle cycle is a huge advantage. Using cotton yarn ensures that it won’t lose its shape or shrink significantly in the wash.
Customization is where your personality really shines through in this Crochet Cable Organizer – Tutorial. You can use color-blocking techniques to color-code your cables—perhaps blue for phone chargers, red for laptop power, and green for audio cables. This level of visual organization makes it incredibly easy to find exactly what you need in a dark bag or cluttered drawer.
For a more “tech-forward” look, you can incorporate conductive thread or reflective yarn into your crochet design. While not strictly necessary for the Crochet Cable Organizer – Tutorial, these modern materials add a unique twist to a traditional craft. It bridges the gap between old-world handicrafts and modern technology in a fun and functional way.
If you find that your cables are particularly heavy, you might consider lining your crochet wrap with a small piece of felt or recycled fabric. This adds an extra layer of protection and prevents the crochet stitches from stretching out. This advanced tip in our Crochet Cable Organizer – Tutorial ensures that your handmade accessory stays looking new for years to come.
As you become more comfortable with the pattern, you can scale the Crochet Cable Organizer – Tutorial up to create organizers for larger household items, such as hair dryer cords or kitchen appliance wires. The logic remains the same: a sturdy crochet fabric, a secure closure, and a design that keeps the clutter at bay. The possibilities for home organization are truly endless.
Lastly, don’t forget to share your creations with the crochet community. Many people look for a Crochet Cable Organizer – Tutorial to solve their organizational woes, and seeing your variations can inspire others. Whether you use bright neon colors or subtle earth tones, your version of this project is a testament to the power of creative DIY solutions in our everyday lives.
FAQ: Frequently Asked Questions
1. What is the best yarn for a crochet cable organizer?
The best choice is almost always 100% cotton yarn. It is durable, has very little stretch, and can be washed easily. Acrylic can work, but it may stretch over time, causing the cables to slip out of the organizer.
2. Is this Crochet Cable Organizer – Tutorial suitable for beginners?
Yes, absolutely! This is an ideal beginner crochet project because it uses basic stitches like the chain and single crochet. It is also a small project, meaning you can finish it in under an hour.
3. Can I make this organizer without a button?
Definitely. If you don’t want to use a button, you can use velcro strips sewn onto the crochet fabric, or even create a crochet tie by making a long chain that wraps around the unit.
4. How do I prevent my cables from slipping out?
The key is to make the wrap slightly tighter than the diameter of the coiled cable. The natural friction of the yarn stitches helps grip the cord, but a snug fit is the best way to ensure everything stays in place.
5. How many cables can one organizer hold?
A standard wrap is designed for one cable. However, you can adapt this Crochet Cable Organizer – Tutorial by making a wider pouch with multiple “loops” or slots to hold an entire travel kit of wires.
6. Does the crochet hook size matter significantly?
Yes, using a hook that is a half-size smaller than what the yarn recommends will create a firmer, more durable cable holder. This prevents the gaps between stitches from becoming too large.
Conclusion
In this Crochet Cable Organizer – Tutorial, we have covered everything from selecting the right cotton yarn to mastering the single crochet stitches needed for a sturdy finish.
We explored how to create functional buttonholes, how to customize your project for different types of electronics, and how to maintain your handmade items for long-term durability. This project is a perfect example of how traditional crochet techniques can be applied to modern problems, resulting in a sustainable and stylish solution for cable management.