CROCHET HEADBAND – Tutorial: Creating your own stylish accessories is one of the most rewarding aspects of fiber arts, and this comprehensive guide is designed to help you master the craft. A crochet headband is the perfect project for both beginners and seasoned crafters because it requires minimal yarn, works up quickly, and offers endless opportunities for customization. Whether you are looking to keep your ears warm during the winter or simply want a chic way to keep hair out of your face, learning how to make a crochet headband is a foundational skill that opens the door to more complex projects.
In this CROCHET HEADBAND – Tutorial, we will explore the essential techniques needed to produce a professional-looking finish. Many people start their journey into crochet by making flat rectangles, and a headband is essentially a refined version of that basic shape, joined with a clever twist or seam. By focusing on stitch tension and yarn selection, you can create a high-quality accessory that rivals anything found in a high-end boutique. This article serves as your roadmap, providing the structure and SEO-optimized advice necessary to succeed in your next creative endeavor.
Understanding the nuances of the CROCHET HEADBAND – Tutorial involves more than just following a pattern; it is about choosing the right crochet hook size and understanding yarn weight. When you dive into this project, you are participating in a tradition of handmade fashion that emphasizes sustainability and personal expression. As we progress through the following sections, you will learn how to select your materials, execute the primary stitches, and assemble your piece with a seamless look. Let’s begin this journey into the world of DIY crochet accessories by looking at the preparation phase.
1. Choosing the Right Materials for Your Crochet Headband
To begin this CROCHET HEADBAND – Tutorial, you must first select a soft acrylic yarn or a comfortable cotton blend that feels good against the skin. Since the headband will sit directly on your forehead, avoiding “scratchy” fibers is vital for long-term comfort and wearability.
The crochet hook you choose should correspond to your yarn’s recommended gauge, typically a 5.0 mm (H) hook for medium-weight yarn. Using the correct tool ensures that your stitches are not too tight, which allows the headband to maintain the necessary stretch and elasticity.
Measuring your head circumference is a crucial step in ensuring your crochet headband fits perfectly without slipping. Most adult heads measure between 21 and 23 inches, so aiming for a finished piece that is slightly smaller will provide a snug fit through natural tension.
Don’t forget the small but essential tools like a tapestry needle and sharp scissors to finish your work professionally. A yarn needle is necessary for weaving in ends and sewing the final seam, which is a key part of our crochet tutorial instructions.
Consider the color palette of your project, as neutral tones like beige or grey make the crochet headband versatile for any outfit. However, bright colors or variegated yarns can turn a simple handmade accessory into a bold fashion statement that reflects your unique personality.
Lastly, keep a stitch marker handy if you are working in rounds or using a complex pattern to track your progress. Preparation is the secret to a stress-free crocheting experience, allowing you to focus entirely on the rhythm of your hands and the flow of the yarn.
2. Essential Stitches and Techniques for Beginners
The foundation of any CROCHET HEADBAND – Tutorial is the chain stitch (ch), which creates the initial length of your work. Mastering a consistent starting chain ensures that one side of your headband doesn’t end up tighter than the other, preventing a curved or distorted shape.
The single crochet (sc) is the most common stitch used in these projects because it creates a dense, warm fabric. It is excellent for winter-themed crochet headbands because the tight structure blocks out the wind and keeps heat trapped close to your skin.
For those who want a bit more texture and height, the half double crochet (hdc) is a fantastic middle-ground stitch. It provides a beautiful, slightly ribbed appearance that gives your crochet headband a sophisticated, shop-bought look while remaining very easy to execute.
Another technique highlighted in this CROCHET HEADBAND – Tutorial is working in the back loops only (BLO). By inserting your hook only into the back loop of the previous row, you create a stretchy, ribbed texture that mimics knitwear and provides extra comfort.
Maintaining a straight edge is a common challenge for beginners, so always count your stitches at the end of every row. This simple habit prevents your crochet headband from accidentally growing wider or narrower as you work, ensuring a uniform and professional result.
Understanding how to slip stitch (sl st) is vital for joining the ends of your rectangle to form the actual band. A clean join is the hallmark of a successful CROCHET HEADBAND – Tutorial, making the seam almost invisible to the naked eye when worn correctly.
3. Step-by-Step Assembly and Adding a Twist
Once you have crocheted a long rectangle based on our CROCHET HEADBAND – Tutorial measurements, it is time to assemble the piece. Lay your work flat on a table and ensure there are no twists in the fabric before you begin the joining process.
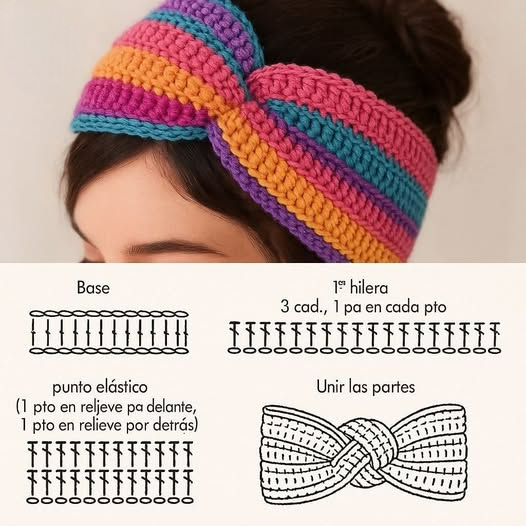
To create the popular twisted crochet headband look, you will employ a technique called the “sandwich fold.” This involves folding each end of the headband in half and interlocking them like two “C” shapes before sewing across all four layers of crochet fabric.
Use your tapestry needle and a length of the same yarn to sew the seam using a whip stitch or a mattress stitch. Sewing through all layers firmly is essential so that the crochet headband maintains its structural integrity even after multiple washes and uses.
After sewing, turn the headband inside out to reveal the beautiful knot or twist at the front. This simple maneuver hides the raw edges of your stitches inside the fold, resulting in a clean, polished handmade gift or personal accessory.
If you prefer a flat headband, you can simply sew the two short ends together using a flat seam. This style is perfect for adding embellishments like crochet flowers or buttons, which can be customized to match your favorite winter coat or summer dress.
Blocking your finished project is a pro tip often mentioned in a high-quality CROCHET HEADBAND – Tutorial. Lightly steaming the yarn helps to relax the fibers, settling the stitches into their final shape and giving the headband a more professional, “finished” appearance.
4. Customization and Care for Your Handmade Accessory
The beauty of a CROCHET HEADBAND – Tutorial lies in its versatility, as you can easily adjust the width to create a “ear warmer” or a thin “hairband.” Simply add or subtract rows until you reach the desired thickness that suits your hairstyling needs.
Experimenting with different yarn textures, such as velvet or faux fur, can completely change the vibe of your project. A velvet crochet headband feels incredibly luxurious and is perfect for formal events, while a chunky wool version is ideal for outdoor activities.
Adding a functional button is another great way to customize your work, allowing the headband to be adjustable. This is particularly useful for children’s sizes, as it allows the crochet accessory to grow with them over time, making it a sustainable choice.
To keep your crochet headband looking new, always follow the care instructions on the yarn label. Most handmade crochet items benefit from being hand-washed in cool water with a mild detergent and laid flat to dry to prevent stretching.
Avoid hanging your crochet accessories on hooks, as the weight of the yarn can cause them to lose their shape over time. Storing them flat in a drawer ensures the stitch definition remains crisp and the fit stays perfect for many seasons to come.
As you finish this CROCHET HEADBAND – Tutorial, remember that practice makes perfect. Each headband you create is an opportunity to refine your crochet technique and explore new color combinations, making you a more confident and creative maker.
FAQ: Frequently Asked Questions
What is the best yarn for a crochet headband?
The best yarn is usually a medium-weight (category 4) acrylic or cotton blend. Acrylic is warm and durable, while cotton is breathable and better for warmer weather. Look for “soft” varieties to avoid skin irritation.
How many chains do I need to start a headband?
This depends on your yarn and hook size, but for a standard adult crochet headband, you usually chain enough to reach about 5 inches in width, or chain the length of the head circumference (approx. 20-22 inches) if working in a different direction.
Can a total beginner finish this CROCHET HEADBAND – Tutorial?
Absolutely! This is one of the most beginner-friendly projects available. If you can make a chain and a single crochet, you have all the skills necessary to complete your first headband in just a few hours.
How do I make the headband stretchy?
To ensure your crochet headband has a good stretch, use a slightly larger hook than recommended and work your stitches into the back loops only (BLO). This creates a ribbed effect that acts like an elastic band.
How much yarn do I need?
Most headbands are very yarn-efficient. You can typically make one using less than 100 yards of yarn, making it an excellent “stash-buster” project for using up leftover materials from larger projects.
Is it better to crochet in rows or rounds?
Both methods work, but crocheting in rows and then sewing the ends together is usually easier for beginners and allows you to create the popular twisted knot design more effectively.
Conclusion
In this CROCHET HEADBAND – Tutorial, we have covered everything from selecting the perfect yarn and hook to mastering the essential stitches and assembling your final piece. We explored how the single crochet and half double crochet provide different textures, and how the back loop only technique adds the necessary stretch for a comfortable fit. You also learned the secret to creating that trendy twisted front and how to care for your handmade accessories to ensure they last for years.
Crocheting is a journey of continuous learning, and we hope this guide has inspired you to pick up your hook and start creating. Whether you are making this for yourself or as a thoughtful gift, the personal touch of a crochet headband is unmatched.