Basic Crochet Stitches – Tutorial is the perfect starting point for anyone looking to dive into the timeless art of yarn craft. Learning how to manipulate a simple hook and a strand of fiber allows you to create everything from cozy blankets to intricate garments, but it all begins with mastering the fundamentals. In this comprehensive guide, we will explore the essential techniques that form the backbone of every project, ensuring you have a solid foundation for your creative journey.
The beauty of a Basic Crochet Stitches – Tutorial lies in its accessibility; you don’t need expensive machinery or a massive workspace to get started. All it takes is a bit of patience, a comfortable hook, and a skein of yarn to begin seeing your progress stitch by stitch. Many beginners feel intimidated by complex patterns, but once you realize that even the most elaborate designs are just combinations of these primary movements, the process becomes much more approachable and relaxing.
As we move through this Basic Crochet Stitches – Tutorial, remember that consistency is more important than speed. Your tension will naturally improve as you practice, and your hands will develop the muscle memory needed to glide through the rows effortlessly. Whether you are looking for a new hobby to reduce stress or aiming to make handmade gifts for loved ones, understanding these core stitches is the first step toward becoming a confident “hooker” in the crafting world.
1. Getting Started with the Chain Stitch and Slip Knot
Every Basic Crochet Stitches – Tutorial must begin with the very first loop on your hook, which is the slip knot. To create one, wrap the yarn around your fingers to form a loop, pull a strand through, and tighten it onto the hook. This isn’t technically a stitch, but it is the “anchor” that holds your work in place as you prepare to build your foundation.
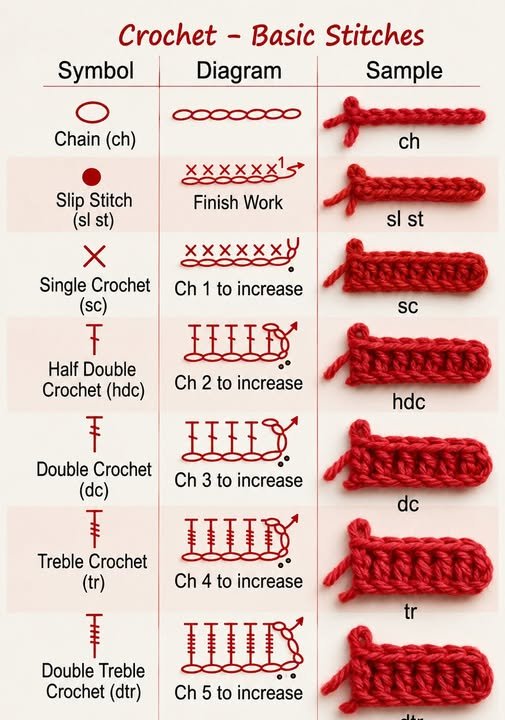
Once your slip knot is ready, you will move on to the chain stitch, often abbreviated as ch in patterns. This is the most fundamental element of crochet, used to create the starting edge of most projects. To do this, simply wrap the yarn over your hook (yarn over) and pull it through the loop already on the hook.
The chain stitch serves as the “foundation chain,” determining the width of your project. If you are making a scarf, you might chain twenty or thirty times; for a blanket, you could chain hundreds. It is vital to keep these chains loose enough so that you can easily insert your hook back into them during the next row.
In this Basic Crochet Stitches – Tutorial, we emphasize that counting your chains is a crucial habit to develop early on. Miscounting at the base level can lead to a lopsided project later. Use your thumb and forefinger to hold the base of the stitch you just made to maintain control and even tension throughout the process.
The chain stitch is also used to create “turning chains” at the start of new rows. This gives the fabric the necessary height to match the stitch you are about to perform. Without a turning chain, the edges of your work will pull inward, resulting in a distorted shape that doesn’t lay flat.
Practicing the chain stitch until your loops look uniform is the best way to prepare for more advanced movements. Don’t worry if your first few attempts look a bit messy or uneven. Most beginners struggle with holding the yarn too tightly, so try to stay relaxed and let the hook do the heavy lifting for you.
2. Mastering the Single Crochet for Dense Fabrics
The single crochet (abbreviated as sc) is the first “real” stitch you will learn in this Basic Crochet Stitches – Tutorial. It creates a tight, dense fabric that is perfect for items like dishcloths, coasters, and amigurumi (stuffed toys). Because the holes between stitches are minimal, it provides excellent structure and durability to any finished piece.
To perform a single crochet, insert your hook into the desired stitch or chain, yarn over, and pull up a loop. You will now have two loops on your hook. Yarn over once more and pull through both loops. This simple two-step process completes one single crochet and sets you up for the next one in the row.
This stitch is highly valued in the Basic Crochet Stitches – Tutorial because it teaches you how to identify the “V” shape at the top of a stitch. When working into a previous row, you generally insert your hook under both loops of that “V.” Understanding this anatomy is key to following professional patterns and maintaining a clean look.
One of the common mistakes when learning the single crochet is skipping the very first or very last stitch of a row. This causes your work to shrink as you go up. To prevent this, many crafters use stitch markers in the first stitch of every row to ensure they know exactly where to finish when they come back across.
The texture of a fabric made entirely of single crochet is somewhat stiff but very sturdy. It is an excellent choice for beginner projects because the stitches are easy to see and count. If you make a mistake, “frogging” (ripping out) a single crochet row is simple and doesn’t waste much yarn or time.
In our Basic Crochet Stitches – Tutorial, we recommend practicing this stitch by making a simple square. By repeating the motion over several rows, you will notice your edges becoming straighter and your rhythm becoming more fluid. Once you feel comfortable with the height and density of this stitch, you are ready to move on to taller variations.
3. Creating Height with the Half Double and Double Crochet
As you progress in this Basic Crochet Stitches – Tutorial, you will want to create fabric faster and with more drape. This is where the half double crochet (hdc) and double crochet (dc) come into play. These stitches are taller than the single crochet, meaning your project grows much more quickly with every row you complete.
The half double crochet is a unique “middle ground” stitch. To start, yarn over before inserting your hook into the stitch. Pull up a loop (three loops on hook), yarn over again, and pull through all three loops at once. This creates a beautiful, slightly braided texture that is softer than a single crochet but firmer than a double.
Next in our Basic Crochet Stitches – Tutorial is the double crochet, which is a staple in the world of blankets and sweaters. To do this, yarn over and insert the hook, pull up a loop (three loops on hook), yarn over and pull through the first two loops, then yarn over again and pull through the final two loops.
The double crochet produces a flexible, breathable fabric with a lovely “drape.” This means the material hangs well on the body, making it ideal for clothing or light throws. It uses more yarn per stitch than the single crochet, but because the stitches are taller, the overall time spent on a project is significantly reduced.
Learning to distinguish between the half double crochet and the double crochet is essential for reading patterns correctly. Many modern designs combine these heights to create waves, shells, and other decorative textures. In this Basic Crochet Stitches – Tutorial, we encourage you to alternate rows of each to see how the fabric changes.
Remember that taller stitches require taller turning chains. Typically, a half double crochet requires a turning chain of two, while a double crochet requires a chain of three. Keeping this consistent ensures that the sides of your work remain straight and professional, preventing the “wobbly edge” look that many beginners encounter.
4. Finishing Touches with the Slip Stitch and Fastening Off
The final essential technique in our Basic Crochet Stitches – Tutorial is the slip stitch (abbreviated as sl st). While it doesn’t add much height to your work, it is incredibly versatile. It is primarily used for joining rounds (like when making a Granny Square), moving the yarn across a row without adding height, or creating a clean finished edge.
To work a slip stitch, insert your hook into the stitch, yarn over, and pull that loop through the stitch and the loop on your hook in one smooth motion. It is the shortest of all stitches and creates a very flat, unobtrusive connection. Many crafters use it to add decorative borders to their finished projects for a polished look.
In this Basic Crochet Stitches – Tutorial, we also emphasize the importance of “fastening off” properly. Once you reach the end of your project, you shouldn’t just pull the hook out. Instead, cut your yarn (leaving a 6-inch tail), yarn over one last time, and pull the entire tail through the loop to create a secure knot.
Weaving in your ends is the final “invisible” step of any Basic Crochet Stitches – Tutorial. Using a blunt tapestry needle, weave the remaining yarn tail back through the stitches of your work. This prevents the project from unraveling and hides the messy ends, ensuring your hard work lasts for years to house or wear.
Mastering the slip stitch also allows you to surface crochet, adding embroidery-like details on top of your finished fabric. It is a tool for refinement and utility. Even though it is simple, it is the glue that holds many complex crochet constructions together, especially when joining different motifs or granny squares.
By now, you have covered the entire spectrum of foundational movements. From the initial chain to the final slip stitch, this Basic Crochet Stitches – Tutorial has equipped you with the vocabulary and physical skills to tackle thousands of different patterns. The world of crochet is now open to you—all you need to do is keep practicing and exploring new textures.
Frequently Asked Questions (FAQ)
What is the easiest stitch for a total beginner to learn first?
The easiest stitch is the chain stitch, followed closely by the single crochet. Most teachers suggest starting with a foundation chain and then practicing rows of single crochet to get used to the movement of the hook and the feel of the yarn.
How do I know which hook size to use for these stitches?
The best way to decide is to check the label on your yarn skein. It will usually recommend a specific hook size (like 5.0mm). As you gain experience, you might choose a larger hook for a looser look or a smaller hook for a tighter, more rigid fabric.
Why is my crochet work getting narrower or wider as I go?
This usually happens because you are accidentally adding or skipping stitches at the beginning or end of your rows. Using stitch markers is a lifesaver for beginners. Always count your stitches at the end of every row to ensure the number matches your starting row.
What does “yarn over” mean in a crochet tutorial?
“Yarn over” (often abbreviated as yo) means wrapping the yarn over your crochet hook from back to front. This is the basic action used to create new loops and build the height of every stitch in crochet.
Can I use any type of yarn to practice these basic stitches?
While you can use any yarn, it is highly recommended that beginners start with a “worsted weight” (category 4) acrylic or cotton yarn in a light, solid color. Dark or fuzzy yarns make it very difficult to see where to insert your hook.
What is a “turning chain” and why is it necessary?
A turning chain is a set of chain stitches made at the start of a new row to bring the yarn up to the height of the stitches you are about to work. Without it, your first stitch would be squashed, and your edges would not be straight.
Conclusion
This Basic Crochet Stitches – Tutorial was designed to take you from a complete novice to a confident crafter ready to explore the world of yarn. We have covered the essential chain stitch, the sturdy single crochet, the versatile half double and double crochet, and the finishing slip stitch.
With these tools in your repertoire, there is no limit to the beautiful, handmade items you can create. Remember, every expert was once a beginner who refused to give up after a few tangled loops.