Mache Fabric Bowls – Tutorial: If you have ever looked at a stack of scrap fabric and wondered how to turn those colorful bits into something functional and artistic, you are in the right place. Creating handmade home decor doesn’t have to involve expensive machinery or high-end supplies; sometimes, all you need is a little glue, some patience, and the right technique. In this comprehensive guide, we will explore the world of textile sculpting to help you master the art of organizational aesthetics.
The beauty of a Mache Fabric Bowls – Tutorial lies in its accessibility and the way it transforms limp material into a rigid, sculptural object. Unlike traditional paper mache, which uses strips of newspaper, this method utilizes the texture and patterns of cotton or linen to create a much more durable and sophisticated finish. Whether you are looking to create a catch-all for your keys or a decorative center-piece for your dining table, the DIY fabric bowl process is incredibly rewarding and environmentally friendly.
By following this Mache Fabric Bowls – Tutorial, you will learn how to balance the ratio of stiffener to fabric to ensure your creation is sturdy enough to hold its shape for years. We will dive deep into the specific materials required, the step-by-step molding process, and the finishing touches that make your work look professional rather than “elementary school craft.” Let’s roll up our sleeves and dive into this colorful journey of upcycling fabric into beautiful, useful art pieces.
1. Essential Materials for Your Mache Fabric Bowls – Tutorial
To begin your journey into fabric mache, you first need to gather the right supplies. The core of this project is the fabric itself; I highly recommend using 100% cotton scrap fabric because it absorbs the stiffening agent much more effectively than synthetic blends. You can use old bedsheets, quilting scraps, or even vintage napkins to give your handmade bowls a unique character and history.
The “magic” ingredient in any Mache Fabric Bowls – Tutorial is the stiffener. While you can buy commercial fabric stiffeners, a mixture of PVA glue (white school glue) and water is a cost-effective and reliable alternative. You want a consistency that is thick enough to coat the fibers but thin enough to soak through the layers without leaving large, unsightly clumps of dried glue on the surface.
Next, you will need a mold to define the shape of your decorative fabric bowl. Common household items like glass mixing bowls, ceramic dishes, or even plastic containers work perfectly. However, a crucial tip for any DIY craft tutorial is to protect your mold. Covering your base bowl with plastic wrap (cling film) or a layer of petroleum jelly ensures that your fabric bowl pops off easily once it is dry.
Don’t forget the tools for application. A soft-bristled foam brush or a wide paintbrush is ideal for smoothing out the fabric strips and ensuring the glue is evenly distributed. Working with your hands is also encouraged, as it allows you to feel for air bubbles or dry spots that might compromise the structural integrity of your artistic bowl. Having a pair of sharp fabric scissors on hand is also vital for prepping your strips.
Workspace preparation is often overlooked but essential for a mess-free experience. Since this Mache Fabric Bowls – Tutorial involves liquid adhesives, laying down a silicone mat or a trash bag will save your furniture from permanent drips. Keep a damp cloth nearby to wipe your fingers periodically, as sticky hands can accidentally pull up the fabric layers you’ve already carefully placed on the mold.
Finally, consider the aesthetic elements like fabric patterns and colors. You can choose to coordinate colors for a modern, monochromatic look, or go for a “shabby chic” vibe by mixing floral prints and stripes. The versatility of textile art means that no two bowls will ever look the same, making these perfect for personalized gifts or unique home accents that reflect your personal style.
2. Preparing the Fabric Strips and the Mold
Preparation is the foundation of success in this Mache Fabric Bowls – Tutorial. Start by cutting your chosen textiles into strips or geometric shapes. For a standard medium-sized bowl, strips that are about 1 to 2 inches wide and 6 inches long are usually the easiest to manage. Smaller pieces allow for more detail and fewer wrinkles, especially when navigating the curves of a round mold.
Once your fabric is ready, focus on the mold preparation. As mentioned earlier, the plastic wrap technique is the most popular among crafters. Stretch the film tightly over the outside of your base bowl, smoothing out as many wrinkles as possible. Any bumps in the plastic wrap will be reflected in the interior of your finished fabric mache project, so take an extra minute to get it right.
Now, let’s talk about the glue saturation process. Dip your fabric strips into the glue mixture one by one. You want the fabric to be fully “wet” but not dripping excessively. Using your fingers like a squeegee, gently pull the strip through to remove excess liquid. This ensures your Mache Fabric Bowls – Tutorial results in a lightweight yet strong structure rather than a heavy, soggy mess.
Placement is the next critical step. Begin by placing your first strip across the bottom of the mold and work your way up the sides. Overlapping the strips is essential; each piece should cover at least a quarter of the previous one. This overlapping technique creates a cross-hatched strength that makes the final sculpted bowl durable enough to hold everyday items like jewelry or craft supplies.
Pay close attention to the rim of the bowl. You can either let the fabric strips hang over the edge for a “raw edge” look or fold them over neatly to create a finished rim. In this Mache Fabric Bowls – Tutorial, we recommend going slightly past your desired height, as you can always trim the edges with scissors once the material is partially dry but still flexible.
Lastly, check for air pockets. As you layer the fabric, use your brush or fingers to press firmly against the mold. Air bubbles are the enemy of structural integrity in crafts, as they create weak spots where the bowl might collapse or lose its shape. Once you have applied 3 to 4 layers of fabric, your bowl is ready for the most difficult part of the process: waiting.
3. Drying and Curing for Maximum Durability
Drying time is the secret variable in any Mache Fabric Bowls – Tutorial. Depending on the humidity of your environment and the thickness of your fabric layers, it can take anywhere from 24 to 48 hours for the bowl to fully cure. Resisting the urge to poke or prod the fabric during the first 12 hours is vital to prevent deforming the bowl shape.
To speed up the process, you can place your project in a well-ventilated area or near a gentle heat source, like a sunny window. However, avoid using a high-heat blow dryer directly on the wet glue, as this can cause the PVA adhesive to crack or peel. A slow, natural evaporation process leads to a much stronger bond between the fabric fibers and the stiffening agent.
Once the outside feels bone-dry and hard to the touch, it is time for the “release.” Carefully slide a thin spatula or a dull knife between the plastic wrap and the mold. In this Mache Fabric Bowls – Tutorial, the bowl should pop off with a satisfying click. If it feels soft or “mushy” on the inside, place it back on the mold and give it another few hours of curing time.
After removing the mold, you might find that the interior is still slightly damp. Turn the bowl upside down and let the air circulate inside the cavity. This is also the perfect time to perform any edge trimming. Using sharp scissors, you can even out the top rim to create a perfectly level circle or leave it wavy for an organic art style.
If you want an extra-sturdy result, you can apply a “top coat” of the glue mixture or a clear acrylic sealer once the bowl is removed from the mold. This adds a subtle sheen and provides a protective barrier against dust and moisture. While these bowls are not waterproof, a good sealant for fabric will make them much easier to clean with a dry or slightly damp cloth.
Consistency is key throughout the drying phase. If you notice any areas that feel thinner than the rest, you can actually add “patch” strips even after the first layer has dried. Just re-apply some glue and add the fabric. This layering method ensures that your Mache Fabric Bowls – Tutorial project ends up as a high-quality piece of decor that looks like it came from a boutique.
4. Creative Finishing Touches and Styling Tips
The final stage of our Mache Fabric Bowls – Tutorial is where your personality truly shines. Now that you have a solid, dry structure, you can experiment with embellishments. Adding a bit of embroidery thread around the rim can give it a hand-stitched look, or you can even glue on beads and sequins for a bit of “boho-chic” flair to your recycled fabric art.
For those who love a bit of luxury, applying gold leaf to the interior of the bowl is a fantastic way to elevate the look. The contrast between the matte texture of the fabric on the outside and the metallic shimmer on the inside creates a high-end decorative accessory. This technique is often used by professional artists to turn simple craft projects into gallery-worthy pieces.
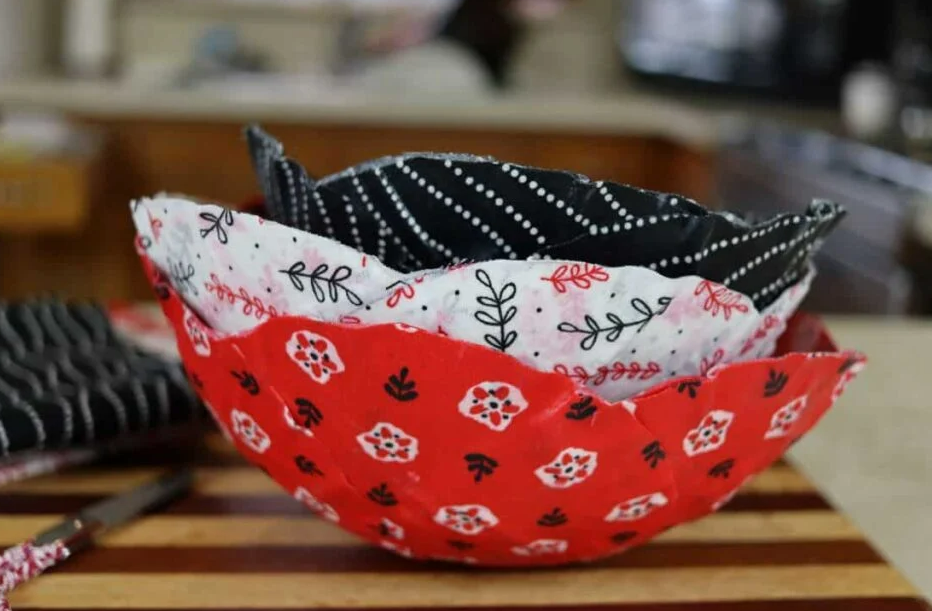
Styling your finished product is just as important as the creation itself. These fabric mache bowls look stunning when grouped in odd numbers—three bowls of varying sizes create a balanced visual. They are perfect for holding “dry” items such as yarn balls, remote controls, or even as a bread basket (if lined with a clean napkin). Remember, these are decorative, not food-safe for direct contact!
If you find that the bottom of your bowl is slightly rounded and it wobbles, don’t worry. You can glue a small circle of felt padding to the base. Not only does this provide a flat surface for the bowl to sit on, but it also protects your wooden furniture from any potential scratches caused by the hardened glue. It’s a small detail that adds a professional finish.
Another great idea for this Mache Fabric Bowls – Tutorial is to play with light. Because fabric is naturally somewhat translucent, placing a battery-operated LED tea light inside the bowl can create a soft, patterned glow. This turns your handmade bowl into a unique lamp or nightlight, highlighting the beautiful weave and patterns of the fabric you chose.
Finally, remember that the skills you learned in this Mache Fabric Bowls – Tutorial are transferable. You can use this same “mache” technique to create trays, wall art, or even holiday ornaments. The world of textile stiffening is vast, and you now have the foundational knowledge to explore it. Keep experimenting with different fabrics like lace, denim, or silk to see how the textures change the final result.
FAQ: Common Questions About Fabric Mache
Can I wash my fabric bowl if it gets dirty?
No, these bowls are not washable. Because they are held together by water-soluble glue, submerging them in water will cause them to soften and lose their shape. To clean them, simply use a dry microfiber cloth or a soft brush to remove dust.
What is the best type of glue to use?
For most crafters, a high-quality white PVA glue is the best option. It is non-toxic, dries clear, and is very affordable. If you want a more rigid finish, you can look for specialized commercial fabric stiffeners available at craft stores.
How many layers of fabric do I need?
Generally, 3 to 5 layers are sufficient for a medium-sized bowl. If you are using very thin fabric like chiffon or lace, you may need more layers to ensure the bowl doesn’t collapse under its own weight.
Are these bowls food-safe?
No. Even if you use non-toxic glue, the fabric can harbor bacteria, and the glue is not rated for food contact. They are best used for holding keys, jewelry, wrapped candies, or as pure decoration.
Can I use this technique with paper instead?
Yes, this is essentially a variation of paper mache. However, fabric offers more durability and a unique texture that paper cannot replicate. You can even mix paper and fabric strips for a “mixed media” look.
Why is my bowl still sticky after 24 hours?
This usually happens due to high humidity or if the glue mixture was too thick. Try moving the bowl to a drier, warmer area. You can also lightly dust the surface with a bit of cornstallk or talcum powder to cut the tackiness if it persists after drying.
Conclusion
Mastering this Mache Fabric Bowls – Tutorial is a fantastic way to combine sustainability with interior design. We have covered everything from selecting the right cotton fabrics and preparing your DIY mold, to the patient process of drying and the creative joy of adding finishing touches. This project proves that with just a few basic materials, you can transform simple scraps into a functional art piece that adds warmth and texture to your home.
The journey of creating handmade home decor is as much about the process as it is about the final product. Each layer of fabric you apply is a step toward a more mindful and creative lifestyle. We hope this guide has inspired you to look at your fabric scraps with new eyes and given you the confidence to start your own textile sculpting project.