Making your own Crochet Kitten Earrings – Tutorial is one of the most rewarding projects for any crafter who loves combining jewelry making with the art of yarn. These tiny, feline-inspired accessories are not only incredibly cute but also serve as the perfect personalized gift for cat lovers or a unique addition to your own jewelry collection. In this comprehensive guide, we will walk you through every step of the process, ensuring you have a fun and successful crafting experience while creating something truly special.
The beauty of a Crochet Kitten Earrings – Tutorial lies in its versatility and the minimal amount of materials required to get started. Unlike large blankets or sweaters, these micro-crochet projects use very little embroidery thread or lace-weight yarn, making them an excellent way to use up your leftover scraps. By mastering a few basic stitches and learning how to work in small scales, you can transform a simple ball of thread into a pair of sophisticated, handmade earrings that look like they came straight from a high-end boutique.
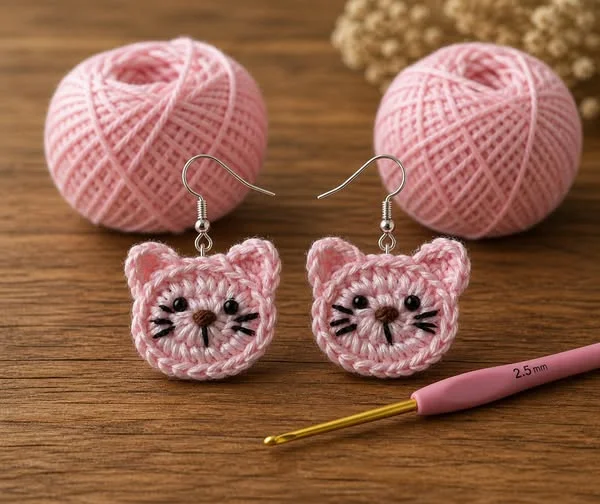
To ensure your Crochet Kitten Earrings – Tutorial results in a professional-looking pair of earrings, we will focus on stitch consistency and the right choice of jewelry findings. Understanding the technical side of how to attach earring hooks and jump rings to your finished crochet piece is just as important as the crochet work itself. This article is designed to be your ultimate resource, covering everything from selecting the right ergonomic hook to the final blocking process that keeps your kittens looking sharp and adorable.
1. Selecting the Right Materials for Your Crochet Kitten Earrings – Tutorial
Choosing the correct yarn is the foundational step of any Crochet Kitten Earrings – Tutorial. Since these are wearable items, you want a material that is lightweight and durable. Mercerized cotton thread (size 10 or 20) is the gold standard for this project because it has a beautiful sheen, doesn’t fray easily, and holds its shape exceptionally well over time.
Your crochet hook size is equally vital to the success of your handmade jewelry. For fine threads, you will typically need a steel hook ranging from 1.0mm to 1.5mm. Using a hook that is too large will result in loose stitches where the stuffing might show through, while a hook that is too small can make the process unnecessarily difficult on your hands and eyes.
Don’t forget the jewelry hardware that turns your crochet art into functional earrings. You will need a pair of hypoallergenic earring hooks, preferably made of sterling silver or surgical steel to avoid skin irritation. Additionally, having a few 4mm jump rings and a pair of needle-nose pliers will make the assembly process much smoother and more secure.
The visual personality of your kittens comes from the embroidery details. A small amount of pink thread for the nose and black thread for the eyes is essential. Some crafters prefer using tiny safety eyes, but for earrings, embroidered eyes are often safer and lighter, ensuring the finished product doesn’t weigh down the wearer’s earlobes during the day.
Stitch markers are your best friend when working on a Crochet Kitten Earrings – Tutorial. Because the pieces are so small, it is very easy to lose track of your round counts. Using a thin piece of contrasting scrap yarn as a running stitch marker will help you keep your place without adding bulk to your delicate work.
Lastly, consider the stuffing material. Since these kittens are miniature, you only need a tiny pinch of polyester fiberfill for each head. Some artists even use leftover yarn ends as stuffing to be more eco-friendly. The goal is to provide enough structure so the kitten looks 3D without overstuffing and distorting the delicate crochet stitches.
2. Mastering the Basic Stitches and Techniques for Miniature Crochet
The most important technique in this Crochet Kitten Earrings – Tutorial is the Magic Ring (or Magic Circle). This method allows you to start crocheting in the round without leaving a hole in the center, which is crucial for the top of the kitten’s head. Mastering the magic ring ensures your work looks professional and prevents any stuffing from escaping.
Most of the kitten’s body will be constructed using the single crochet (sc) stitch. In the world of amigurumi, the single crochet is the building block because it creates a dense, sturdy fabric. When working on a small scale, keeping your tension consistent is the secret to making sure both earrings in the pair look identical in size and shape.
Increases and decreases are what give your Crochet Kitten Earrings – Tutorial its feline silhouette. The invisible decrease (inv dec) is a specialized technique used in toy making to reduce the number of stitches without creating unsightly bumps. Using this method will give your kitten a smooth, rounded finish that looks much cleaner than a standard decrease.
Working in continuous rounds is another key aspect of this project. Instead of joining each row with a slip stitch, you will spiral upwards. This technique eliminates the “seam” line that can sometimes ruin the aesthetic of small crochet projects. It makes the kitten look seamless and more lifelike from every angle.
The ears are usually created using a combination of slip stitches, half-double crochets, or even picot stitches to get that perfect triangular point. Understanding how to transition between stitch heights within a single row allows you to shape the ears directly onto the head, reducing the amount of sewing required at the end.
Finally, let’s talk about weaving in ends. In a Crochet Kitten Earrings – Tutorial, there isn’t much space to hide long tails of yarn. Learning how to weave your ends back through the center of the piece using a tapestry needle will ensure your earrings are durable and won’t unravel with regular wear and tear.
3. Assembling and Customizing Your Crochet Kitten Earrings – Tutorial
Once you have crocheted the head and ears, the assembly phase of the Crochet Kitten Earrings – Tutorial begins. This is where the “character” of your kitten comes to life. Use a sharp embroidery needle to stitch a small “V” shape for the nose. Positioning is key; placing the nose slightly lower can give the kitten a “kawaii” or cute appearance.
Attaching the earring findings requires a bit of finesse. You should identify the center-top of the kitten’s head and pass a jump ring through at least two loops of yarn. Passing it through only one loop might cause the yarn to stretch or tear over time. Use your pliers to close the jump ring tightly so the earring hook stays securely attached.
Customization is the most fun part of any Crochet Kitten Earrings – Tutorial. You can experiment with different yarn colors to mimic specific cat breeds, such as a Siamese with darker ears or a ginger tabby with orange stripes. Adding a tiny crochet bow or a small bell can make your design stand out even more.
If you want your earrings to have a bit more rigidity, you can use a fabric stiffener or a mixture of water and white glue. Lightly dabbing this on the ears will help them stay upright and pointy. This is a pro-tip for crochet jewelry makers who want their pieces to maintain their “freshly made” look for years.
Consider the weight of your finished piece. One of the reasons people love crochet earrings is that they are incredibly lightweight. Even though it is tempting to add beads or charms, always check that the total weight remains comfortable. A successful Crochet Kitten Earrings – Tutorial results in a product that can be worn all day without discomfort.
To finish off your project, give your kittens a gentle “grooming.” Use a pair of sharp embroidery scissors to snip away any tiny fuzzy fibers (fuzzies) that might be sticking out. This simple step of finishing techniques elevates the quality of your work from a hobbyist level to a professional craft level, ready for gifting or selling.
4. Tips for Selling and Gifting Your Handmade Crochet Earrings
If you plan to sell the items you make from this Crochet Kitten Earrings – Tutorial, presentation is everything. Mounting your earrings on custom cardstock display cards makes them look professional and retail-ready. You can even print your logo or social media handle on the card to help build your handmade brand.
Photographing your work is another essential skill. Use natural lighting to capture the true colors of the yarn and the intricate details of your stitches. Since these earrings are small, using a macro lens or the portrait mode on your smartphone can help create a beautiful blurred background, making the Crochet Kitten Earrings the star of the show.
When it comes to pricing your crochet jewelry, don’t undervalue your time. Even though the materials are inexpensive, the skill required for micro-crochet is significant. Calculate your price based on the hours spent on the Crochet Kitten Earrings – Tutorial, plus the cost of high-quality hooks and packaging.
Gifting these earrings is a heartfelt gesture. Because they are handmade, no two kittens will be exactly alike, giving each pair a unique soul. Including a small note about the care instructions (such as “do not submerge in water”) will help the recipient keep their new feline friends in perfect condition.
For those looking to scale their hobby, creating a product collection based on this tutorial is a great idea. You could offer “seasonal kittens” with tiny Santa hats or pumpkins. This keeps your shop or gift-giving fresh and exciting throughout the year, using the same base pattern from the Crochet Kitten Earrings – Tutorial.
Finally, join the online community! Sharing your finished pieces from this Crochet Kitten Earrings – Tutorial on platforms like Instagram or Pinterest is a great way to connect with other crochet enthusiasts. Use relevant hashtags to ensure your work is seen by people who appreciate the art of miniature crochet and handmade accessories.
FAQ – Frequently Asked Questions
1. Is it hard to crochet such small items?
It can be challenging at first because it requires more focus and fine motor skills. However, with a good ergonomic hook and bright lighting, most crafters find they adapt to the scale quickly.
2. What is the best yarn for crochet earrings?
Mercerized cotton thread is highly recommended. It provides the structural integrity needed for jewelry and has a smooth finish that makes the kitten details pop.
3. Can I make these if I am a beginner?
Yes! While micro-crochet is a bit more advanced than standard crochet, the stitches used in this Crochet Kitten Earrings – Tutorial are basic. Patience is your most important tool.
4. How do I clean my crochet earrings if they get dirty?
It is best to spot clean them with a damp cloth and a tiny bit of mild soap. Avoid soaking them, as this can rust the earring hooks or cause the stuffing to clump.
5. How long does it take to make one pair?
Once you are comfortable with the pattern, a pair of kittens usually takes between 1 to 2 hours, including the embroidery and assembly of the jewelry hardware.
6. Do I need to use a wire frame inside the kittens?
No, for earrings this small, a wire frame is unnecessary. The tight tension of your stitches and a little bit of stuffing are enough to keep the shape.
Conclusion
In this Crochet Kitten Earrings – Tutorial, we have covered everything from selecting the finest cotton threads to the delicate art of assembling handmade jewelry.
You’ve learned how to use the magic ring, maintain consistent stitch tension, and add those final personality-filled details like embroidered noses and pointy ears. Creating these miniature wonders is a testament to your patience and creativity, resulting in an accessory that is as unique as it is adorable.