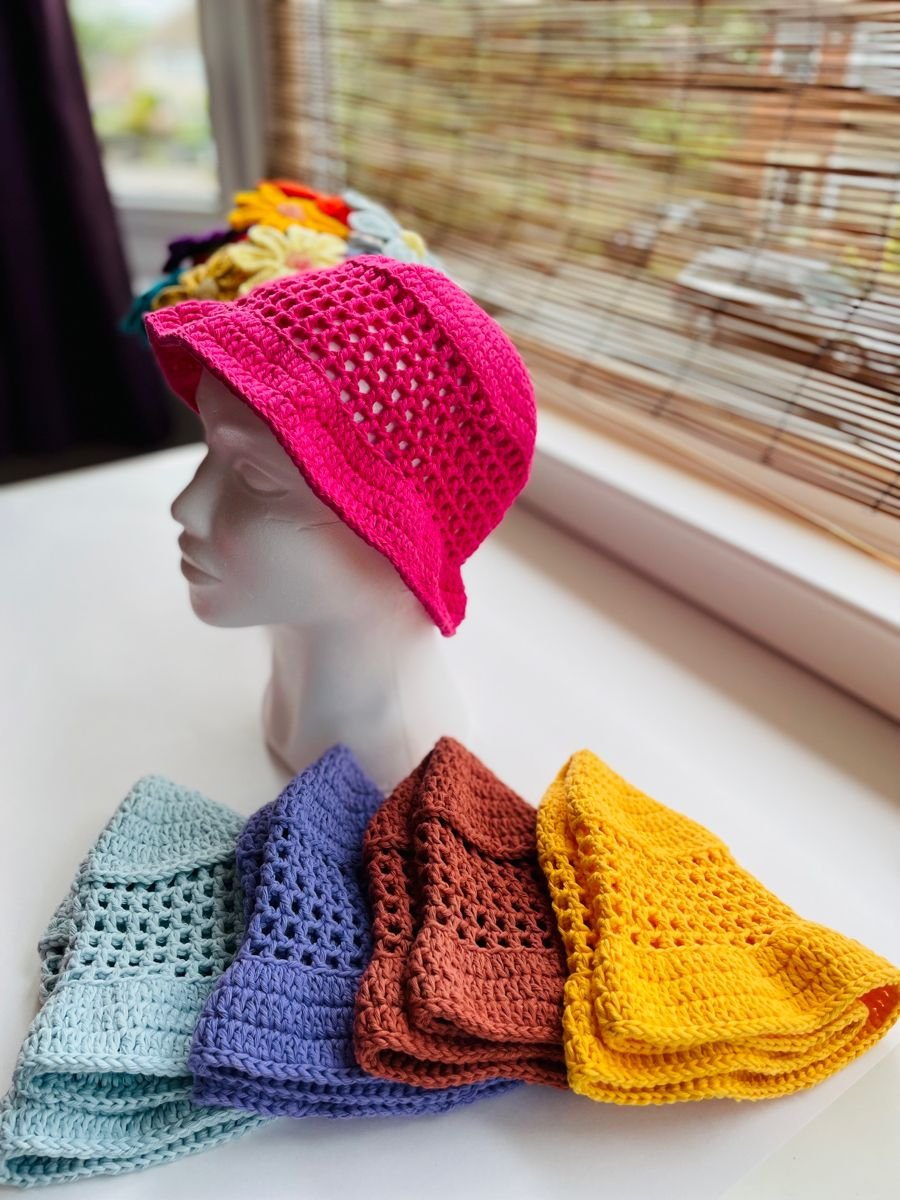
The CROCHET BUCKET HAT – Tutorial is exactly what you need if you are looking to combine retro vibes with modern flair in your handmade wardrobe. This iconic accessory has made a massive comeback, transitioning from a 90s staple to a must-have piece for festival-goers, beach lovers, and street-style enthusiasts alike. Learning how to craft your own version allows for endless customization, ensuring that your final piece is not only stylish but also a perfect reflection of your unique personality.
Starting a CROCHET BUCKET HAT – Tutorial journey is a fantastic way for beginners to practice working in the round while more experienced crafters can experiment with intricate stitch patterns and colorwork. The beauty of this project lies in its simplicity; with just a few basic tools and a bit of patience, you can create a high-quality accessory that rivals high-end boutique finds. Beyond the fashion aspect, the process of crocheting is incredibly meditative, offering a creative escape that results in a functional, wearable piece of art.
In this comprehensive guide, we will dive deep into everything you need to know about the CROCHET BUCKET HAT – Tutorial, from selecting the right yarn fibers to mastering the shaping techniques required for that classic “bucket” silhouette. We will focus on creating a durable, comfortable, and breathable hat that works for all seasons. Whether you want a solid color for a minimalist look or a vibrant, multi-colored pattern to stand out in a crowd, the following steps will provide the technical foundation and creative inspiration you need to succeed.
1. Choosing the Right Materials for Your Crochet Bucket Hat
Selecting the perfect yarn weight is the first step in ensuring your hat has the right structure. For a classic look, a medium weight cotton yarn (number 4) is highly recommended because it provides the necessary stiffness to hold the brim’s shape while remaining breathable. Cotton is also much cooler than acrylic or wool, making it the ideal choice for summer wear.
The crochet hook size you choose will significantly impact the tension and size of your stitches. Most tutorials suggest a 5.0mm (H) hook or a 4.5mm (G+) hook to keep the stitches tight enough so that the hat isn’t too floppy. A tighter gauge ensures that the “holes” between stitches are minimized, providing better sun protection and a more professional finish.
Don’t forget the essential notions like stitch markers, a tapestry needle, and sharp scissors. Stitch markers are particularly vital when working in continuous rounds, as they help you identify the beginning of each row. Without them, it is very easy to lose track of your stitch count, which can lead to an asymmetrical hat that doesn’t fit correctly.
If you are aiming for a trendy, “fuzzy” look, you might consider using chenille yarn or velvet yarn. While these are softer, they can be trickier for beginners because the stitch definition is harder to see. For your first CROCHET BUCKET HAT – Tutorial attempt, sticking to a smooth mercerized cotton will make the learning process much smoother and more enjoyable.
Color choice plays a huge role in the final aesthetic of your project. Neutral tones like beige, cream, or black offer versatility, allowing the hat to match almost any outfit. On the other hand, variegated yarns or scrap yarn projects can create a fun, bohemian “granny square” style hat that is currently very popular on social media platforms.
Lastly, consider the durability of your materials. Since hats are often stuffed into bags or worn in the sun, choosing a washable yarn is a smart move. Check the yarn label for care instructions to ensure your handmade creation stays looking fresh and new even after multiple trips to the washing machine or the beach.
2. Understanding the Basic Construction and Stitch Patterns
The construction of a CROCHET BUCKET HAT – Tutorial generally consists of three main parts: the crown, the body, and the brim. The crown is a flat circle that determines the diameter of the hat. To get this right, you will start with a magic ring (or magic circle), which allows you to pull the center tight and eliminate any unwanted holes at the top.
Once the magic ring is secure, you will work in rounds using increases. An increase means placing two stitches into a single stitch from the previous row. By systematically adding stitches, the circle grows outward while remaining flat. Common stitches used here include the single crochet (sc) for a dense fabric or the double crochet (dc) for a faster project.
After the crown reaches the desired width (usually about 6 to 7 inches for an adult), you stop increasing and move on to the body. This is where you simply work one stitch into every stitch from the previous row. Because you aren’t adding any more width, the piece will naturally begin to curve downward, forming the sides of the hat that cover your head.
During the body phase, you can get creative with textured stitches. Many crafters love using the waistcoat stitch or the half double crochet (hdc) to add a bit of visual interest. You can also introduce color changes here to create stripes or a checkered pattern, which are hallmark designs for a stylish CROCHET BUCKET HAT – Tutorial.
The final structural element is the brim. To create the flare of the bucket hat, you must reintroduce increases. Depending on how wide or “wavy” you want the brim to be, you might increase in every third or fourth stitch. A wide-brimmed bucket hat offers more sun protection, while a shorter brim gives a more sporty, modern look.
To finish the hat, many experts recommend a final row of slip stitches or a crab stitch (reverse single crochet) around the edge of the brim. This adds a decorative “border” and provides extra stability, preventing the edge from curling or losing its shape over time. Proper weaving in of ends with your tapestry needle ensures the hat won’t unravel.
3. Mastering Sizing and Tension for a Perfect Fit
One of the biggest challenges in any CROCHET BUCKET HAT – Tutorial is getting the size exactly right. Standard adult sizes usually fall between 21 and 23 inches in circumference. To ensure accuracy, it is highly recommended to create a gauge swatch before you begin the actual hat. This allows you to see if your tension matches the pattern’s requirements.
If your tension is too loose, the hat will end up oversized and may slip over your eyes. Conversely, if your tension is too tight, the hat will be uncomfortable and might not stay on your head. You can adjust your tension by switching to a smaller or larger hook or by consciously loosening your grip on the yarn as you work through your crochet stitches.
Measuring as you go is the secret to success. Use a flexible measuring tape to check the diameter of the flat crown. A common formula is to divide your target head circumference by $3.14$ (Pi) to find the required diameter of the flat circle. For example, a 22-inch head needs a crown that is approximately 7 inches wide before you stop increasing.
For those making hats for children or toddlers, you will simply stop the increase rounds sooner. Most CROCHET BUCKET HAT – Tutorial guides provide a size chart, but since everyone’s head shape is different, trying the hat on as you complete the body section is the best way to guarantee a custom fit that feels snug but not restrictive.
Keep in mind that natural fibers like cotton can stretch slightly over time. If you find your hat is just a tiny bit too big, you can sometimes “shrink” it slightly by washing it in warm water and drying it. However, it’s always better to aim for a slightly snugger fit during the crochet process to account for the natural give of the yarn.
Don’t be discouraged if your first attempt isn’t perfect. Crocheting is a skill that improves with repetition. If the brim looks too “ruffly,” you likely increased too frequently. If it’s too flat, you didn’t increase enough. The beauty of this CROCHET BUCKET HAT – Tutorial is that you can always “frog” (unravel) a few rows and try again until the shape is just right.
4. Tips for Customization and Professional Finishing
The “bucket” style is a canvas for your creativity, and a CROCHET BUCKET HAT – Tutorial wouldn’t be complete without discussing personal touches. You can add appliques like small crochet flowers, butterflies, or even “devil horns” for a more edgy look. Adding a drawstring or a ribbon through the stitches of the body can also make the size adjustable.
Blocking your crochet is a professional technique that can transform a handmade item into a store-quality accessory. By lightly steaming the hat or wetting it and shaping it over a bowl or a mannequin head, you can “set” the stitches. This is particularly helpful for the brim, ensuring it stays perfectly flat or maintains a consistent curve.
For those interested in SEO-optimized crafting, documenting your process with clear photos and sharing them on social media is a great way to engage with the community. Use hashtags like #CrochetBucketHat and #DIYFashion to reach other enthusiasts. Your unique twist on the CROCHET BUCKET HAT – Tutorial could inspire someone else to pick up a hook for the first time.
Consider experimenting with mixed media. You can sew a fabric lining inside the hat using a coordinating cotton print. This not only makes the hat more comfortable for people with sensitive skin but also adds an element of “luxury” and high-end craftsmanship that makes your handmade gifts stand out from the rest.
If you are making these hats to sell, consistency is key. Developing your own “signature” brim style or color palette can help you build a brand. Ensure that every CROCHET BUCKET HAT – Tutorial you follow results in a product that is free of knots and has neatly hidden joins, as customers value high-quality finishing and attention to detail.
Finally, remember that the most important part of this CROCHET BUCKET HAT – Tutorial is to have fun. The world of fiber arts is inclusive and ever-evolving. Whether you are making a hat for yourself, a friend, or your online shop, the love and effort you put into every stitch will surely shine through in the finished product.
FAQ – Frequently Asked Questions
How long does it take to finish a crochet bucket hat?
For an intermediate crafter, a standard hat usually takes between 3 to 5 hours. Beginners might need a bit more time to get used to the increases and shaping, but it is generally considered a “weekend project.”
Can I use acrylic yarn for this tutorial?
Yes, you can, but keep in mind that acrylic doesn’t “breathe” as well as cotton. This might make the hat quite warm on a hot day. However, acrylic is often softer and comes in a wider variety of neon colors.
What is the best stitch for a sturdy brim?
The single crochet is the best choice for the brim because it creates a dense, stiff fabric. If you want even more structure, you can crochet over a piece of “fishing line” or millinery wire in the final round.
How do I clean my handmade crochet hat?
It is best to hand wash your hat in cool water with a mild detergent. Lay it flat to dry over a shaped object (like an upside-down bowl) to help it retain its circular form. Avoid wringing it out, as this can distort the stitches.
My brim is too wavy, what did I do wrong?
Waviness is caused by too many increases. If you want a flatter brim, try increasing less frequently (for example, every 10 stitches instead of every 5). If the brim is “pointing down” too much, you need more increases.
Can I make a bucket hat with a “Granny Square” design?
Absolutely! You can crochet 5 square panels and join them to form the crown and body, then add a traditional brim around the bottom edge. It’s a very popular variation of the CROCHET BUCKET HAT – Tutorial.
Conclusion
In this CROCHET BUCKET HAT – Tutorial, we have covered the essential steps to creating a stylish and functional accessory. We discussed the importance of choosing high-quality cotton yarn, mastering the magic ring, and understanding how increases work to shape the crown and the brim.
We also touched on the significance of tension and gauge to ensure your hat fits perfectly every time. By following these structured steps, you can create a durable piece that is both a fashion statement and a testament to your crafting skills.