Creating a Mini Crochet Bag Keychain – Tutorial is one of the most rewarding quick projects for crafters who love combining functionality with adorable aesthetics. These tiny accessories have taken the fashion world by storm, appearing on everything from high-end designer backpacks to simple sets of house keys. Because they require very little yarn and even less time, making a Mini Crochet Bag Keychain is the perfect way to use up your scrap basket while producing something that people genuinely love to receive as gifts.
When you dive into this Mini Crochet Bag Keychain – Tutorial, you are not just learning how to make a decoration; you are mastering the art of miniature construction. Working in a smaller scale helps improve your tension control and your ability to see stitches clearly, even when using thinner threads or smaller hooks. This project is ideal for beginners who want to move beyond basic scarves and into the world of amigurumi-style shaping without the commitment of a large-scale plushie.
The beauty of following a Mini Crochet Bag Keychain – Tutorial lies in its versatility and the professional finish you can achieve with minimal tools. Whether you want to create a tiny boho-style tote, a miniature backpack, or a classic clutch, the foundational techniques remain the same. In the following sections, we will explore the essential materials, the step-by-step process of building the base, and how to add those final handcrafted touches that make your keychain stand out in a crowded marketplace or craft fair.
1. Choosing the Best Materials for Your Mini Crochet Bag Keychain
Selecting the right yarn is the first step in ensuring your Mini Crochet Bag Keychain – Tutorial results in a crisp, durable accessory. For miniature work, a mercerized cotton yarn is often the top choice because it has a beautiful sheen and excellent stitch definition. Unlike fuzzy acrylics, cotton won’t pill easily when it is tossed around in a pocket or a purse, keeping your miniature crochet bag looking brand new for longer.
Your crochet hook size is equally important to the success of this tutorial. Generally, you should use a hook that is slightly smaller than what the yarn label recommends; this creates a tight stitch gauge which prevents the bag from stretching out or losing its shape. A 2.5mm or 3.0mm hook is typically the “sweet spot” for most sport-weight yarns used in these tiny crochet projects.
Don’t forget the hardware, as a Mini Crochet Bag Keychain isn’t complete without a sturdy attachment. You can find lobster claws, split rings, or ball chains at most craft stores. Choosing a high-quality metal finish, like antique brass or rose gold, can instantly elevate your DIY crochet keychain from a simple hobby project to a professional-looking product ready for an Etsy shop.
Stitch markers are your best friend when working in rounds, which is a common technique in any Mini Crochet Bag Keychain – Tutorial. Because the pieces are so small, it is very easy to lose track of where a row ends. Using a simple plastic clip or a piece of contrasting scrap yarn will save you the frustration of having to frog your work and restart your crochet pattern.
Tapestry needles with a blunt tip are essential for weaving in ends and sewing the tiny straps onto your bag. Since the space is limited, a smaller needle allows for more precision when hiding your yarn tails inside the crochet stitches. Sharp scissors are also a must for clean cuts, preventing the yarn from fraying while you finish the final assembly of your miniature accessory.
Lastly, consider adding small embellishments like tiny buttons, beads, or even a small tassel. These details add personality to your Mini Crochet Bag Keychain and allow you to customize the design for different seasons or styles. Learning to incorporate these elements is a key part of mastering a Mini Crochet Bag Keychain – Tutorial and expanding your creative horizons.
2. Mastering the Foundation and Base Construction
The foundation of any great Mini Crochet Bag Keychain – Tutorial begins with a solid base, usually started with a magic ring or a small foundation chain. If you want a round bucket-style bag, the magic ring is the preferred method because it leaves no hole at the bottom. This ensures that even the tiniest items you might put inside—like a stray coin or a lip balm—won’t fall through the crochet fabric.
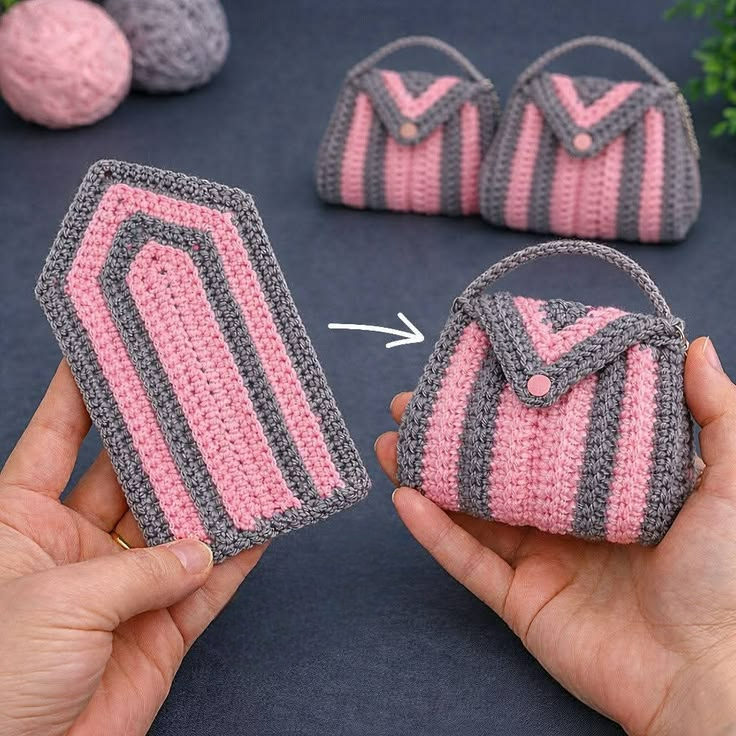
If you prefer a rectangular or “tote” look for your Mini Crochet Bag Keychain, you will start by crocheting a short chain and then working around both sides of that chain. This technique, often called an oval base, provides a flat bottom that allows the bag to sit upright. Mastering this shape is a fundamental skill in any crochet tutorial focused on bags and containers.
Consistency in your single crochet stitches is what gives the bag its structural integrity. You want your stitches to be firm so the bag maintains its “3D” look even when it isn’t filled with anything. In this Mini Crochet Bag Keychain – Tutorial, we emphasize maintaining a steady tension to ensure the sides of the bag rise evenly without bulging or leaning to one side.
As you move from the base to the body of the keychain bag, you will stop increasing your stitches and simply work “even” in rounds. This transition is where the magic happens, as the flat circle or oval begins to cup upward, forming the walls of your miniature craft. It is a very satisfying moment for any crocheter to see their flat work transform into a functional object.
Colors can be swapped here to create stripes or a color-block effect. Using scrap yarn in different hues is a great way to make every Mini Crochet Bag Keychain unique. When changing colors, always complete the final pull-through of the last stitch with the new color to keep the transition seamless and professional, a tip often highlighted in advanced crochet tutorials.
Check your stitch count frequently during this stage. Even in a project as small as a Mini Crochet Bag Keychain, missing a single stitch can lead to a lopsided result. Taking the time to count your sc stitches at the end of each round ensures that the top of your bag will be perfectly level when it comes time to add the handles and the keyring attachment.
3. Adding Handles and Finishing Techniques
The handles are what truly define the character of your Mini Crochet Bag Keychain. You can opt for short, sturdy loops for a handbag look or a single long strap to mimic a crossbody bag. In this Mini Crochet Bag Keychain – Tutorial, we recommend using a simple chain stitch reinforced with slip stitches to make the handles durable enough to withstand daily use on a set of keys.
Attaching the handles requires a bit of precision. You should use your stitch markers to map out exactly where the straps will go, ensuring they are perfectly centered. Once you are happy with the placement, you can either crochet them directly onto the edge or use a tapestry needle to sew them on securely with a whip stitch.
Reinforcing the top edge of your Mini Crochet Bag Keychain with a round of slip stitches is a pro-level tip. This creates a decorative “braid” look around the opening and prevents the top of the bag from stretching out over time. It is these small finishing touches that separate a beginner’s work from a master’s crochet tutorial result.
Now is the time to attach the metal keychain hardware. You can loop the yarn directly through the ring during the last row of crocheting, or use a separate jump ring to connect the bag to the keychain. If the bag is meant to hold something specific, like earbuds, make sure the attachment is strong enough to support the extra weight.
Weaving in your ends is the final “invisible” step of the Mini Crochet Bag Keychain – Tutorial. Because the item is small and will be handled frequently, it is vital to weave the yarn tails through several stitches in different directions. This “locking” method ensures that your handmade keychain won’t unravel, even with heavy use on a daily basis.
Take a moment to “block” your mini bag by gently shaping it with your fingers. Since it is small, you don’t usually need water or pins; just a bit of manual manipulation will help the crochet stitches settle into their final home. Your Mini Crochet Bag Keychain is now ready to be gifted, sold, or clipped onto your favorite bag as a badge of crafty pride.
4. Scaling Your Craft and SEO for Bloggers
Once you have mastered the Mini Crochet Bag Keychain – Tutorial, you might want to share your creations with the world. For content creators and bloggers, using the right keywords and SEO strategies is essential to getting your work seen. High-quality photos of your miniature crochet are the first thing that will draw people in, so make sure to use natural lighting.
In the world of digital marketing for crafters, search terms like “easy crochet tutorial”, “beginner amigurumi”, and “crochet gift ideas” are highly competitive but valuable. By focusing on a specific niche, like the Mini Crochet Bag Keychain, you can rank higher in search results because you are providing specialized, high-demand content that solves a specific problem for the reader.
Structuring your blog post with clear H2 headers and bullet points makes your tutorial easy to read on mobile devices. Most users looking for a Mini Crochet Bag Keychain – Tutorial will likely be crocheting while looking at their phones, so a clean, user-friendly layout is just as important as the quality of the instructions themselves.
Social media integration is another key component of SEO. Sharing your crochet keychain on platforms like Pinterest or Instagram with the hashtag #MiniCrochetBag can drive significant traffic back to your website. Google notices this “social signal,” which can help improve your overall search engine ranking for the Mini Crochet Bag Keychain – Tutorial.
Engagement is the final piece of the puzzle. Encouraging your readers to leave comments or share photos of their finished keychains creates a community around your craft blog. Responding to these comments with helpful advice further establishes you as an authority in the crochet community, making your site a go-to resource for unique tutorials.
Remember that SEO is a marathon, not a sprint. Continually updating your Mini Crochet Bag Keychain – Tutorial with new photos, seasonal color ideas, or video snippets will keep the content fresh and relevant. This consistency tells search engines that your site is an active, reliable source of crochet inspiration and technical knowledge for makers everywhere.
FAQ – Frequently Asked Questions
How long does it take to complete a Mini Crochet Bag Keychain?
On average, a experienced crocheter can finish a Mini Crochet Bag Keychain in about 30 to 45 minutes. For beginners, it might take about an hour as they get used to working with a smaller hook and maintaining tension.
What is the best yarn for this Mini Crochet Bag Keychain – Tutorial?
Cotton yarn (size 2 or 3) is generally the best choice. It provides the stiffness needed for the bag to hold its shape and offers great stitch definition, which is crucial for miniature items.
Can I sell the bags I make from this tutorial?
Absolutely! Handmade keychains are very popular at craft fairs and on platforms like Etsy. Just make sure to price them fairly, taking into account both your material costs and the time spent on the handcrafted details.
Do I need to line the mini bag with fabric?
Since these bags are very small, lining is usually not necessary unless you are using a very loose stitch. For a Mini Crochet Bag Keychain, a tight single crochet stitch is usually enough to keep items secure without any lining.
What do people usually keep inside these tiny bags?
They are perfect for holding emergency cash, a single key, lip balm, or even small wireless earbuds. Some people also use them to hold “worry stones” or small charms.
How do I clean my crochet keychain if it gets dirty?
If you used cotton yarn, you can gently hand wash the keychain with mild soap and lukewarm water. Avoid soaking the metal hardware for too long to prevent rusting, and always air dry the crochet bag thoroughly.
Conclusion
This Mini Crochet Bag Keychain – Tutorial has covered everything from selecting the perfect mercerized cotton to mastering the foundation chain and adding professional finishing touches. We have explored how these tiny projects serve as excellent scrap-busters and how they can even help you grow your digital presence through SEO-optimized crafting content. By following these steps, you now have the skills to create an endless variety of miniature accessories that are as functional as they are cute.
We hope this guide inspires you to pick up your hook and start experimenting with different colors and textures. Whether you are making these for yourself or as part of a creative business, the joy of handmade items is in the process and the personal touch you add. Please leave your sincere opinion and suggestions in the comments below! We would love to hear what colors you chose or if you have any ideas for the next crochet tutorial.