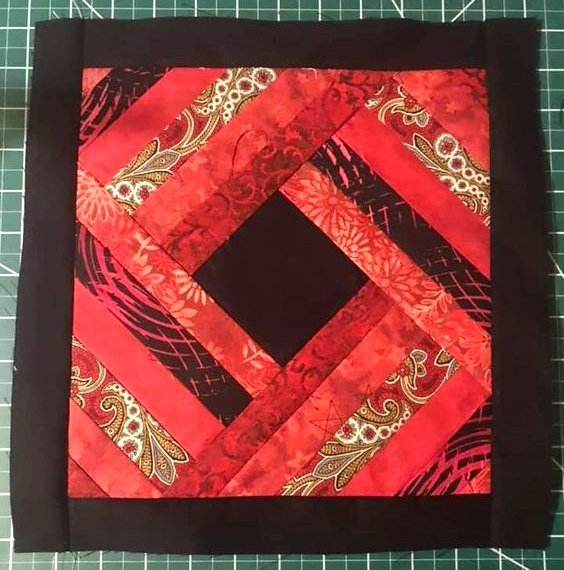
The Rotating Quilt Block – Tutorial is an exciting journey into the world of geometric precision and visual movement that every quilter should experience at least once. If you are looking to elevate your sewing projects from simple designs to mesmerizing masterpieces, learning how to master the Rotating Quilt Block is the perfect next step. This specific technique allows you to create a sense of motion across your quilt top, making the fabric appear as if it is spinning or shifting depending on the angle from which it is viewed.
Creating a Rotating Quilt Block requires a blend of careful planning, accurate cutting, and a bit of creative flair when it comes to color theory. Many quilters enjoy this pattern because it utilizes half-square triangles (HSTs) and quarter-square triangles in a way that maximizes the contrast between different fabric prints. By focusing on this Rotating Quilt Block – Tutorial, you will gain the confidence to handle complex layouts while maintaining the cozy, handmade charm that makes quilting such a beloved art form.
In this comprehensive Rotating Quilt Block – Tutorial, we are going to break down the technical barriers that often intimidate beginners and intermediate sewists alike. We will explore the essential tools, the step-by-step assembly process, and the SEO-friendly quilting tips that help your work stand out in the digital crafting community. Whether you are aiming to create a modern wall hanging or a traditional king-sized quilt, the principles of the Rotating Quilt Block remain a foundational skill that opens up endless possibilities for custom textile design.
1. Essential Materials for the Rotating Quilt Block – Tutorial
Before you sit down at your sewing machine, gathering the right supplies is the first step toward a successful Rotating Quilt Block. High-quality cotton quilting fabric is the gold standard for this project because it holds its shape well and resists fraying during the intricate piecing process. You will want at least two contrasting colors—one light and one dark—to ensure the “rotation” effect is clearly visible to the eye.
A sharp rotary cutter and a self-healing cutting mat are non-negotiable tools for this Rotating Quilt Block – Tutorial. Precision is the secret ingredient here; even a slight deviation in your cuts can throw off the alignment of the entire quilt block. Using an acrylic ruler with clear grid lines will help you achieve those crisp edges that make the rotating pattern look professional and polished.
Don’t forget the importance of a neutral thread and a fresh needle in your sewing machine. Since you will be sewing many seams that intersect at the center, using a 60wt or 50wt cotton thread helps reduce bulk at the corners. This ensures that your Rotating Quilt Block remains flat and smooth, which is vital when you eventually move on to the quilting and binding phase of your project.
To keep your fabric from shifting, high-quality quilting pins or fabric clips are highly recommended. As you follow this Rotating Quilt Block – Tutorial, you will find that “nesting” your seams is much easier when the fabric is securely held in place. Precise pinning prevents the “creep” that often happens when sewing multiple layers of batting and fabric together.
A reliable steam iron is another “must-have” for any serious quilter. Pressing your seams as you go—rather than waiting until the end—is what differentiates a flat, beautiful Rotating Quilt Block from one that is lumpy or distorted. We always recommend pressing to the dark side to prevent the seam allowance from showing through the lighter fabrics of your quilt design.
Lastly, having a quilt design board or a flat surface to lay out your pieces is incredibly helpful. This allows you to visualize the rotating effect before you commit to sewing the pieces together. In this Rotating Quilt Block – Tutorial, we emphasize the “lay before you sew” method to catch any orientation errors early, saving you the headache of using a seam ripper later.
2. Step-by-Step Assembly of the Rotating Quilt Block
The heart of this Rotating Quilt Block – Tutorial lies in the construction of the individual units. Most rotating designs are built using a series of square-in-a-square units or triangles. To start, you will cut your fabric into precise squares based on your desired finished size, typically adding a 1/4 inch seam allowance to every measurement to ensure the final dimensions are accurate.
Once your squares are cut, you will begin creating half-square triangles, which are the building blocks of the Rotating Quilt Block. Place two contrasting squares right sides together and draw a diagonal line from corner to corner. Sew a seam exactly 1/4 inch away from both sides of that line, then cut along the drawn line to reveal two perfectly matched HST units for your quilt pattern.
After sewing your units, it is time to trim them down to the exact size required for your Rotating Quilt Block. Using a squaring ruler is the best way to ensure every piece is identical. This step is often skipped by beginners, but in our Rotating Quilt Block – Tutorial, we consider it essential for achieving the geometric harmony that makes the rotating motion look so fluid and intentional.
Now comes the fun part: the layout. Arrange your trimmed units on your workspace in a circular or pinwheel orientation. The key to the Rotating Quilt Block is the way the colors lead the eye from the center outward. Ensure that the dark values of your fabric scraps or new yardage point in a consistent clockwise or counter-clockwise direction to establish the visual rotation.
When you are ready to sew the units together, work in rows. Sew the top two units together, then the bottom two, forming two halves of your Rotating Quilt Block. Finger-pressing the seams initially can help you check the alignment before you take them to the ironing board for a final, hot press. This methodical approach ensures your center points are sharp and perfectly joined.
Finish the block by joining the two halves. This final seam is the most important one in the Rotating Quilt Block – Tutorial, as it locks in the entire design. Align the center seams perfectly, pin them securely, and sew with a steady straight stitch. Once opened and pressed, you will see the stunning Rotating Quilt Block come to life, ready to be incorporated into a larger patchwork quilt.
3. Mastering Color Contrast and Fabric Selection
Choosing the right colors is what truly makes a Rotating Quilt Block pop. If the colors are too similar in value (lightness or darkness), the “rotation” effect will be lost, and the block will look like a jumble of shapes. For this Rotating Quilt Block – Tutorial, we suggest using the color wheel to find complementary colors, such as blue and orange or purple and yellow, to create maximum impact.
Texture also plays a huge role in modern quilting. Mixing solid fabrics with subtle tone-on-tone prints can add depth to your Rotating Quilt Block without distracting from the geometric lines. Avoid using very large, busy prints for the main rotating elements, as they can “break” the visual line of the triangles and hide the hard work you put into your precision piecing.
In this Rotating Quilt Block – Tutorial, we also love the idea of using a “gradient” or ombré fabric. By using a fabric that fades from light to dark, you can create a 3D quilt effect that makes the block look like it is physically spinning off the surface. This advanced quilting technique is a favorite among artists looking to push the boundaries of traditional patchwork designs.
If you prefer a more scrappy look, the Rotating Quilt Block is a fantastic way to use up your fabric stash. Just make sure to maintain a consistent “value” for each part of the rotation. For example, if the “spinning” arms of the block are all made of various dark scraps and the background is all light scraps, the rotating quilt pattern will still be clearly defined despite the variety of prints.
Consider the background fabric as the stage upon which your block performs. A crisp white, deep navy, or charcoal grey can act as a “negative space” that allows the Rotating Quilt Block to be the star of the show. In many SEO-optimized quilt blogs, you will see that minimalist backgrounds are currently trending because they highlight the complexity of the quilt construction.
Don’t be afraid to experiment with metallic fabrics or batiks in your next Rotating Quilt Block – Tutorial project. Batiks are especially wonderful because they have no “wrong side,” making them very forgiving when you are flipping and rotating pieces to find the perfect layout. The goal is to create a visual rhythm that keeps the viewer’s eye moving across the quilt surface.
4. Advanced Tips for Professional Quilting Results
To take your Rotating Quilt Block to the next level, you must pay attention to the “points.” A professional-looking quilt has points that are “sharp,” meaning they aren’t cut off by the seam allowance. In this Rotating Quilt Block – Tutorial, we recommend using a scant 1/4 inch seam. This tiny adjustment accounts for the fold of the fabric and ensures your blocks stay the exact size they are supposed to be.
Another professional secret is the use of fabric starch. Spraying your fabric before cutting makes it slightly stiff, almost like paper. This is incredibly helpful when working with the bias edges of triangles in a Rotating Quilt Block. Starch prevents the fabric from stretching out of shape, which is the most common reason why quilt blocks end up wonky or distorted.
If you find that your center is becoming too bulky, you can “spin” your seams at the intersection. This involves clipping a few stitches in the seam allowance (not the main seam!) to allow the fabric to lay in a circular pattern on the back. This quilting hack is a game-changer for the Rotating Quilt Block – Tutorial, as it allows your machine to glide over the center without skipping stitches.
For those who want to turn their blocks into a full quilt top, consider adding sashing between the blocks. Sashing acts as a frame, giving each Rotating Quilt Block room to breathe. You can even use a “cornerstone” block at the intersections of the sashing to add another layer of detail to your handmade quilt.
When it comes to the actual quilting process (the stitching that holds the layers together), “stitching in the ditch” is a classic choice for this pattern. However, if you want to emphasize the movement, try free-motion quilting in a spiral pattern starting from the center of the Rotating Quilt Block. This reinforces the theme of the tutorial and adds beautiful texture to the finished piece.
Finally, always document your journey. Taking photos of your Rotating Quilt Block – Tutorial progress is great for sharing on social media or your own craft blog. Using hashtags like #QuiltingTutorial, #RotatingQuilt, and #ModernPatchwork helps you connect with other makers and builds a supportive community around your creative hobby.
FAQ – Frequently Asked Questions
What is a Rotating Quilt Block?
A Rotating Quilt Block is a patchwork design where the units (usually triangles or squares) are arranged in a specific orientation to create the visual illusion of movement or spinning. It is a popular technique in both traditional and modern quilting.
Is the Rotating Quilt Block – Tutorial suitable for beginners?
Yes! While it looks complex, the block is primarily made of basic shapes like half-square triangles. As long as you focus on accurate cutting and a consistent 1/4 inch seam allowance, beginners can definitely achieve great results.
How do I make sure my quilt block is perfectly square?
The best way is to trim each individual unit (like the HSTs) before sewing them together. Using a specialized squaring ruler and a sharp rotary cutter ensures that the final assembly goes smoothly and the block remains square.
What are the best fabrics for a Rotating Quilt Block?
100% quilting cotton is recommended due to its stability. To make the design stand out, choose fabrics with high contrast in value—meaning one should be significantly lighter or darker than the other.
Can I resize the Rotating Quilt Block?
Absolutely. You can scale the initial squares up or down to make blocks of any size. Just remember to adjust your cutting measurements while maintaining the standard 1/4 inch seam allowance throughout the process.
Why does my rotating quilt block look lumpy in the middle?
Lumpiness is usually caused by too many seams meeting at a single point. To fix this, try “spinning” your seams at the back or pressing them open to distribute the fabric bulk more evenly across the center intersection.
Conclusion
In this Rotating Quilt Block – Tutorial, we have explored everything from selecting the perfect high-contrast fabrics to the technical nuances of precision piecing and seam management. We learned that the secret to a stunning Rotating Quilt Block lies in the preparation—accurate cutting, diligent pressing, and a thoughtful layout. By mastering the half-square triangle and understanding how to orient your units to create a sense of motion, you have added a powerful and versatile tool to your quilting repertoire.
The beauty of the Rotating Quilt Block is that it can be adapted to any style, whether you love the rustic feel of upcycled denim or the clean lines of modern minimalism. We hope this guide has inspired you to dust off your sewing machine and start creating your own spinning masterpieces. Remember, every stitch is a step forward in your creative journey, and there is no “wrong” way to express your artistic vision through textile arts.