This Crochet Bucket Hat – Tutorial is designed to guide you through the process of creating one of the most versatile and stylish accessories in modern fashion. Whether you are looking to protect yourself from the sun or simply want to add a handmade touch to your streetwear aesthetic, learning how to master a Crochet Bucket Hat – Tutorial is a rewarding journey for any maker. In this guide, we will explore the essential techniques, materials, and creative steps required to produce a high-quality piece that looks professional and feels comfortable.
The beauty of a Crochet Bucket Hat – Tutorial lies in its simplicity and the endless room for customization it offers. From choosing the perfect yarn weight to selecting a hook size that matches your tension, every decision you make contributes to the final silhouette of the hat. Many beginners find that this project is the perfect entry point into garment making because it involves basic geometric shapes—specifically circles and cylinders—that come together to form a functional 3D object.
As we dive deeper into this Crochet Bucket Hat – Tutorial, keep in mind that patience and consistency are your best friends. We will focus on stitch definition, increasing techniques, and how to achieve a clean finish that sets your work apart. By following these steps, you won’t just be making a hat; you’ll be developing a foundational understanding of crochet anatomy that can be applied to many other projects in the future.
1. Choosing Your Materials and Understanding the Crochet Bucket Hat – Tutorial Basics
When starting your project, the first thing you need to consider is the fiber content of your yarn. For a classic, breathable summer hat, 100% cotton yarn is the gold standard because it holds its shape well and doesn’t trap excessive heat. If you prefer a softer, more draped look, a cotton-acrylic blend can offer the best of both worlds, providing durability while remaining easy on the hands during the stitching process.
The hook size you choose is equally critical to the success of your Crochet Bucket Hat – Tutorial. Most medium-weight yarns (Category 4) pair beautifully with a 5.0mm (H) hook, but if you tend to crochet loosely, you might want to drop down to a 4.5mm hook. Having a tighter tension ensures that the “holes” between stitches are minimized, giving the hat a more solid, sun-protective structure that looks polished.
Beyond the basics, you will also need a few essential notions to keep your work organized. A stitch marker is indispensable for tracking the beginning of your rounds, especially when working in a continuous spiral. You will also need a tapestry needle for weaving in your ends and a pair of sharp scissors. Having these tools ready before you begin will make the entire process much smoother and more enjoyable.
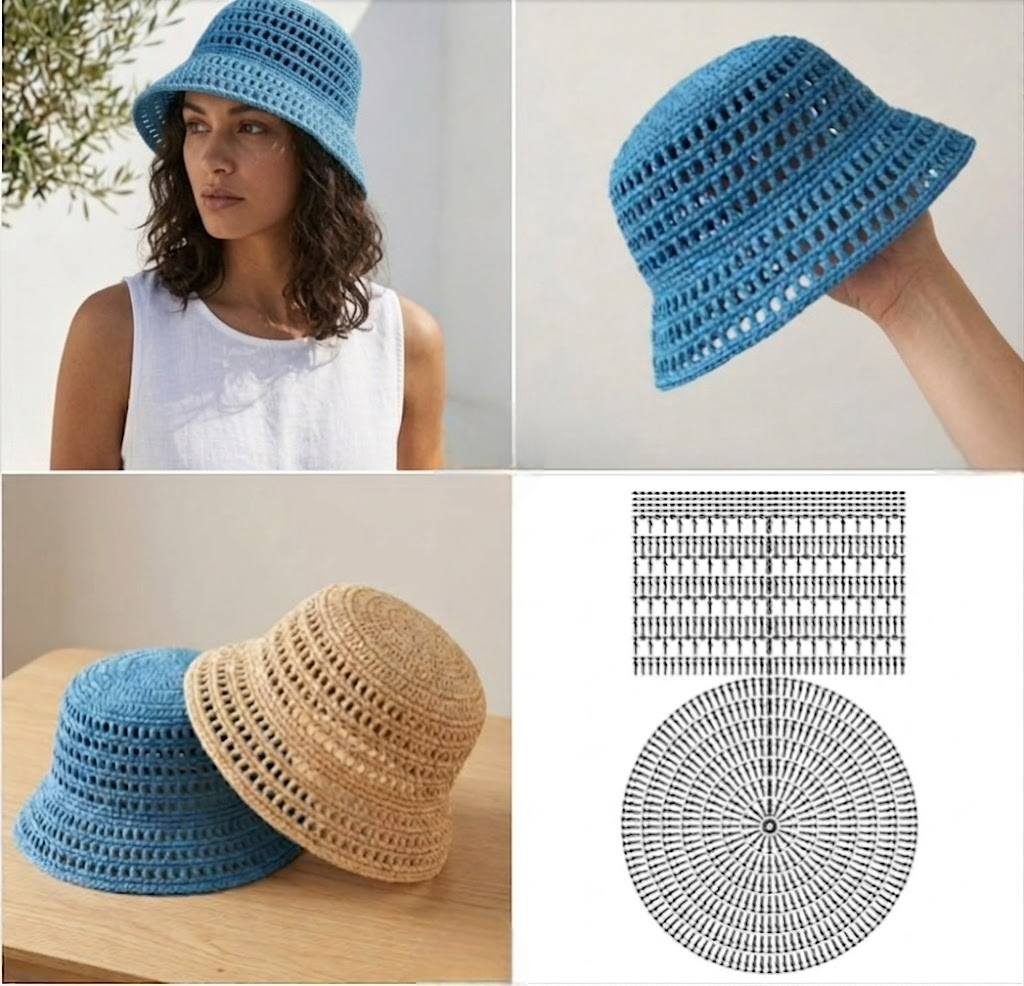
Before you make your first loop, it is helpful to understand the anatomy of a bucket hat. It consists of three main parts: the crown (the flat top circle), the body (the cylindrical side walls), and the brim (the flared edge). This Crochet Bucket Hat – Tutorial will break down each section individually so you can visualize the construction as you go. Understanding this structure helps you troubleshoot any issues with sizing early on.
One common mistake is ignoring the gauge swatch. While it might seem tedious, spending ten minutes checking your gauge ensures that your Crochet Bucket Hat – Tutorial results in a hat that actually fits your head. Measure how many stitches and rows fit into a 4×4 inch square; if your count is higher than the pattern suggests, your hat will be too small, and if it’s lower, the hat will be too large.
Finally, consider the color palette you want to use. You can go for a solid color for a minimalist look, or experiment with color blocking and variegated yarn for something more vibrant. Some crafters even use this Crochet Bucket Hat – Tutorial to create “granny square” versions, but for this specific guide, we will focus on a seamless solid construction which is the most popular style for beginners and pros alike.
2. Mastering the Crown and Starting Your Crochet Bucket Hat – Tutorial
The foundation of any great hat is the magic ring (or magic circle). This technique allows you to start your Crochet Bucket Hat – Tutorial with a center that can be pulled tight, leaving no visible hole at the top of the crown. Inside this ring, you will typically work 6 to 8 single crochet (sc) or half-double crochet (hdc) stitches, depending on the desired height and density of your fabric.
Once your base ring is set, the Crochet Bucket Hat – Tutorial moves into the increase rounds. To keep the crown flat, you must add stitches mathematically in each row. For example, if you started with 8 stitches, your second round should have 16 (2 stitches in each). This consistent expansion prevents the hat from curling too early or becoming wavy, ensuring a perfectly circular top that sits comfortably against the head.
Proper stitch placement is vital during these initial rounds. Always ensure you are inserting your hook under both loops of the “V” shape at the top of the stitch unless the tutorial specifically calls for back loop only (BLO) work. Working through both loops provides the structural integrity needed for a Crochet Bucket Hat – Tutorial to maintain its iconic shape through multiple wears and washes.
As the crown grows, you will need to measure the diameter frequently. For an average adult head, a crown diameter of about 6.5 to 7 inches is standard. In this Crochet Bucket Hat – Tutorial, we emphasize that the crown determines the final circumference of the hat; if you stop increasing too soon, the hat will be tight, but if you go too far, it will slip down over your eyes.
Managing your tension is another key factor in the crown stage. If you pull too tightly, the center might start to “cone” upward; if you work too loosely, it might ripple. The goal is a flat, pancake-like disc. If you notice rippling, you may need to reduce the number of increases per round. If it cups, you likely need to add more increases to help it spread out.
The transition from the crown to the body is a “magic” moment in the Crochet Bucket Hat – Tutorial. Once your circle reaches the desired width, you simply stop increasing. By placing one stitch in every stitch from the previous row, the fabric will naturally begin to turn downward, forming the walls of the hat. This marks the end of the flat work and the beginning of the three-dimensional transformation.
3. Building the Body and Shaping the Crochet Bucket Hat – Tutorial
The body of the hat is often the most relaxing part of the Crochet Bucket Hat – Tutorial. This section requires no complex math or counting—just “autopilot” stitching. You will continue to work in rounds until the hat reaches the top of your ears. For most adults, this usually requires about 3 to 5 inches of vertical growth from the edge of the crown, giving the hat its signature “bucket” depth.
During this phase, you can experiment with stitch patterns. While simple single crochet provides a dense, modern look, using double crochet (dc) can make the project grow faster and create a lighter, more breathable fabric. Many people following a Crochet Bucket Hat – Tutorial like to switch colors here to create stripes, which is a fantastic way to use up leftover yarn scraps from other projects.
It is important to keep track of your row count even if you aren’t increasing. This ensures that if you decide to make a second hat (or a matching pair for a friend), you can replicate the exact dimensions. Using a row counter or a simple piece of paper to mark your progress keeps the Crochet Bucket Hat – Tutorial organized and prevents you from making one side longer than the other if you are working in sections.
While working on the body, periodically try the hat on. This is the “live fitting” stage of the Crochet Bucket Hat – Tutorial. Because everyone’s head shape is different, checking the depth now prevents the frustration of finishing the entire hat only to realize it sits too high or too low. The edge of the body should ideally sit about an inch above your eyebrows before you start the brim.
If you find that the body feels a bit loose, you can perform a few decreases (sc2tog) in the final round of the body. This slightly cinches the hat just above the ears, providing a “snug” fit that stays on even in a light breeze. This tip is a secret of professional makers that elevates a standard Crochet Bucket Hat – Tutorial into a custom-tailored piece of headwear.
Consistency in your yarn tension remains paramount here. If your stitches start getting looser as you get tired, the body of the hat will flare out prematurely, ruining the “bucket” silhouette. Keep your hands relaxed but firm, ensuring every stitch is uniform. This level of detail is what makes a handmade item look like it was bought from a high-end boutique.
4. Crafting the Brim and Finishing Your Crochet Bucket Hat – Tutorial
The brim is where the Crochet Bucket Hat – Tutorial really gains its personality. To create the flare, you will reintroduce increases into your rounds. The frequency of these increases determines how wide or “floppy” the brim becomes. A standard brim usually involves increasing in every 3rd or 5th stitch in the first round of the brim, then working several rounds of even stitching to give it length.
If you want a 90s style bucket hat, keep the brim short and relatively stiff. To achieve this, you can use a smaller hook for the brim or even work over a piece of fishing line or millinery wire to give it “memory.” This allows the brim to stay exactly where you flip it, which is a popular technique for those following a professional-grade Crochet Bucket Hat – Tutorial.
For a more bohemian, floppy look, continue to add increase rounds every other row in the brim. This creates a wider circumference that will naturally wave and drape. When working on the brim, the Crochet Bucket Hat – Tutorial requires you to be careful not to increase too much, or the edge will become “lettuce-like” and lose the classic bucket hat aesthetic.
The final round of your brim is the perfect place to add a decorative touch. You can finish with a crab stitch (reverse single crochet) for a corded, sturdy edge, or a simple slip stitch border for a clean, minimalist look. This final touch hides any minor imperfections in the last row and gives your Crochet Bucket Hat – Tutorial project a professional “store-bought” durability.
Once you reach your desired brim width, it’s time for the fastening off process. Cut your yarn, leaving a tail of about 6 inches. Using your tapestry needle, weave the tail through the stitches on the inside of the hat. This is a crucial step in the Crochet Bucket Hat – Tutorial—if you just tie a knot and cut it short, the hat may unravel after a few uses or washes.
After weaving in all your ends, your Crochet Bucket Hat – Tutorial is complete! I recommend blocking your hat to set the stitches. You can do this by lightly steaming it with an iron (don’t touch the iron to the yarn if it’s acrylic!) or by dipping it in cool water and letting it dry over a bowl or a mannequin head. This ensures your hat maintains its perfect shape for years to come.
FAQ – Frequently Asked Questions
Which yarn is best for a crochet bucket hat?
For the best results in any Crochet Bucket Hat – Tutorial, cotton yarn is highly recommended. It is sturdy, breathable, and holds the shape of the brim much better than wool or soft acrylics.
How long does it take to crochet a bucket hat?
Depending on your skill level, a standard Crochet Bucket Hat – Tutorial can be completed in about 3 to 6 hours. It is an excellent “weekend project” for intermediate crocheters or a productive multi-day task for beginners.
Can I wash my crochet bucket hat?
Yes! If you used cotton or acrylic yarn, you can usually machine wash it on a delicate cycle. However, to keep the shape from this Crochet Bucket Hat – Tutorial looking its best, hand washing and air drying flat is always the safest option.
How do I make the hat larger or smaller?
To adjust the size, you simply change the diameter of the crown. A smaller circle creates a child-sized hat, while adding one or two extra increase rounds will create a larger adult size.
Is this project suitable for absolute beginners?
Absolutely. The Crochet Bucket Hat – Tutorial primarily uses basic stitches like the single crochet and increases. If you can make a circle, you can make this hat.
Conclusion
In this Crochet Bucket Hat – Tutorial, we have covered everything from selecting the right cotton yarn and hook size to mastering the magic ring, building the body, and flaring out the brim.
This project is more than just a fashion statement; it is a fantastic way to practice your tension and learn the mechanics of circular crochet. By following these structured steps, you now have the knowledge to create a custom accessory that reflects your personal style.