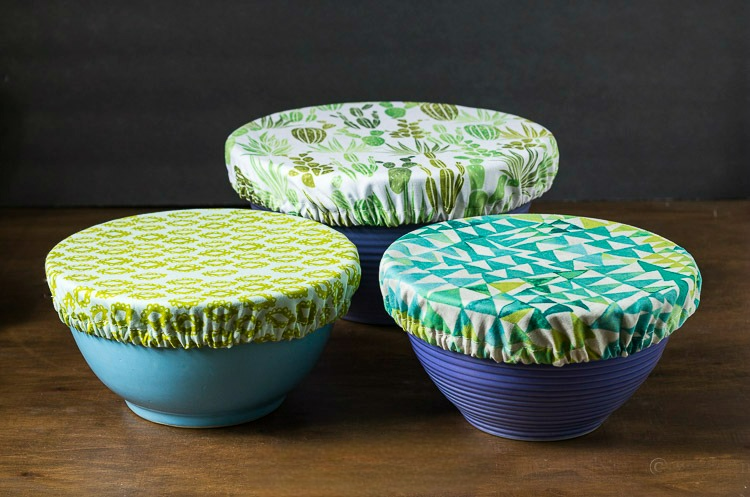
Fabric Covers For Bowls – Tutorial: If you are looking for a sustainable, stylish, and practical way to keep your food fresh, learning how to make these reusable alternatives is a fantastic project. These eco-friendly kitchen accessories have gained massive popularity recently because they eliminate the need for single-use plastics like cling wrap or aluminum foil. By following this Fabric Covers For Bowls – Tutorial, you can customize your kitchen storage to match your decor while contributing to a greener planet.
Creating your own kitchen essentials is a rewarding experience that combines functionality with personal flair. This Fabric Covers For Bowls – Tutorial is designed for crafters of all levels, whether you are a seasoned sewist or a beginner looking for an easy afternoon project. With just a few scraps of cotton fabric and some elastic, you can create a professional-looking set that protects your leftovers, proofing bread dough, or even keeping bugs away during an outdoor picnic.
The beauty of this project lies in its simplicity and the endless possibilities for customization. In this comprehensive Fabric Covers For Bowls – Tutorial, we will dive deep into the materials, the step-by-step sewing process, and the best ways to maintain your new creations. Investing time in handmade fabric bowl covers is not just about saving money on plastic wrap; it is about embracing a zero-waste lifestyle that values quality and durability over convenience.
1. Essential Materials for Your Fabric Covers For Bowls – Tutorial
To begin this Fabric Covers For Bowls – Tutorial, you need to gather high-quality 100% cotton fabric. Cotton is the preferred choice because it is breathable, easy to wash, and comes in countless vibrant patterns. Avoid synthetic fabrics that might shed microplastics or react poorly with food temperatures, ensuring your kitchen remains safe and healthy.
The second most important component is the elastic cord or flat elastic. This is what gives the cover its grip, allowing it to stretch over various sizes of glass, ceramic, or metal bowls. A 1/4-inch width is typically ideal for this tutorial, as it provides enough tension to keep the cover secure without being too bulky to sew into a casing.
You will also need basic sewing notions such as all-purpose polyester thread, sharp fabric scissors, and a rotary cutter with a mat. Having the right tools ensures that your fabric circles are perfectly round, which is a key step in making your reusable bowl covers look professional. Precision at the cutting stage makes the sewing process much smoother later on.
Don’t forget your measuring tools, specifically a flexible measuring tape or a large compass. To get the perfect fit, you must measure the diameter of your bowls and add a few inches for the “overhang” and the elastic casing. This Fabric Covers For Bowls – Tutorial emphasizes accurate measuring as the foundation for a snug, spill-proof fit.
Marking tools are also vital; use a tailor’s chalk or a water-soluble fabric pen to trace your circles. This allows you to see your cutting lines clearly without leaving permanent marks on your beautiful textile projects. Keeping your workspace organized with these items will make the crafting experience much more enjoyable and efficient.
Lastly, a sewing machine and a safety pin are required. The machine will handle the structural seams, while the safety pin is an old-school trick used to thread the elastic through the finished hem. Following this Fabric Covers For Bowls – Tutorial step-by-step will result in a durable product that can withstand hundreds of trips through the washing machine.
2. Step-by-Step Sewing Guide for Fabric Bowl Covers
The first active step in our Fabric Covers For Bowls – Tutorial is preparing your fabric. Lay your fabric flat and place your bowl upside down on the wrong side of the cloth. Use your marking tool to trace a circle that is approximately 2 to 3 inches wider than the bowl’s rim to account for the depth of the bowl and the sewing seam allowance.
Once your circles are cut, it is time to finish the edges to prevent fraying. You can use a zigzag stitch or a serger around the entire perimeter of the fabric circle. This step is crucial for sustainable kitchen products because they will be washed frequently, and reinforced edges ensure they don’t fall apart after the first few uses.
Next, you will create the elastic casing by folding the edge of the fabric toward the wrong side by about 1/2 inch. Pin this fold in place all the way around the circle. As you sew this hem, leave a small opening—about 1 inch wide—where you will eventually insert the elastic. This is a standard technique in any sewing tutorial for gathered edges.
Now, take your elastic and cut a length that is slightly smaller than the circumference of your bowl’s rim. Attach a safety pin to one end of the elastic and feed it through the opening you left in the casing. This part of the Fabric Covers For Bowls – Tutorial requires a bit of patience as you bunch the fabric and pull the elastic through.
Once the elastic has traveled all the way around and come out of the same hole, overlap the two ends of the elastic by about half an inch. Use a sturdy backstitch or a box stitch to secure the elastic ends together. Make sure the elastic isn’t twisted inside the casing before you finish this step to ensure a flat, even grip.
The final touch is to tuck the joined elastic into the casing and sew the 1-inch opening closed. Give the fabric a good stretch to distribute the gathers evenly around the circumference. You have now completed the main portion of the Fabric Covers For Bowls – Tutorial, resulting in a functional, eco-friendly bowl lid that is ready for immediate use.
3. Benefits of Using Reusable Fabric Bowl Covers
One of the primary reasons people seek out a Fabric Covers For Bowls – Tutorial is the significant reduction in household waste. By replacing rolls of plastic wrap, you are preventing non-biodegradable materials from entering landfills. These reusable fabric covers are a hallmark of the eco-conscious kitchen, providing a long-term solution to a daily problem.
Beyond the environmental impact, these covers offer superior breathability for certain foods. If you are a fan of baking, you’ll find that a cotton bowl cover is perfect for proofing bread dough. It allows a tiny amount of air circulation while keeping the surface of the dough from drying out, which is something plastic wrap often fails to do.
From a financial perspective, following this Fabric Covers For Bowls – Tutorial saves money over time. While there is a small upfront cost for fabric and elastic, a single set of covers can last for years. You will no longer need to add “cling film” to your weekly grocery list, making this a very cost-effective DIY project.
Aesthetic appeal is another major benefit that shouldn’t be overlooked. When you use a Fabric Covers For Bowls – Tutorial to make your own sets, you can choose patterns that match your kitchen’s color scheme or seasonal themes. They look much more intentional and beautiful on a dinner table or inside a refrigerator than messy, crumpled plastic.
Safety is also a key factor; many plastic wraps contain chemicals like phthalates which can leach into food, especially when under tension or exposed to temperature changes. By using natural fiber bowl covers, you are ensuring that only safe, non-toxic materials come into contact with your family’s meals, supporting a healthy lifestyle.
Finally, these covers are incredibly versatile. While this tutorial focuses on bowls, the same logic applies to jars, plates, and even small casseroles. Once you master the technique in this Fabric Covers For Bowls – Tutorial, you can adapt the sizes to cover almost any container in your pantry, making your kitchen organization more seamless and sustainable.
4. Care and Maintenance for Long-Lasting Covers
To ensure the longevity of the items made in this Fabric Covers For Bowls – Tutorial, proper washing is essential. Most cotton fabric covers can be tossed into the washing machine with your regular kitchen towels. Use a gentle cycle and a mild detergent to keep the colors vibrant and the elastic from losing its stretch over time.
Air drying is highly recommended for these handmade kitchen accessories. While cotton can handle the heat of a dryer, the elastic inside the casing can become brittle and lose its “snap” if exposed to high temperatures repeatedly. Hanging them to dry ensures that your fabric bowl covers maintain their perfect fit for as long as possible.
If your covers come into contact with oily foods or sauces like tomato paste, it is best to pre-treat the spots. A quick soak in cool water with a bit of dish soap can prevent permanent staining. Because this Fabric Covers For Bowls – Tutorial uses fabric, they are much more forgiving and easier to deep-clean than disposable alternatives.
Ironing your covers is optional, but it can help them look brand new again. If you choose to iron, use a medium setting and be careful not to press directly over the area where the elastic is housed. Keeping the fabric crisp makes the bowl covers easier to store and more pleasing to look at when they are in use.
Storage is simple: you can nest them inside one another or keep them in a dedicated kitchen drawer. Since they are made of soft cloth, they take up very little space. Following the maintenance tips in this Fabric Covers For Bowls – Tutorial ensures that your hard work doesn’t go to waste and your kitchen remains clutter-free.
Regularly inspect the elastic every few months. If you notice the cover is becoming loose, you can easily unpick a small section of the seam and replace the elastic using the same method taught in this Fabric Covers For Bowls – Tutorial. This repairability is what makes sustainable crafting so much better than buying cheap, mass-produced items.
FAQ – Frequently Asked Questions
Can I use these fabric covers in the microwave?
It is generally not recommended to use these covers in the microwave. While 100% cotton is safe, the elastic is often made of rubber or synthetic materials that could melt or degrade. Additionally, if the fabric is not “microwave-safe” certified, it could potentially scorch. Use them primarily for fridge storage, countertop proofing, or transport.
Which fabric is best for food contact?
The best choice is unbleached organic cotton or food-grade PUL fabric if you want a waterproof liner. For a standard Fabric Covers For Bowls – Tutorial, a high-quality quilting cotton is excellent because it is tight-woven and durable. Always pre-wash your fabric before sewing to remove any factory chemicals or sizing.
How do I know what size of elastic to use?
A good rule of thumb is to cut your elastic to be about 80% of the length of the bowl’s circumference. This ensures the elastic is stretched enough to hold the cover tight without being so tight that it’s difficult to put on. The Fabric Covers For Bowls – Tutorial method allows you to adjust this before you sew the final gap closed.
Are these covers waterproof?
Standard cotton covers are not waterproof; they are water-resistant to a small degree but will eventually soak through if liquid touches them directly. If you need a waterproof version, you can add a layer of laminated cotton or PUL (polyurethane laminate) to the inside of your project during the sewing process.
Can I make these without a sewing machine?
Yes! While a machine is faster, you can absolutely follow this Fabric Covers For Bowls – Tutorial using a simple backstitch by hand. It will take longer, but the result will be just as functional. Hand-sewing allows for even more precision in small areas and is a great way to practice your stitching.
How long do these fabric bowl covers typically last?
With proper care (washing in cool water and air drying), these covers can easily last 2 to 5 years. The fabric will eventually wear thin or the elastic will lose its stretch, but both are easily replaceable. This longevity is what makes the Fabric Covers For Bowls – Tutorial such a valuable resource for a zero-waste home.
Conclusion
In this Fabric Covers For Bowls – Tutorial, we have explored everything from selecting the right 100% cotton fabrics to the final steps of threading the elastic for a perfect fit.
We learned that these covers are not only a beautiful addition to any kitchen but also a powerful tool in reducing plastic waste and saving money. By mastering the elastic casing technique and understanding the importance of sustainable kitchen materials, you have gained a skill that benefits both your home and the environment.