Creating a Patriotic Placemat with Bandana – Tutorial is one of the most rewarding ways to add a splash of Americana to your home decor without spending a fortune on high-end boutique items. Whether you are preparing for a Fourth of July barbecue, a Memorial Day brunch, or simply want to celebrate the spirit of the season, these DIY patriotic placemats offer a blend of rustic charm and vibrant color. Using bandanas as your primary fabric source is a brilliant hack because they come pre-hemmed, feature iconic patterns, and are incredibly durable for high-traffic dining areas.
In this comprehensive Patriotic Placemat with Bandana – Tutorial, we will explore how to transform simple red, white, and blue fabrics into functional pieces of art for your tabletop. Many people feel intimidated by sewing projects, but this specific method is designed for all skill levels, focusing on straight lines and creative layering. By the end of this guide, you will have a set of custom table linens that look professionally made but carry the warmth and heart of a handmade creation.
The beauty of following a Patriotic Placemat with Bandana – Tutorial lies in the versatility of the materials; you can choose vintage-style faded bandanas for a farmhouse look or bright, crisp star-patterned textiles for a more modern celebratory feel. Beyond the aesthetics, these handmade placemats serve as excellent conversation starters, allowing you to showcase your crafting skills to friends and family. Let’s dive into the essential steps, materials, and professional tips needed to master this festive sewing project and elevate your next holiday gathering.
1. Gathering Essential Materials for Your Patriotic Placemat with Bandana – Tutorial
To begin your Patriotic Placemat with Bandana – Tutorial, the first and most important step is selecting high-quality cotton bandanas. Look for 100% cotton options, as they provide the best heat resistance for hot plates and are much easier to wash than synthetic blends. You will typically need two bandanas per placemat if you want a double-sided finish, or one bandana combined with a neutral backing fabric like burlap or denim for added weight.
Next, you must consider the internal structure of your patriotic table decor. A good sewing tutorial always emphasizes the use of fusible fleece or cotton batting. This middle layer is what gives the placemat its “body” and prevents it from sliding around the table. By using an iron-on interfacing, you ensure that the bandana fabric stays crisp and doesn’t bunch up after a trip through the washing machine.
Don’t forget the small but mighty tools that make this Patriotic Placemat with Bandana – Tutorial successful. You will need sharp fabric shears, a rotary cutter for precise edges, and patriotic colored thread (navy blue or deep red usually work best). Having a clear acrylic ruler is also vital for ensuring your placemat dimensions are consistent across the entire set, typically measuring around 14 by 18 inches for a standard place setting.
If you want to add an extra layer of detail, consider purchasing white rick-rack trim or star-shaped appliqués. These embellishments can be sewn onto the bandana borders to enhance the American flag theme. Small details like these turn a simple utility item into a standout piece of DIY home styling that looks like it came from a specialty craft boutique.
For those who prefer a “no-sew” version of this Patriotic Placemat with Bandana – Tutorial, you can substitute the sewing machine with high-strength fabric glue or fusible hem tape. While sewing provides a more permanent bond, these adhesive options are perfect for quick holiday decorating if you are short on time. Just ensure the glue is heat-resistant so it doesn’t melt under a warm dinner plate.
Lastly, make sure your workspace is prepared with a clean, flat surface and a reliable steam iron. The secret to a professional-looking patriotic craft is frequent pressing. Ironing your bandanas before you cut them eliminates wrinkles that could lead to uneven measurements, ensuring that every Independence Day placemat you create is perfectly symmetrical and ready for the spotlight.
2. Step-by-Step Construction of the Bandana Table Linens
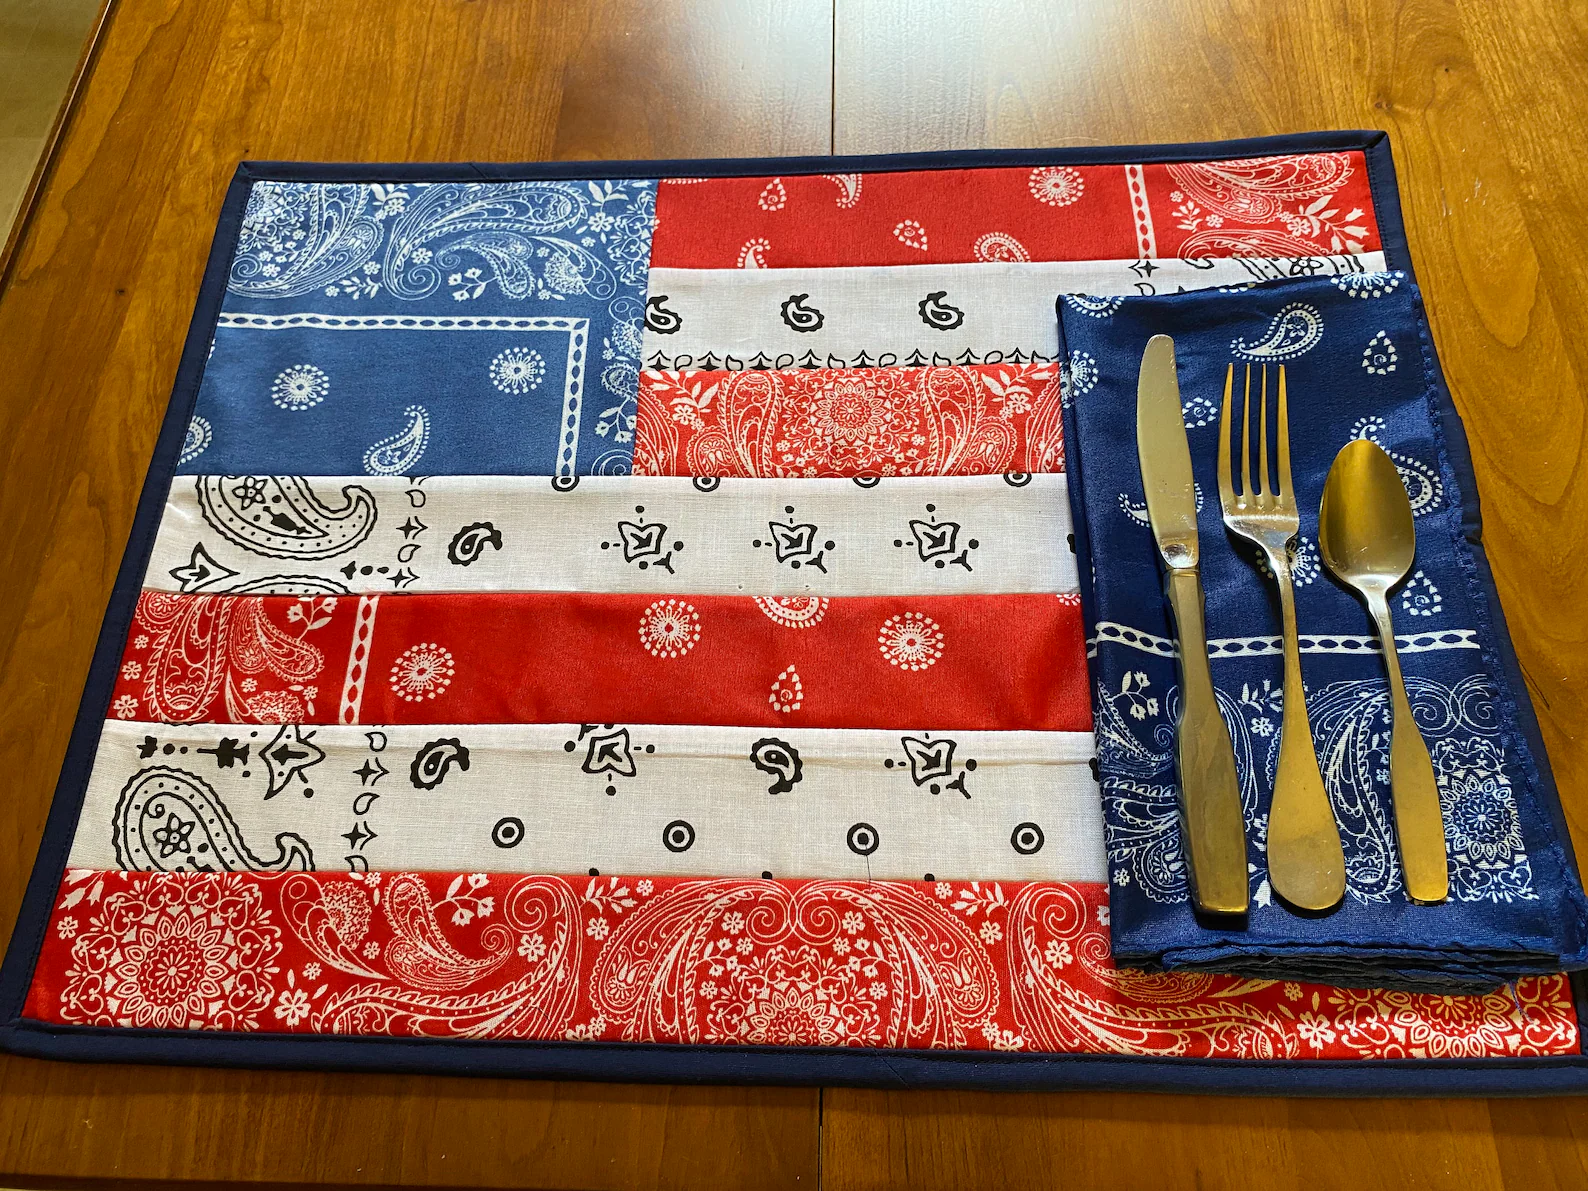
The first active phase of the Patriotic Placemat with Bandana – Tutorial involves the “fussy cutting” of your fabric. Lay your patterned bandana flat and decide which part of the design you want centered on your plate. Since most American flag bandanas have a border, try to align your cutting marks so that the border of the bandana becomes the border of your finished placemat.
Once your pieces are cut, it is time to layer your textiles. Place your backing fabric face down, followed by the fusible fleece, and finally your patriotic bandana face up. This “sandwich” method is a staple in quilt-making tutorials and works perfectly here to create a sturdy, multi-layered dining accessory that can withstand spills and frequent use during summer cookouts.
Pinning is a step you should never skip in this Patriotic Placemat with Bandana – Tutorial. Use quilting clips or fine pins to hold the layers together, starting from the center and working your way out to the edges. This prevents the cotton fabric from shifting while you sew, which is a common frustration when working with the slightly slippery texture of some bandana weaves.
Now, head to your sewing machine for the stitching process. A simple straight stitch around the perimeter is all you need, but for a more decorative patriotic look, you can try a “stitch-in-the-dable” technique or a topstitch approximately a quarter-inch from the edge. This reinforces the placemat structure and gives it a clean, tailored appearance that mimics high-end Americana home goods.
If you are following the double-sided placemat variation of this Patriotic Placemat with Bandana – Tutorial, sew the two sides right-sides together, leaving a small gap for turning. Once turned right-side out, use a point turner to make the corners sharp. This technique hides all raw edges inside, resulting in a reversible placemat that offers two different patriotic patterns for the price of one.
The final construction step is the “quilting” of the top surface. You don’t need to be a pro quilter; simply sewing a large “X” from corner to corner or a few vertical lines across the bandana surface will keep the layers from separating. This adds a beautiful textured finish to your Patriotic Placemat with Bandana – Tutorial project and ensures the item remains flat after being laundered.
3. Styling and Coordinating Your Patriotic Tablescape
Once you have completed the Patriotic Placemat with Bandana – Tutorial, the fun of holiday tablescaping begins. To make your handmade placemats pop, pair them with solid-colored plates—white ceramic or blue stoneware works beautifully. The busy paisley or star patterns of the bandana provide a vibrant backdrop that makes even simple dinnerware look sophisticated and festive.
Consider incorporating other bandana-themed decor to complement your new linens. You can use leftover scraps from your Patriotic Placemat with Bandana – Tutorial to create matching napkin rings or small flags for food picks. This creates a cohesive visual theme across your entire dining room, emphasizing the red, white, and blue aesthetic without overwhelming the space.
Natural elements serve as a great balance to the bold colors of patriotic bandanas. Try placing a wooden centerpiece or some fresh white flowers in a blue mason jar in the center of the table. The organic textures of wood and glass soften the vibrant fabric colors, resulting in a rustic patriotic table that feels inviting and comfortable for your guests.
Lighting also plays a huge role in showcasing your DIY sewing project. If you are hosting an outdoor evening event, use warm string lights or lanterns. The light will catch the quilted texture of your bandana placemats, highlighting the effort you put into the Patriotic Placemat with Bandana – Tutorial. It creates a cozy, celebratory atmosphere perfect for watching fireworks.
For a more formal patriotic dinner, you can layer these placemats over a neutral white tablecloth. This “layering” technique is a favorite among interior designers because it adds depth to the table. The bandana placemats act as a focal point, drawing the eye to each individual setting and making your friends feel like you’ve pulled out all the stops for the holiday celebration.
Don’t be afraid to mix and match different bandana prints. As long as you stay within the red, white, and blue color palette, using different patterns—like one with stars and another with classic paisley—adds an eclectic, bohemian-patriotic vibe. This approach makes your Patriotic Placemat with Bandana – Tutorial results feel unique and personalized rather than mass-produced.
4. Care and Maintenance of Your Handmade Placemats
To ensure the longevity of the items created in this Patriotic Placemat with Bandana – Tutorial, proper laundering is essential. Because bandanas are usually made of cotton, they are prone to slight shrinking if washed in hot water. Always use a cold, gentle cycle to preserve the vibrant fabric dyes and prevent the red and blue colors from bleeding into the white sections.
If you encounter a stubborn stain during your Fourth of July party, treat it immediately with a mild fabric stain remover. Avoid using bleach, even on the white parts of the patriotic pattern, as it can weaken the fibers of the cotton bandana and cause the surrounding colors to fade. Air drying is the safest method, but a low-heat dryer setting also works well.
Ironing is the “secret weapon” for keeping your handmade table linens looking brand new. After washing, your placemats might come out a bit wrinkled. A quick pass with a steam iron will flatten the quilted layers and crisp up the edges. This step is crucial if you want to reuse your Patriotic Placemat with Bandana – Tutorial projects year after year.
Storing your seasonal decor correctly will save you time next summer. Instead of folding the placemats, which can create permanent creases in the interfacing, try laying them flat in a drawer or rolling them gently. Keep them in a cool, dry place away from direct sunlight to prevent the patriotic colors from fading over the off-season.
If you notice any loose threads over time, simply trim them with embroidery scissors. Since the Patriotic Placemat with Bandana – Tutorial uses a topstitch, the structural integrity should remain high, but a little “grooming” keeps them looking professional. You can even add a fresh topstitch every few years if you want to reinforce the edges after heavy use.
Finally, remember that these DIY placemats are meant to be used and enjoyed. The slightly “weathered” look that comes with age often adds to the vintage Americana charm. By following these care tips, your Patriotic Placemat with Bandana – Tutorial creations will become cherished family heirlooms that come out every summer to celebrate the nation’s history and your own creative spirit.
Frequently Asked Questions (FAQ)
Can I make these placemats without a sewing machine?
Yes, you can absolutely create a “no-sew” version of this Patriotic Placemat with Bandana – Tutorial by using high-quality fabric bond or double-sided fusible web. Simply iron the layers together according to the adhesive’s instructions for a quick and easy alternative.
How many bandanas do I need for a set of four placemats?
Typically, you will need four to eight bandanas, depending on whether you want the placemats to be single-sided or reversible. If you use a different fabric for the backing, four bandanas are sufficient for a set of four.
Will the red dye in the bandanas bleed into the white stars?
To prevent color bleeding, it is highly recommended to pre-wash your bandanas in cold water with a “color catcher” sheet before starting your Patriotic Placemat with Bandana – Tutorial. This removes excess dye and ensures your whites stay bright.
What is the best size for a standard patriotic placemat?
The standard size for most dining tables is 14 inches by 18 inches. However, one of the benefits of this DIY tutorial is that you can customize the size to fit your specific table or even create smaller “mug rugs” from the leftover scraps.
What kind of batting is best for table linens?
Cotton batting or a thin fusible fleece is best. You want something that provides heat protection but isn’t so thick that your glasses or plates become unstable on the surface of the placemat.
Conclusion
In this Patriotic Placemat with Bandana – Tutorial, we have covered everything from selecting the best red, white, and blue fabrics to the final stitches and styling tips.
Creating your own holiday decor is not just a way to save money; it’s a way to infuse your home with personality and pride. These handmade bandanna placemats are durable, stylish, and perfect for any Americana-themed event. We hope this guide inspires you to fire up your sewing machine and add a touch of handmade charm to your next celebration.