If you have ever misplaced a favorite pair of earrings or found your necklaces tangled into an impossible knot, you already know the value of smart storage. A mini jewelry box is the ultimate solution for keeping your precious items safe, organized, and beautifully displayed. Crafting your own customized organizer is not only a fun, rewarding DIY project, but it also allows you to design a piece that perfectly matches your personal style and specific storage needs.
In this comprehensive mini jewelry box tutorial, we will walk you through every single step required to create a stunning, functional organizer from scratch. Whether you are an experienced crafter looking for your next weekend project or a complete beginner eager to try your hand at something new, this guide is designed for you. We will explore the best materials, precise construction techniques, and creative finishing touches to ensure your final piece looks like a high-end boutique find.
By mastering this mini jewelry box crafting process, you will gain valuable skills in measuring, lining, and decorating small-scale organizational pieces. This tutorial focuses on accessible methods that deliver professional results without requiring expensive specialty tools or advanced woodworking skills. Get your crafting supplies ready as we dive into the ultimate guide to building, personalizing, and enjoying your very own custom jewelry storage solution.
1. Planning and Preparing Your Mini Jewelry Box Materials
Before cutting any materials or applying glue, a successful mini jewelry box tutorial always begins with careful planning and preparation. You need to decide on the dimensions and the overall aesthetic you want to achieve for your compact storage piece. Taking the time to visualize the final product prevents mistakes and ensures that all your favorite rings, studs, and bracelets will fit comfortably inside.
For this specific project, a heavy-duty chipboard, thick cardboard, or lightweight balsa wood serves as the perfect sturdy foundation. These materials are incredibly accessible, easy to cut with a standard utility knife, and highly durable when assembled correctly. Choosing high-quality base materials ensures that your mini jewelry box remains structurally sound and protects your valuables for years to come.
In addition to your structural base, you will need a few essential tools to ensure precise assembly and a flawless finish. Gather a sharp craft knife, a metal ruler for straight lines, high-quality PVA glue or a hot glue gun, and your choice of decorative paper or fabric. Having all your supplies organized on your workspace beforehand makes the crafting process much smoother and more enjoyable.
The interior lining is just as important as the exterior appearance when designing a functional mini jewelry box. Soft fabrics like velvet, felt, or faux suede are ideal because they provide a gentle, scratch-free surface for delicate metals and gemstones. Selecting a complementary color for the interior lining adds an elegant, professional touch that elevates the entire project.
If you plan to include specific compartments or ring rolls, now is the time to sketch out those measurements on a piece of paper. Knowing exactly where each divider will go allows you to cut all your pieces simultaneously, saving you time later in the process. Accurate planning at this stage guarantees that your mini jewelry box tutorial experience is seamless and stress-free.
Once your workspace is clean, well-lit, and fully stocked, you can confidently transition from the planning phase to the actual construction. Double-check your measurements against the types of jewelry you wear most frequently to ensure maximum utility. With your blueprint ready and your materials gathered, you are officially prepared to start building the frame of your box.
2. Building the Structural Frame and Inner Dividers
Now that your materials are prepared, it is time to cut the main pieces that will form the body of your mini jewelry box. Using your metal ruler and utility knife, carefully cut out the bottom base, the two side panels, and the front and back panels according to your sketch. Clean, straight cuts are essential here, as they ensure the corners align perfectly without any awkward gaps.
To assemble the main frame, apply a thin, even layer of strong craft glue along the edges of the base panel. Press the side panels firmly against the base, using painter’s tape to hold them securely in place while the adhesive dries. Building a sturdy frame is a crucial step in this mini jewelry box tutorial, as it provides the core stability for the entire structure.
While the main outer frame is drying, you can begin cutting the smaller pieces that will serve as your internal dividers. Internal walls help separate your earrings from your bracelets, preventing items from shifting around when the box is moved. Customize the size of these compartments based on your personal collection, keeping some areas larger and others smaller for balance.
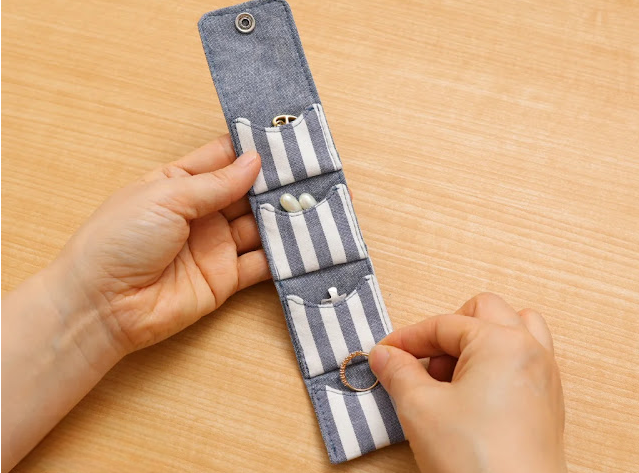
To give your custom organizer a luxury feel, consider adding a dedicated ring roll section inside one of the main compartments. You can easily create ring rolls by tightly rolling small pieces of felt or foam and gluing them side-by-side along the bottom. This classic feature of a high-quality mini jewelry box keeps rings upright, secure, and incredibly easy to see at a single glance.
If you want to add a lid to your creation, cut a final piece of chipboard that is slightly larger than the top openings of your frame. You can choose to create a completely detachable lift-off lid, or a hinged lid using a small strip of durable fabric or ribbon. A secure lid is vital for a mini jewelry box meant for travel, ensuring your treasures stay safe on the go.
Allow the fully assembled structural frame and its internal dividers to dry completely for at least one to two hours before moving forward. Check that all corners are square and that the structure feels firm and rigid when light pressure is applied. Once the glue has cured, your project is structurally complete and ready for the most creative phase: decoration.
3. Covering and Lining Your Mini Jewelry Box Professionally
The secret to a truly spectacular DIY project lies in the neatness of its exterior wrapping and internal fabric lining. To wrap the exterior of your mini jewelry box, lay your chosen decorative paper or fabric face down on your clean workspace. Place the box frame in the center, measure the overlap needed to cover the sides, and cut the wrapping material accordingly.
Apply a thin layer of liquid glue over the exterior surfaces of the box, ensuring there are no large clumps or bare spots. Carefully press the decorative material onto the surfaces, smoothing it out from the center outward to eliminate any trapped air bubbles. Wrapping your mini jewelry box smoothly requires patience, but the beautiful, seamless finish is absolutely worth the extra effort.
When wrapping the corners, cut a small diagonal slit in the fabric or paper at each corner to allow for neat folding. Fold the excess material over the top edges and secure it inside the box, where it will eventually be hidden by the liner. This clean wrapping technique is a staple of any professional mini jewelry box tutorial, ensuring no raw edges are visible.
Next, it is time to measure and cut the soft velvet or felt lining for the interior compartments and dividers. Cut individual pieces of fabric for the inner bottom and each of the inside walls, making them just a fraction smaller than the actual dimensions. Precise cuts prevent the fabric from bunching up in the corners of your mini jewelry box, keeping the interior clean.
Carefully glue the fabric pieces into place, starting with the main bottom section and then moving to the individual side walls. Use a clean, dry popsicle stick or a bone folder to press the fabric firmly into the corners and along the edges. Taking your time during this step ensures that the inside of your mini jewelry box looks just as stunning as the outside.
Once the lining is secured, gently insert your wrapped internal dividers and ring rolls into their designated positions, adding a touch of glue to keep them permanent. Let the entire piece air out in a well-ventilated space so that the glue dries completely and any adhesive odors dissipate. Your beautifully wrapped, incredibly soft storage solution is now ready for its final, personal enhancements.
4. Personalizing and Utilizing Your Custom Storage Space
With the main construction and lining complete, you can now add beautiful embellishments to make your creation truly unique. Consider adding a small, elegant metal latch to the front of your lid, or a delicate ribbon pull tab for easy opening. These tiny hardware details instantly transform a simple handmade piece into a sophisticated mini jewelry box that looks professionally manufactured.
You can also personalize the exterior lid with beautiful monograms, delicate fabric flowers, metallic paint accents, or vintage-style corner protectors. If you prefer a clean and modern aesthetic, leave the decorative paper or fabric plain to showcase its natural patterns and textures. The beauty of this mini jewelry box tutorial is that it gives you complete creative freedom over the final design.
Now that your masterpiece is finished, it is time to organize your jewelry collection inside its brand-new custom home. Place your delicate rings into the soft foam rolls, hang your dainty bracelets in the wider sections, and organize your studs in the smaller slots. Your new mini jewelry box will keep your favorite accessories free from dust, tangles, and accidental loss.
Because of its compact and lightweight design, this specific style of organizer is absolutely perfect for both home display and travel. It slides easily into a suitcase, carry-on bag, or vanity drawer, ensuring you always have your favorite accessories within arm’s reach. Your handmade mini jewelry box successfully combines practical portability with beautiful, artistic home decor.
This completed project also makes for an incredibly thoughtful, heartwarming gift for friends, family members, or loved ones on special occasions. You can customize the colors, patterns, and internal layout to perfectly match the recipient’s specific jewelry collection and style preferences. Nothing says you care quite like a beautiful, handmade mini jewelry box crafted entirely by your own hands.
Take a moment to admire your finished project, appreciating the clean lines, soft interior, and functional compartments you created from scratch. You have successfully taken simple raw materials and transformed them into a beautiful, organized, and highly practical treasure chest. Enjoy the peace of mind that comes with having a perfectly styled, tangle-free jewelry collection every day.
Frequently Asked Questions (FAQ)
What are the best materials to use for a DIY mini jewelry box?
The best structural materials for a durable handmade box are heavy-duty chipboard, bookbinding board, or thick recycled cardboard. For the exterior, high-quality scrapbooking paper, cotton fabric, or faux leather work beautifully. For the interior lining, always choose soft, non-abrasive fabrics like velvet, felt, or microfiber suede to protect your jewelry from scratches.
How can I make sure the corners of my box look neat and professional?
To achieve clean corners, avoid folding thick layers of paper or fabric directly over each other. Instead, cut the corners of your wrapping material at a precise 45-degree angle, leaving just a few millimeters of space from the actual corner of the box. This allows the edges to meet perfectly without bunching up or leaving the underlying cardboard exposed.
Can I use a hot glue gun instead of liquid craft glue for this project?
Yes, you can use hot glue, but it requires a very steady hand and quick movements. Hot glue cools down rapidly, which can sometimes create unwanted bumps beneath thin paper or delicate fabric lining. For the smoothest and most professional finish, a high-quality liquid PVA glue or wood glue applied with a brush is highly recommended.
How do I clean and maintain my handmade jewelry organizer over time?
To keep your organizer looking its best, use a dry, soft-bristled brush or a clean lint roller to gently remove dust from the interior fabric lining. Avoid using liquid cleaners or water on the exterior if you used decorative paper, as moisture can warp the structure. Keep your box in a dry environment away from direct, intense sunlight to prevent colors from fading.
Is this crafting project suitable for absolute beginners?
Absolutely! This project is highly adaptable and serves as an excellent entry point into the world of bookbinding and box-making. By following the steps in this guide carefully and taking your time with measurements, even a complete beginner can achieve a beautiful outcome. You can start with a simpler design without dividers and add complexity as your confidence grows.
Conclusion
In this detailed guide, you have learned how to plan, build, wrap, and personalize your very own custom organizer from start to finish. We explored the best structural materials, covered precise wrapping techniques to avoid bulky corners, and discussed how to create protective velvet linings and ring rolls.
By combining these simple steps, you can create a beautiful, durable piece that rivals store-bought alternatives while perfectly fitting your unique collection.