Hair clips with fabric flowers are the ultimate blend of function and fashion, offering a delightful way to personalize your accessories while diving into a creative crafting session. In this comprehensive hair clips with fabric flowers tutorial, you will discover how simple materials like scrap fabric, alligator clips, and hot glue can be transformed into stunning boutique-quality hairpieces. Whether you are looking to create a sweet accessory for a child, a statement piece for a special event, or even a brand-new inventory line for your online craft shop, mastering this craft opens up endless creative possibilities.
The beauty of this project lies in its accessibility and the sheer variety of designs you can achieve just by altering your fabric choice. From elegant satin and delicate organza to rustic linen and cozy cotton prints, every material gives your finished piece a completely unique personality. Crafting your own hair accessories is also a fantastic, eco-friendly way to practice sustainable crafting by utilizing those leftover fabric pieces from larger sewing projects that would otherwise go to waste.
Beyond being a budget-friendly hobby, learning how to make these gorgeous accessories can easily turn into a lucrative side hustle. This detailed guide is meticulously designed to walk you through every single step of the process, ensuring your very first flower turns out beautifully. Get your scissors ready, clear your crafting table, and let us dive straight into this rewarding, step-by-step journey to creating handmade hair gems.
1. Essential Materials and Tools for Crafting Fabric Flower Hair Clips
Before you begin assembling your beautiful accessories, gathering the right high-quality supplies is the most crucial step for success. To make durable hair clips with fabric flowers, you will need a selection of fabric remnants, sturdy metal alligator clips or snap clips, a reliable hot glue gun with premium glue sticks, sharp fabric scissors, and decorative centers like vintage buttons, pearls, or rhinestones. Choosing the correct weight of fabric will directly influence how well your flower petals hold their shape over time.
For beginners, lightweight woven cotton, felt, and grosgrain ribbons are the absolute easiest materials to manipulate because they do not slip or fray excessively during the cutting and folding process. If you are looking for a more delicate or high-end look, you can experiment with silk, satin, or chiffon, though these slicker fabrics require a bit more patience and a steady hand. Make sure your fabric scissors are incredibly sharp, as dull blades will chew the edges of your fabric and lead to unwanted fraying.
The metal base you choose is just as important as the flower itself because it determines how securely the accessory will stay in the hair. Standard 1.75-inch metal alligator clips are the industry favorite for fabric flowers because they provide a flat, stable surface that easily adheres to fabric backings using hot glue. If you are making accessories specifically for infants or toddlers with very fine hair, look for ribbon-lined alligator clips featuring silicone non-slip grips to ensure they stay safely in place.
In addition to your main fabrics, you will need a small sheet of stiff felt, preferably in a color that matches your chosen fabric, to create sturdy backing discs. These small felt circles act as the structural foundation of your flower, giving the petals a secure surface to adhere to and providing a smooth area to glue onto the metal clip. You will also want to keep a needle and strong upholstery thread nearby, as some flower styles require a quick running stitch to gather the petals together neatly.
Do not overlook the importance of the center embellishments, as the right centerpiece can instantly elevate a simple fabric flower into a luxurious boutique accessory. Look through your old jewelry boxes, scrapbooking supplies, or thrift store finds for unique flat-back pearls, glittering crystals, or mismatched vintage brass buttons that add character. Having a pair of fine tweezers on hand will make placing these tiny center details onto hot glue dots incredibly precise and burn-free.
Lastly, setting up a safe, clean, and well-ventilated crafting workspace will make the entire creation process much more enjoyable and efficient. Lay down a silicone crafting mat or a piece of parchment paper to protect your tabletop from accidental hot glue drips, which can be difficult to remove once hardened. Once your tools are organized, your glue gun is warming up, and your fabrics are pressed flat with an iron, you are fully prepared to move on to the preparation phase.
2. Preparing and Cutting Your Fabric Petals
Preparation is the secret key to achieving perfectly symmetrical and professional-looking results in this hair clips with fabric flowers tutorial. Before making a single cut, take the time to iron your fabric scraps thoroughly to remove any wrinkles or creases, as uneven fabric will result in distorted petals. Once your fabric is smooth, you can choose to cut your petals freehand for an organic look, or use a sturdy cardboard template to guarantee that every single layer is completely identical.
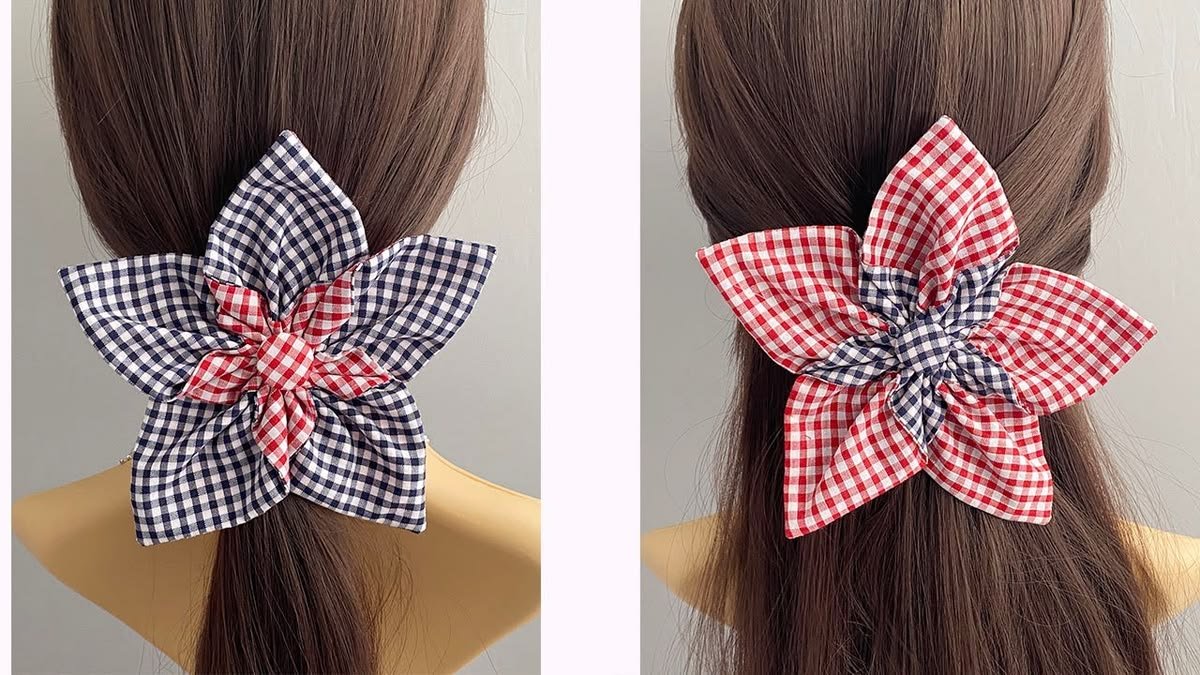
To create a classic multi-layered fabric blossom, you will generally need to cut out five to six matching squares or circles of fabric, depending on the specific style you choose. For a medium-sized hair accessory, cutting fabric squares measuring exactly 2.5 inches by 2.5 inches is a fantastic baseline that yields a beautifully proportioned flower. If you prefer a richer, more dimensional look, you can cut three squares in a slightly larger size for the bottom layer and three smaller squares for the top layer.
If you are working with synthetic fabrics like polyester satin, organza, or chiffon, you can use a clever heat-sealing technique to prevent the raw edges from ever fraying. Gently pass the cut edges of your fabric petals near the flame of a candle or a handheld lighter, allowing the intense heat to melt the synthetic fibers slightly. This creates a durable, sealed edge that stops loose threads in their tracks and gives the petals a lovely, naturally curled shape.
For natural fibers like cotton, linen, or wool felt, heat sealing will not work because these organic materials will burn rather than melt into a clean bead. Instead, you can apply a very thin layer of liquid fray-check solution along the perimeter of your cut shapes, or use pinking shears to cut out your circles, which naturally minimizes fraying. Felt is an especially wonderful option for absolute beginners because it never frays, holds its shape perfectly, and requires zero edge preparation.
Once all your individual fabric pieces are neatly cut and treated, group them into organized stacks on your workspace based on their size and color pattern. This is also the perfect moment to cut out your small felt backing circles, which should measure roughly 1 inch in diameter, ensuring they are small enough to stay hidden behind the finished petals. Taking these extra minutes to prepare your components systematically prevents confusion and keeps your workflow seamless when working with fast-drying hot glue.
With your fabric shapes ready, you can play around with different folding arrangements to see how the folds alter the final look of your flower. Folding a circle in half twice creates a beautiful, volumetric petal that stands up proud, while gathering a fabric strip creates a classic, ruffled rosette look. Take your time during this creative prep stage, enjoy the textures of your materials, and get ready to start assembling your masterpiece in the next section.
3. Step-by-Step Flower Assembly and Petal Layering
Now comes the most exciting and magical part of the process, where your loose pieces of fabric finally transform into an exquisite, three-dimensional blossom. To build a classic folded-petal flower, take one of your prepared fabric squares, fold it diagonally in half to form a triangle, and then fold the two outer corners down to meet the center point. Apply a microscopic drop of hot glue to secure these folds in place, creating your very first completed structural petal.
Repeat this identical folding process with your remaining fabric pieces until you have five or six uniform petals sitting beautifully on your work table. Next, take your small felt backing circle and apply a thin, neat ring of hot glue around its outer perimeter, leaving the very center of the felt circle open. Carefully press the raw, folded bottom edge of your first petal firmly onto the hot glue ring, holding it steady for a few seconds until the adhesive sets.
Continue placing your petals around the circle one by one, ensuring that they sit closely together without overlapping so tightly that they bunch up unnervingly. The petals should radiate outward evenly from the center, looking like the spokes of a wheel, with their edges lightly touching to create a full, continuous flower shape. If you notice a small gap before placing your final petal, gently nudge the existing petals outward slightly to adjust the spacing before the glue cures completely.
If you want to create a double-layered look for extra volume, create a second set of slightly smaller folded petals using a coordinating or contrasting fabric pattern. Apply another small ring of hot glue directly on top of your first layer of petals, slightly closer to the center of the felt circle. Place your smaller petals down, intentionally staggering them so they sit beautifully in the gaps between the larger petals of the bottom layer.
Once your petal structure is perfectly secure and full, it is time to conceal the open center where the raw edges meet by attaching your decorative embellishment. Apply a generous drop of hot glue right into the middle of the flower, and use your fine tweezers to press your chosen button or pearl down firmly. Hold it in place with steady, gentle pressure for about ten seconds to ensure it bonds deeply with all the underlying fabric layers.
Take a quick moment to look over your assembled flower, carefully pulling away any thin, wispy hot glue strings that might be clinging to the fabric surface. Flip the flower over to inspect the backing, ensuring the felt circle is completely hidden from the front view and sits perfectly flat. Your beautiful handmade textile blossom is now entirely complete, structurally sound, and ready to be mounted onto its functional metal clip.
4. Mounting the Flower Securely onto the Hair Clip
The final construction phase involves attaching your completed textile flower to the metal base so that it functions perfectly as an everyday hair accessory. Before gluing, it is highly recommended to line your metal alligator clip with a matching grosgrain ribbon to create a professional finish and provide a better bonding surface. Cut a strip of 3/8-inch wide ribbon that is roughly twice the length of your clip, and singe the ribbon ends with a lighter to stop fraying.
Apply a smooth, thin line of hot glue along the top flat surface of the metal alligator clip, and carefully press your ribbon strip onto the adhesive. Open the clip and wrap the remaining ribbon around the thumb tab and inside the top prong, smoothing it down firmly with your fingers to eliminate air bubbles. Lining the clip not only hides the plain industrial metal, but it also prevents the cold metal from snagging or pulling on delicate hair when worn.
Once your lined clip is ready, decide exactly where you want the flower to sit on the clip, keeping in mind how it will be placed in the hair. For a balanced look, the flower should be centered horizontally over the main body of the clip, leaving the ribbon-covered thumb tab slightly exposed so it can be pressed easily. Flip your flower over so the felt backing circle faces up, and apply a generous, zigzag pattern of hot glue directly onto that felt surface.
Quickly and carefully press the glued felt backing of the flower firmly onto the ribbon-covered top prong of your prepared metal alligator clip. Apply steady, firm pressure from both sides, squeezing the flower backing and the inside of the clip together for at least fifteen to twenty seconds. Be careful not to accidentally glue the entire alligator clip shut by letting excess adhesive squeeze into the inner mechanics of the spring mechanism.
If any hot glue does happen to seep out from under the edges of the felt circle, quickly wipe it away with a scrap piece of cardboard before it hardens. Let the fully assembled hair accessory sit completely undisturbed on your flat work surface for at least five full minutes to allow the hot glue to cure and cool down. This cooling period is absolutely vital for creating a permanent, heavy-duty bond that can withstand the daily wear and tear of being opened and closed.
Now that the adhesive is totally cool, your handmade accessory is fully complete, beautifully durable, and ready to be worn with pride or packaged up for sale. You can use this exact same mounting methodology to attach your fabric flowers to elastic headbands, plastic hair slides, or even metal bobby pins. With practice, you will be able to assemble these gorgeous pieces effortlessly, mixing colors and fabric textures to match any wardrobe or seasonal style trend.
FAQ – Frequently Asked Questions
What is the best type of fabric to use for making hair clips with fabric flowers?
The best fabric depends entirely on the specific style you want to achieve and your crafting experience level. For absolute beginners, 100% woven cotton and polyester felt are ideal because they are stable, easy to cut, and hold creases beautifully without slipping around. If you want an elegant, airy blossom, lightweight synthetic materials like polyester organza, satin, and chiffon work wonderfully because their edges can be melted with heat to completely eliminate fraying.
How do I prevent the raw edges of my fabric petals from fraying over time?
For synthetic fabrics, the most effective method is to carefully singe the cut edges near a candle flame, which melts the plastic fibers into a permanent, fray-proof bead. For natural fabrics like cotton or linen, you can apply a specialized liquid fray-preventer solution along the edges, or use sharp pinking shears to cut out your shapes. Using high-quality felt is another fantastic option, as felt is a non-woven material that will naturally never fray or unravel.
Can I make these hair clips without using a hot glue gun?
Yes, you can absolutely create beautiful fabric flowers without using hot glue by sewing the petals together using a needle and heavy-duty thread. You can sew a running stitch through the base of your petals, gather them tightly into a circular flower shape, and knot the thread securely at the back. To attach the finished flower to the metal hair clip, you can use a strong, flexible fabric adhesive like E6000, though you will need to allow it to dry for 24 hours.
How do I ensure the flower stays permanently attached to the metal clip?
The secret to a permanent bond is lining your metal clip with grosgrain ribbon before attempting to glue your finished flower onto it. Hot glue does not adhere permanently to slick, bare metal over time and can pop off easily with repeated use. Gluing a felt circle to the back of your flower, and then gluing that felt piece directly to the fabric ribbon on the clip, creates an incredibly strong fabric-to-fabric bond that lasts.
Are these fabric flower clips safe for babies and toddlers with fine hair?
Yes, they can be made perfectly safe for young children by using smaller, lightweight alligator clips and lining them entirely with soft ribbon. It is highly recommended to add a silicone non-slip grip strip inside the lined clip, which helps the accessory stay securely anchored to even the finest toddler hair without pulling. Always ensure that any small center embellishments, like pearls or buttons, are glued down with maximum security, and supervise young children while they are wearing them.
Conclusion
In this detailed hair clips with fabric flowers tutorial, we explored the entire creative process of transforming simple fabric scraps into gorgeous, boutique-ready hair accessories.
We covered everything from choosing the ideal fabrics and prepping your tools, to cutting uniform shapes, assembling intricate petal layers, and securely mounting your blossoms onto ribbon-lined metal clips. By mastering these core techniques, you now possess the skills needed to design an endless variety of customized hair accessories tailored for any special occasion, gift, or craft business inventory.