Crochet Flower – Tutorial: if you are looking for a creative, relaxing, and incredibly rewarding craft project, learning how to make a beautiful handmade bloom is the perfect place to start. Crocheting has transcended generations, evolving from a traditional household skill into a vibrant, modern art form that allows anyone to express their unique style. Whether you want to embellish an old denim jacket, create a stunning bouquet that never fades, or simply find a soothing hobby to unwind after a busy day, this comprehensive guide will walk you through every single step of the process.
The beauty of a Crochet Flower – Tutorial lies in its versatility and accessibility, making it an ideal project for both absolute beginners and seasoned crafters looking for a quick, satisfying win. With just a small amount of yarn and a hook, you can transform simple loops into a gorgeous, textured piece of art that radiates charm. In this article, we will explore everything from selecting the right materials and mastering foundational stitches to assembling your project and exploring advanced creative techniques to make your work stand out.
By the time you reach the end of this guide, you will not only have a deep understanding of the Crochet Flower – Tutorial framework, but you will also possess the confidence to experiment with different colors, textures, and patterns. We have carefully structured this guide to align with the best modern practices, ensuring the content is engaging, easy to digest, and highly informative. So, grab your crochet hook, find a comfortable seat, and let’s dive into the wonderful world of fiber arts together.
1. Essential Materials for Your Crochet Flower – Tutorial
When embarking on your first Crochet Flower – Tutorial, selecting the right tools is the foundation of your success. You do not need an expensive setup to get started, which makes this hobby incredibly budget-friendly and accessible. A standard aluminum crochet hook, a skein of medium-weight yarn, a pair of sharp scissors, and a tapestry needle are all the essential supplies required to bring your floral creations to life.
For beginners tackling a Crochet Flower – Tutorial, we highly recommend starting with a worsted weight cotton or acrylic yarn in a bright, solid color. Cotton yarn offers excellent stitch definition, which means you can easily see where your hook needs to go, while acrylic yarn provides a soft, forgiving texture. Avoid dark colors like black or deep navy for your first project, as they can make it difficult to locate your stitches.
Choosing the correct hook size is equally vital to ensure your stitches are neither too loose nor too tight. Most yarn labels come with a recommended hook size printed directly on the packaging, which is usually a 4.0mm (G-6) or 5.0mm (H-8) for standard worsted weight yarn. Using the recommended size ensures your Crochet Flower – Tutorial yields a balanced, sturdy blossom that holds its shape beautifully over time.
In addition to your hook and yarn, having a few simple accessories nearby will make your crafting experience much smoother. A tapestry needle, also known as a yarn needle, is absolutely essential for weaving in loose ends securely so your work doesn’t unravel. Small embroidery scissors will help you make clean cuts, and locking stitch markers can be incredibly helpful for keeping track of your rows.
As you gain more confidence with this Crochet Flower – Tutorial, you can begin experimenting with specialty fibers like bamboo, linen, or even metallic threads. Different textures will completely alter the look and feel of your finished project, allowing you to create delicate, vintage-style lace blossoms or chunky, modern bohemian flowers. The choices are entirely up to your personal aesthetic.
Investing a little time in understanding your materials prevents frustration and guarantees a much more enjoyable crafting journey. High-quality, basic tools will last for years, allowing you to produce dozens of beautiful projects down the road. Now that your crafting space is set up with the perfect supplies, you are fully prepared to move on to the core techniques of our tutorial.
2. Step-by-Step Guide to Hooking Your First Petal
Every successful Crochet Flower – Tutorial begins with a solid foundation, which usually starts with a slip knot and a short chain or a magic ring. The magic ring is a fantastic technique for floral projects because it allows you to pull the center completely tight, leaving no visible hole. If you find the magic ring a bit tricky at first, simply chaining four and joining with a slip stitch works just as well.
Once your center ring is established, the next phase of the Crochet Flower – Tutorial involves working your first round of stitches into that central loop. Typically, you will use single crochet stitches to create a firm, round core for your flower. This central disc serves as the anchor point where all your beautiful, flowing petals will eventually attach and bloom outward.
Now comes the most exciting part of the Crochet Flower – Tutorial: creating the actual petals that give your work its distinctive shape. To create a classic rounded petal, you will work a combination of different stitch heights into a single space, such as a slip stitch, a half double crochet, a double crochet, and another slip stitch. This clever variation in stitch height naturally creates a beautiful, curved arc.
Repetition is the key to symmetry when you are following a Crochet Flower – Tutorial to build a balanced blossom. You will repeat the petal sequence all the way around your central ring, usually creating five or six petals depending on the specific look you want. Take your time with each stitch, ensuring your tension remains relatively consistent so all your petals look uniform.
As you complete the final petal of your Crochet Flower – Tutorial, you will join the round using a neat slip stitch into the very first loop you made. This seamless join closes the circle perfectly and gives your flower a professional, polished appearance. Cut your yarn, leaving a tail of about six inches, and pull it through the final loop to lock everything securely in place.
Take a moment to admire your work, gently shaping the petals with your fingers to help them sit flat and even. It is completely normal for your first few attempts to look a little quirky, as building muscle memory takes time and practice. With one successful blossom complete, you are now ready to explore how to enhance and refine your new creation.
3. Creative Ways to Use and Apply Crochet Flowers
Once you have mastered the basic Crochet Flower – Tutorial, you will quickly realize that these charming little motifs can be used in countless innovative ways. One of the most popular applications is fashion embellishment, where you sew your finished blossoms onto denim jackets, hats, scarves, or canvas tote bags. It is an amazing way to breathe new life into old wardrobe pieces.
Another fantastic way to utilize the skills learned in this Crochet Flower – Tutorial is by creating unique, handmade home decor. You can attach several colorful flowers to a long strand of crocheted twine to create a whimsical garland for a nursery or a mantlepiece. Alternatively, sewing them onto plain throw pillows adds a wonderful pop of three-dimensional texture to your living room.
If you love making practical gifts, the blossoms from this Crochet Flower – Tutorial can easily be converted into stylish accessories. By securely gluing or sewing a metal hair clip, bobby pin, or elastic band to the back of the flower, you can create custom hair accessories. You can also attach a safety pin backing to turn your work into a vintage-inspired brooch.
For those who enjoy cardmaking and scrapbooking, these miniature textile flowers offer an incredible way to elevate your paper crafts. A flat, lightweight flower made from fine embroidery floss adds a luxury, tactile element to wedding invitations, birthday cards, or journal covers. It shows the recipient that you took extra time to create something truly special.
You can also scale up the concepts from this Crochet Flower – Tutorial by using thick blanket yarn and a massive hook to create giant floral seat cushions. The exact same stitch pattern works beautifully across different yarn weights, giving you the freedom to make micro-flowers or macro-creations. This flexibility is what makes fiber arts so incredibly addictive and fun.
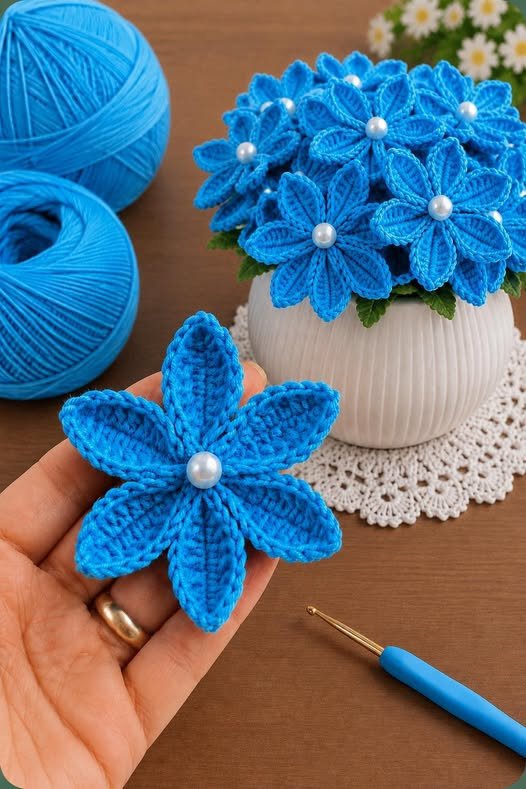
Finally, consider assembling a permanent crochet bouquet by attaching your finished flowers to cloth-covered floral wires. A vase filled with these handmade blooms makes a spectacular centerpiece that requires absolutely no watering and will look fresh for years to come. The creative possibilities are truly infinite, bounded only by the limits of your imagination.
4. Advanced Tips for Perfecting Your Stitch Definition
To truly elevate your work beyond a basic Crochet Flower – Tutorial, you need to focus on perfecting your tension and stitch definition. Consistent tension ensures that your stitches are perfectly uniform, preventing your petals from curling unnaturally or looking distorted. Practicing holding your yarn comfortably will naturally stabilize your tension over time.
Another excellent tip for improving your Crochet Flower – Tutorial results is mastering the invisible join method when finishing your rounds. Instead of using a standard slip stitch, which can sometimes leave a noticeable bump, the invisible join uses a tapestry needle to mimic a natural stitch loop. This minor adjustment creates an incredibly clean, professional edge.
Blocking your finished pieces is a secret weapon that many beginners overlook after completing a Crochet Flower – Tutorial. Blocking involves gently wetting your crochet flower, pinning it into the perfect shape on a foam board, and letting it air dry completely. This process relaxes the yarn fibers, flattens out any curling edges, and locks in the perfect shape permanently.
Choosing the right color combinations can also completely transform the outcome of your Crochet Flower – Tutorial projects. Experiment with using a contrasting color for the center disc and a complementary shade for the outer petals to make the design pop. Ombré or self-striping yarns can also create beautiful, natural-looking color transitions without requiring you to change yarn balls.
As you become more advanced, you can modify the Crochet Flower – Tutorial by working into the front loops or back loops only. This technique creates stunning ridges and secondary layers, allowing you to build complex, multi-layered 3D flowers like carnations or roses. It is an easy way to add depth and sophistication to a simple layout.
Never be afraid to experiment, make mistakes, and rip out your stitches to try again, a process affectionately known as “frogging” in the crafting community. Every mistake is a valuable learning opportunity that refines your hand-eye coordination and deepens your understanding of stitch mechanics. Enjoy the process of learning and growing as an artist.
Frequently Asked Questions (FAQ)
What is the best yarn for a beginner attempting a crochet flower? For your very first project, a 100% cotton yarn or a high-quality acrylic yarn in a worsted weight (medium weight 4) is highly recommended. Cotton yarn is ideal because it isn’t slippery, doesn’t split easily, and offers fantastic stitch definition, allowing you to see exactly where to insert your hook.
How do I prevent my crochet flower petals from curling up? Petals usually curl if your stitches are too tight or if you have added too many stitches into a single space. Try relaxing your hand tension, or switch to a crochet hook that is half a millimeter larger. Additionally, blocking your finished flower with water and pins will easily flatten out minor curls.
Can I use this tutorial to make flowers of different sizes? Yes, absolutely! The easiest way to change the size of your flower without changing the pattern is to alter your yarn weight and hook size. If you want a tiny, delicate flower, use embroidery floss and a small steel hook. For a massive flower, use chunky chenille yarn and a large 8.0mm hook.
What is a magic ring, and do I have to use it for this project? A magic ring is an adjustable loop technique used to begin crochet projects worked in the round, allowing you to pull the center hole completely shut. While it gives the cleanest finish, it is not mandatory. You can achieve a similar result by chaining 3 or 4, joining into a ring with a slip stitch, and working your stitches into that loop.
How do I clean and wash items that have crochet flowers attached to them? If your flowers are made from cotton or acrylic yarn, they can generally be hand-washed in cool water with a mild detergent. Reshape the petals gently while damp and lay them flat to air dry. Avoid machine washing and high heat dryers, as this can cause the yarn to pill or lose its shape.
Conclusion
In this Crochet Flower – Tutorial, we have covered all the fundamental steps required to create beautiful, handmade blossoms from scratch.
From selecting the perfect worsted weight cotton yarn and matching hook to mastering the magic ring, building symmetrical petals, and exploring advanced styling tips, you now possess the essential knowledge to create stunning floral designs. Crocheting is a journey of patience and creativity, and each flower you make will reflect your unique artistic touch.