Crochet Coaster – Tutorial: Creating beautiful and functional home decor has never been easier or more rewarding. If you are looking for a quick, satisfying project that instantly adds a touch of handmade charm to your living space, learning how to make a crochet coaster is the perfect place to start. This comprehensive tutorial is designed to guide you through every single step of the process, ensuring that even if you are a absolute beginner, you will end up with a gorgeous, practical piece that protects your furniture in style.
In the world of fiber arts, a handmade crochet coaster represents the ultimate fusion of utility and creativity. These delightful little mats are fantastic for using up leftover yarn scraps from larger projects, making them an eco-friendly and budget-friendly choice for passionate crafters. Beyond their practicality in preventing unsightly water rings on your favorite wooden tables, crafting these items allows you to experiment with new stitches, vibrant color combinations, and various yarn textures without committing to a massive, time-consuming project like a blanket or a sweater.
This detailed crochet coaster walkthrough is structured to give you all the confidence you need to succeed on your very first try. We will break down the essential materials, the foundational stitches, and the step-by-step assembly so that your final product looks polished, professional, and ready to impress your guests. Grab your favorite hook, select some beautiful yarn, and let us dive straight into this definitive tutorial that will elevate your crafting skills and bring warmth to your home.
1. Choosing the Best Materials for Your Crochet Coaster Project
When embarking on a new crochet coaster adventure, selecting the right yarn is the single most important decision you will make for the longevity of your project. For coasters, 100% cotton yarn is universally recognized as the absolute best choice because it is highly absorbent, durable, and exceptionally heat-resistant. Unlike acrylic yarn, which can melt when exposed to hot coffee mugs or sweat profusely when holding cold drinks, cotton absorbs moisture effortlessly and washes beautifully time after time.
The weight of the yarn also plays a massive role in how your finished item will look and function. A worsted weight (medium number 4) cotton yarn is highly recommended for this specific tutorial because it provides excellent stitch definition and creates a sturdy, thick barrier for your surfaces. If you choose a yarn that is too thin, your coaster might turn out flimsy, while a yarn that is too thick might create an uneven surface where your glasses could easily tip over.
In addition to your yarn, you will need to select the perfect crochet hook to match your material. For a standard worsted weight cotton, a 4.0mm (G-6) or 4.5mm (7) hook usually yields the best results, creating tight, neat stitches that prevent liquids from seeping through the gaps. However, if you naturally tend to crochet very tightly, you might want to move up a hook size to maintain a relaxed, flat shape throughout your work.
Do not forget to gather a few essential notions before you sit down to start stitching your beautiful project. A sharp pair of craft scissors and a sturdy yarn needle (also known as a tapestry needle) are absolutely non-negotiable for finishing your work professionally. The yarn needle will allow you to weave in your loose ends securely so that your coaster does not unravel the very first time it goes through the laundry cycle.
Another helpful tool to keep nearby is a couple of locking stitch markers, especially if you are new to working in continuous rounds. These little plastic clips help you identify the exact beginning of each row, saving you from the frustration of losing your count halfway through. Keeping your workspace organized with these simple tools ensures a smooth, relaxing, and highly enjoyable crafting experience from start to finish.
Finally, think about your color palette before you begin winding your yarn cake or pulling from the skein. You can choose a solid, neutral color that seamlessly matches your existing living room decor, or you can opt for bright, variegated yarns that create automatic patterns as you work. No matter what aesthetic you prefer, choosing high-quality materials ensures your crochet coaster looks stunning and performs perfectly for years to come.
2. Essential Stitches and Foundations in This Comprehensive Tutorial
Before we dive into the actual step-by-step pattern, it is crucial to familiarize yourself with the fundamental stitches used in this tutorial. The foundation of almost every circular project begins with either a chain loop or the incredibly popular magic ring technique. The magic ring is highly preferred for a crochet coaster because it allows you to pull the center completely closed, leaving zero gaps for condensation to drip through onto your table.
If the magic ring feels a bit too tricky for your current skill level, do not worry at all. You can easily substitute it by chaining four stitches and joining the last chain to the first chain with a simple slip stitch to form a small ring. Working your initial round of stitches directly into that chain loop is a time-tested alternative that works beautifully for crafters of all experience levels.
The star of this specific project is the double crochet stitch, abbreviated as DC in standard patterns. The double crochet is an ideal stitch for home decor because it works up incredibly quickly and provides a lovely, classic texture that looks elegant in any setting. Mastering the rhythm of wrapping your yarn, inserting the hook, and pulling through the loops is the key to achieving uniform stitch consistency.
In addition to the double crochet, you will also need to utilize the slip stitch to join your rounds seamlessly. The slip stitch does not add any height to your work; instead, it acts as a invisible bridge that connects the end of your round back to the very beginning. Mastering this join keeps your circle perfectly round and prevents your coaster from looking warped or asymmetrical as it grows.
Maintaining even tension throughout your stitches is another vital skill that this hands-on guide will help you develop naturally. If your tension is too loose, your coaster will become floppy and lose its structural integrity; if it is too tight, the edges will begin to curl upward into a bowl shape. Relax your hands, let the hook do the heavy lifting, and try to make each stitch the exact same height as the one before it.
As you practice these foundational techniques, remember that patience is a fundamental part of the creative process. If a round does not look quite right, do not be afraid to gently pull out the stitches and try them one more time. Every single stitch you make builds your muscle memory, making the next round smoother, faster, and much more satisfying as your handmade masterpiece takes shape.
3. Step-by-Step Guide to Crafting Your Round Handmade Mat
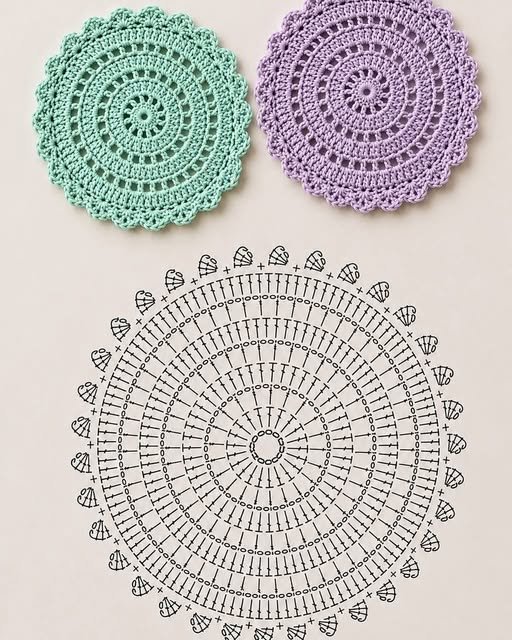
Now that you have gathered your premium materials and mastered the basic stitches, it is time to begin the core of our crochet coaster pattern. Start by creating your magic ring, or your chain-four loop, and secure it with a single chain stitch. Next, chain two, which will count as your very first double crochet stitch for this round, and then work eleven additional double crochet stitches directly into the center of the ring.
Once you have a total of twelve double crochet stitches inside your ring, firmly grab the short tail of your yarn and pull it tight until the center hole completely disappears. To finish this initial round, insert your hook into the top of your beginning chain-two stitch and execute a neat slip stitch to join. You have now completed round one, which serves as the solid foundation for the rest of your beautiful project.
To begin round two, chain two to establish your height, and then work a double crochet into the exact same stitch as your chain. For the remainder of this round, you will work two double crochet stitches into every single stitch from the previous row all the way around. This systematic increase doubles your stitch count to twenty-four, allowing your circle to grow perfectly flat without curling at the edges.
Join round two with a slip stitch to the top of your initial chain-two, and prepare yourself for the final body row in round three. Chain two, work a second double crochet into that same stitch, and then work just one double crochet into the next stitch. Repeat this sequence—two double crochets in one stitch, followed by one double crochet in the next—all the way around the circle until you reach the end.
This specific increase pattern brings your total stitch count to thirty-six, creating the ideal diameter for a standard beverage mug. Join this final round with another clean slip stitch, ensure the work lies completely flat on your table, and admire the beautiful geometric symmetry you have created. If your circle looks flat and even, you are ready to move on to the finishing touches of this tutorial.
Before cutting your yarn, pull a slightly longer loop through to give yourself plenty of room for a secure finish. Cut your working yarn, leaving a tail of at least six inches, and pull the thread completely through the loop to fasten off your work. This structural layout forms the core of your coaster, ensuring it is robust enough to handle daily use while looking absolutely fantastic.
4. Professional Finishing Techniques and Care Instructions
The difference between an amateur crafting project and a stunning, store-quality piece lies entirely within the final details. To finish your crochet coaster professionally, thread your remaining six-inch yarn tail onto your tapestry needle. Instead of just knotting the yarn, carefully weave the needle back and forth through the inside of your stitches on the back of the coaster, changing directions at least three times to lock it in place.
Weaving in your ends with this specific directional change ensures that no matter how many times the item is handled or washed, the yarn will never slip out. Once you have woven it in securely, gently stretch the fabric to make sure there is no puckering, and clip the excess yarn close to the stitches. Repeat this exact same process with the starting tail in the center of your magic ring to ensure absolute structural security.
To take your handmade item to the next level, you should highly consider a simple process known in the crafting community as blocking. Wet blocking involves soaking your finished coaster in lukewarm water with a drop of gentle soap, squeezing out the excess moisture in a towel, and pinning it flat onto a foam board. Allowing it to dry completely in this pinned position relaxes the cotton fibers and creates perfectly crisp, professional edges.
Once your beautiful creations are in regular use around your home, knowing how to clean and care for them will keep them looking brand new for years. Because you wisely chose high-quality cotton yarn for this project, your coasters can easily be hand washed in warm soapy water whenever spills inevitably happen. Lay them flat to dry after washing to maintain their perfect circular shape and prevent any unwanted stretching.
If you prefer using a washing machine, place your cotton coasters inside a mesh lingerie bag to protect them from snagging on zippers or buttons from other garments. Use a gentle, cold cycle and reshape them completely by hand immediately after taking them out of the machine. Taking these few extra moments to care for your work preserves the vibrant colors and the tight stitch definition you worked so hard to achieve.
These handmade pieces make incredible, thoughtful gifts for housewarming parties, weddings, holidays, or teacher appreciation days. You can tie a stack of four or six coasters together with a rustic piece of twine or a beautiful satin ribbon to create an instant, elegant present. Now that you have completed this comprehensive tutorial, you possess the skills to create endless variations, experimenting with colors and borders to match any style.
Frequently Asked Questions (FAQ)
What is the best yarn type for making a durable crochet coaster?
The absolute best yarn type for this project is 100% cotton yarn, specifically in a worsted or medium weight. Cotton is highly absorbent, which means it will easily catch any condensation dripping from cold drinks or protect surfaces from hot beverages. Acrylic yarn is not recommended for this type of project because it lacks absorbency and can easily melt or warp when exposed to high heat from mugs.
Why is my coaster curling into a bowl shape instead of laying flat?
Curling usually happens for two common reasons: either your stitch tension is far too tight, or you accidentally missed an increase stitch in your rounds. When working in circles, each round requires a specific, mathematically consistent number of increases to allow the diameter to expand flatly. If you notice curling, try relaxing your hands to loosen your tension, or count your stitches to ensure you have the exact number required for that round.
How long does it typically take a beginner to finish one coaster?
For a complete beginner who is still learning the basic double crochet stitch and adjusting to their hook comfort, a single coaster might take around 30 to 45 minutes to complete. As you develop muscle memory, establish a steady rhythm, and get comfortable reading the pattern steps, you will quickly find that you can easily finish a complete coaster in less than 15 to 20 minutes.
Can I use this pattern to make larger mats or plant place settings?
Absolutely! The beautiful thing about circular crochet patterns is that they are infinitely expandable. To make a larger mat or a plant placeholder, simply continue following the standard rules of circular increases for subsequent rounds. For example, round four would follow a pattern of two double crochets in one stitch, followed by one double crochet in each of the next two stitches, allowing the project to grow smoothly to any size you desire.
Conclusion
In conclusion, this crochet coaster journey demonstrates just how simple, relaxing, and incredibly rewarding handmade home decor can be when you have the right guidance. Throughout this comprehensive tutorial, we have explored everything from choosing high-quality, absorbent cotton yarn to mastering the foundations of the magic ring and double crochet increases.
By focusing on clean joins, proper tension, and professional finishing techniques like weaving in ends and blocking, you now have the ability to create gorgeous, practical mats that elevate your living space or serve as heartwarming gifts for loved ones.