Are you ready to elevate your quilting journey with a project that brings the vibrant beauty of a blooming garden straight onto your fabric? The Flora Quilt Block – Tutorial is exactly what you need to master a timeless, nature-inspired design that adds elegance and a fresh, modern touch to any quilting project. Whether you are planning to create a stunning botanical heirloom blanket, a charming set of decorative throw pillows, or a fresh table runner for the spring season, learning this versatile design will quickly become one of your favorite quilting achievements.
Quilting has always been a beautiful blend of precise geometry and artistic self-expression, and this specific pattern perfectly captures that balance. In this comprehensive guide, we are going to break down every single step of the process, ensuring that even if you consider yourself a beginner, you can follow along with absolute confidence and ease. By focusing on smart fabric choices, precise cutting techniques, and accurate seam allowances, you will see how a handful of simple fabric pieces can seamlessly come together to form an intricate, breathtaking floral motif.
Mastering the Flora Quilt Block – Tutorial is not just about learning a new layout; it is about expanding your creative toolkit and discovering new ways to play with color value, contrast, and negative space. Throughout this article, we will share expert tips, clear cutting guides, and essential pressing instructions to make your sewing experience completely stress-free. So, clear off your cutting mat, dust off your rotary cutter, gather your favorite coordinating fabric scraps, and let’s dive deep into the wonderful world of floral quilt making!
1. Selecting the Perfect Fabrics for Your Flora Quilt Block
When preparing to dive into the Flora Quilt Block – Tutorial, your very first step is choosing a cohesive and striking color palette that will make your design pop. The secret to a breathtaking botanical block lies entirely in the contrast between your background fabric and the petals of your flower. For a classic, timeless aesthetic, many quilters prefer crisp white, soft cream, or deep charcoal backgrounds that allow the vibrant colors of the central flower to take center stage.
To create a realistic sense of depth within the petals, you should consider using monochromatic gradients or highly contrasting complementary colors. For instance, blending soft pinks with deep magentas, or pairing sunny yellows with rich violets, can give your block a beautiful, lifelike dimension. Don’t be afraid to mix small-scale prints, delicate polkadots, or subtle batiks with solid fabrics to add wonderful texture and visual movement to the final piece.
Fabric quality is another critical element that can make or break your experience with this Flora Quilt Block – Tutorial. Always opt for high-quality, 100% quilting cotton, as it holds its shape beautifully during cutting, piecing, and pressing, preventing any unwanted stretching. Pre-washing your fabrics is an excellent practice if you are working with highly saturated colors like deep reds or blues, ensuring they won’t bleed when your finished quilt goes into the washing machine.
Ironing your chosen fabrics with a good quality spray starch before you even touch them with a rotary cutter will give them extra stability. This simple preparation step makes working with smaller pieces or bias edges significantly easier, resulting in flatter seams and perfectly square blocks. Take your time during this initial phase, as enjoying the process of laying out different fabric combinations is one of the most fulfilling parts of the quilting craft.
Keep in mind that the scale of the prints you select will heavily influence how recognizable the final flower motif looks from a distance. Large, bold prints can sometimes swallow up the clean lines of the piecing, making the overall floral pattern look a bit muddled or disconnected. Stick to solid colors, subtle tonal blenders, or tiny directional prints to ensure that every single petal within the block remains sharp, distinct, and visually stunning.
Ultimately, your fabric selection should tell a unique story and reflect your own personal style, whether you prefer soft, romantic pastels or bold, high-contrast modern hues. Think about where the finished quilt will be displayed or who will be receiving it as a thoughtful, handmade gift. Once you have curated the ultimate bundle of fabrics and prepped them to perfection, you are officially ready to move on to the precise layout and cutting stage.
2. Comprehensive Cutting Guide and Layout Preparation
Accurate cutting is the absolute foundation of any successful quilting project, and it is especially crucial when following this Flora Quilt Block – Tutorial. To achieve those crisp, perfectly pointed petals and clean intersections, you will need a sharp rotary cutter blade, a reliable cutting mat, and a clear acrylic quilting ruler. Take your time to measure twice and cut once, as even a tiny sixteenth of an inch error can compound across the block and throw off your alignment.
For a standard twelve-inch finished block, you will need to cut a specific combination of squares and rectangles from both your background and focus fabrics. From your primary background fabric, cut four medium-sized squares for the outer corners and a series of smaller squares that will be used to create the delicate snowball corners on your petals. From your main flower petal fabrics, carefully cut the designated rectangles and squares required to build the layers of the blossom.
Organization is your best friend during this phase of the Flora Quilt Block – Tutorial, so keeping your cut pieces in labeled piles will save you plenty of time. You can use small sticky notes or specialized quilting pins with numbers to keep track of which fabric piece belongs to the center, the inner petals, and the outer border. This disciplined approach eliminates any confusion once you sit down at your sewing machine and start piecing the components together.
Once all your pieces are meticulously cut, it is highly recommended to arrange them on a portable design wall, a piece of batting, or a clean flat table. Laying out the entire block in its final configuration before sewing a single stitch allows you to double-check your color placement and value contrast. It gives you a clear visual roadmap of how the pieces interact, helping you catch any accidental upside-down prints or misplaced colors early on.
During this layout process, pay close attention to any directional prints you might have chosen to use, ensuring they all face the correct way for a harmonious look. Take a quick photo of your laid-out block with your smartphone; this serves as an invaluable digital reference guide that you can look back at as you piece the block row by row. This simple trick prevents you from accidentally turning a unit the wrong way while walking from your design table to your sewing machine.
With all your pieces cut with absolute precision and your layout visually verified, you can proceed to the sewing machine with complete peace of mind. Remember that patience during the cutting phase pays off massively when it comes to the actual assembly, resulting in a smooth, enjoyable sewing experience. Now that your beautiful fabric puzzle is laid out before you, it is time to turn on your machine and start stitching the pieces together.
3. Step by Step Assembly and Sewing Techniques
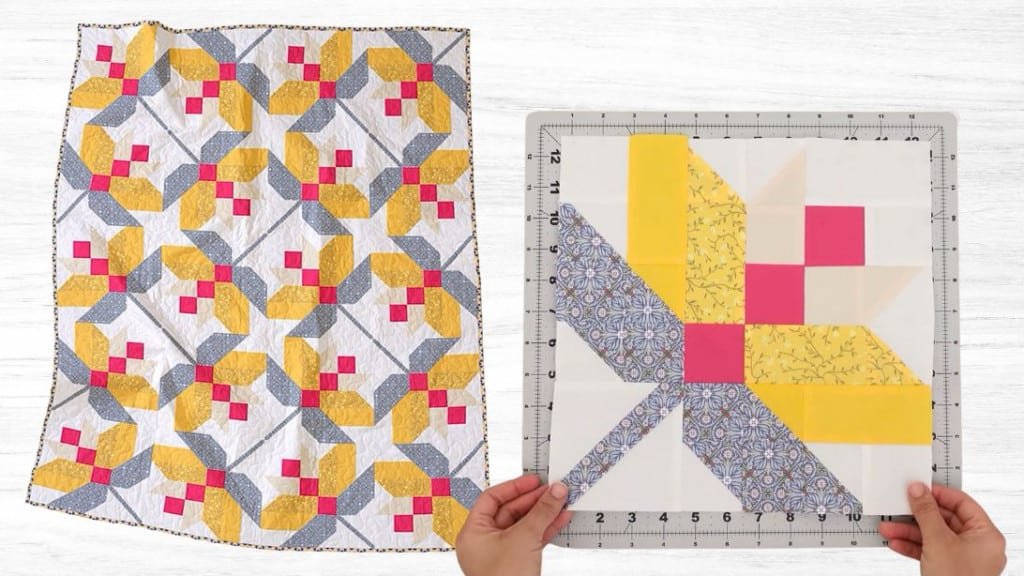
Now we arrive at the heart of the Flora Quilt Block – Tutorial, where your precisely cut fabric pieces begin to transform into a gorgeous, blooming flower block. Set your sewing machine to a standard piecing stitch length, usually around 2.0mm to 2.5mm, and ensure you are using a fresh, sharp universal or microtex needle. The single most important rule for this assembly process is maintaining a strict, accurate quarter-inch seam allowance throughout the entire construction.
We will begin the assembly by constructing the central unit of the flower, which often features a beautiful square-in-a-square design or a prominent fussy-cut fabric. To create the gentle curves of the petals without actually sewing difficult curved seams, we utilize the popular corner-triangle or “snowballing” technique. This involves drawing a diagonal line on the back of your small background squares, aligning them on the corners of your petal rectangles, and sewing directly on the line.
After sewing along your marked diagonal guide lines, carefully trim away the excess fabric a quarter of an inch away from the stitched line using your ruler and rotary cutter. Open up the resulting triangle and gently press the seam open or toward the darker fabric to create a perfect, clean corner triangle that mimics a petal. Repeat this exact process for all the designated petal units, taking care not to stretch the bias edges of the fabric as you handle them.
Once your individual petal units and corner sections are fully constructed, it is time to assemble the block using a classic, organized three-by-three grid layout. Sew the top row pieces together from left to right, followed by the middle row containing your flower center, and finally the bottom row. Always use fine, glass-head quilting pins at every single intersection to prevent the fabric layers from shifting as they pass under your machine’s presser foot.
As you join the individual rows together to complete your masterwork, you will want to match up your seams perfectly by nesting them tightly together. Nesting seams involves pressing the seam allowances of adjacent rows in opposite directions, allowing the fabric folds to lock together beautifully like puzzle pieces. This professional technique ensures that your corners meet with absolute perfection, giving your finished block a highly polished, expert look that you can be proud of.
Take your time as you guide the fabric through the machine, letting the feed dogs do the work rather than pulling or pushing the pieces forcefully. Once the rows are securely joined, give your completed block a final, thorough press with your iron, moving it straight up and down rather than sliding it. Congratulations, you have successfully brought the beautiful floral design to life through careful, structured, and mindful piecing techniques!
4. Professional Pressing Tips and Squaring Up the Block
The final step in our Flora Quilt Block – Tutorial is just as crucial as the first, focusing on the professional finishing techniques of pressing and squaring up. A quilt block is never truly finished until it has been properly pressed to lay completely flat and trimmed to its exact intended dimensions. Proper pressing is a deliberate act of using heat and weight to set the stitches, which is completely different from aggressive ironing that can easily warp your fabric.
To begin, place your hot iron directly over the newly sewn seams while they are still closed to “set” the stitches into the cotton fibers. Next, carefully open up the fabric pieces and press from the front side, using your fingers to gently guide the seam open or to one side before applying the iron. Pressing your seams flat minimizes any bulk at the intersections, making the quilting process much smoother down the road when you assemble the entire quilt top.
Whether you choose to press your seams to the side or press them completely open is a matter of personal preference, but consistency is key. Pressing seams to one side provides extra strength and allows for easy nesting, while pressing them open creates an incredibly flat surface and reduces bulk in dense areas. If you encounter stubborn seams that refuse to lay completely flat, using a wooden tailor’s clapper immediately after applying steam works wonders to flatten them.
Once your block has cooled down completely from the iron, place it carefully on your cutting mat to check its final dimensions and squareness. Use a large square acrylic quilting ruler that matches or exceeds the size of your block, aligning the diagonal markings on the ruler with the diagonal seams of your flower. This ensures that the central flower motif remains perfectly centered and symmetrical within the outer boundaries of the finished block.
Gently trim away any tiny slivers of fabric, loose threads, or uneven edges that may have developed during the sewing process, ensuring all four corners form perfect ninety-degree angles. Squaring up your blocks at this stage guarantees that when you sew multiple blocks together to form a large quilt top, they will fit together effortlessly without any puckering. It is the ultimate secret weapon that separates amateur quilting projects from breathtaking, professional-quality textile masterpieces.
Now that your block is beautifully pressed, perfectly square, and looking vibrant, you can step back and admire your handiwork. This versatile design can be repeated in dozens of different colorways to create an entire garden-themed quilt, or framed with borders to make an elegant standalone piece. By mastering the techniques shared in this guide, you have unlocked endless creative possibilities for your future textile art journeys.
Frequently Asked Questions (FAQ)
What is the ideal skill level required for this specific quilt block?
This pattern is perfectly suited for confident beginners and intermediate quilters alike. While it looks remarkably intricate and detailed when finished, it relies entirely on straightforward, straight-line sewing and basic corner-triangle techniques, making it an excellent skill-building project.
Can I use scrap fabrics or fat quarters to make this design?
Absolutely! This design is incredibly scrap-friendly and works beautifully with fat quarters. Utilizing a wide variety of colorful fabric scraps can give your finished block a charming, scrappy, wildflower appearance that adds unique personality and warmth to the project.
How do I stop my fabric points from getting cut off at the seams?
To keep your beautiful petal points perfectly intact, always ensure you are sewing with an accurate quarter-inch seam allowance. When joining your units, look closely at the back of the fabric and sew precisely through the exact intersection where your previous diagonal stitching lines meet.
Should I pre-wash my quilting cottons before starting this project?
Pre-washing is highly recommended if you are using highly saturated fabrics alongside crisp white backgrounds to prevent color bleeding. However, if you prefer the crisp feel and extra stability of unwashed fabric, you can use high-quality color catcher sheets in the washing machine during the first wash.
What size does this specific block turn out to be when finished?
Following the standard measurements provided in this guide, the block will measure twelve and a half inches un-finished, which results in a perfect twelve-inch square block once it is fully sewn into a completed quilt top.
Conclusion
In this comprehensive guide, we have explored every essential step of creating a beautiful botanical masterpiece, from selecting high-contrast, quality fabrics to mastering the precise cutting, layout, and assembly techniques of the Flora Quilt Block – Tutorial.
We discussed the immense value of maintaining a consistent quarter-inch seam allowance, using the snowballing technique for effortless petal shapes, and employing professional pressing and squaring-up practices to achieve a completely flat, flawless finish. This versatile block is a phenomenal way to practice precision while expressing your unique artistic style through endless color combinations.