Mastering the Quilt Carpenter’s Star – Tutorial is one of the most rewarding milestones for any passionate quilter. This classic geometric pattern beautifully blends tradition with modern design, creating a stunning visual impact that looks incredibly intricate yet is surprisingly approachable. Whether you are aiming to create a beautiful family heirloom, a cozy throw for your living room, or an eye-catching wall hanging, learning how to master this specific design will elevate your quilting skills to a whole new level.
By following a well-structured Quilt Carpenter’s Star – Tutorial, you will discover that the secret to this mesmerizing pattern lies in the precise arrangement of diamonds, squares, and half-square triangles. While it looks like a complex puzzle that only master artisans could tackle, breaking it down step-by-step makes it completely manageable for quilters of various skill levels. This comprehensive guide is designed to walk you through every single phase of the process with clarity, encouraging words, and practical advice.
In this ultimate Quilt Carpenter’s Star – Tutorial, we are going to explore everything from selecting the perfect fabric combinations to cutting your pieces accurately, assembling the blocks flawlessly, and putting the final touches on your masterpiece. We will use time-tested techniques that guarantee sharp points and flat seams, ensuring your finished project looks absolutely spectacular. Grab your rotary cutter, prepare your sewing machine, and let’s dive into the wonderful world of star quilting together.
1 Understanding the Anatomy and Fabric Selection for Your Carpenter’s Star
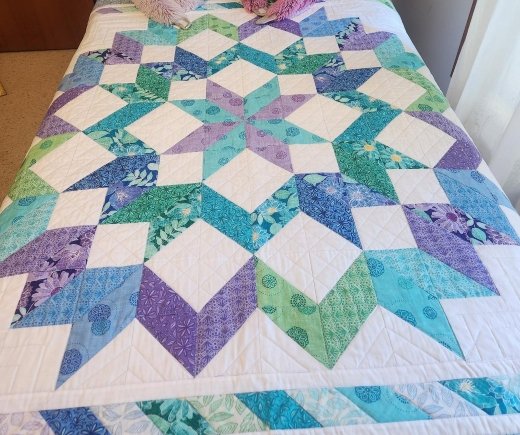
Before cutting into your favorite fabrics, it is vital to understand how the visual magic of this specific pattern works. The Quilt Carpenter’s Star – Tutorial relies heavily on color contrast to make the central star pop against the background. Typically, this design uses a combination of light, medium, and dark fabrics to create a sense of depth and movement that draws the eye directly to the center.
When selecting your materials, consider using high-quality 100% cotton fabric, as it holds its shape beautifully during cutting and pressing. For a classic look, many crafters choose a neutral background like crisp white, cream, or light gray, which allows the star points to shine. You can then select two or three coordinating colors for the star itself to create a harmonious blend.
If you prefer a more modern aesthetic, don’t be afraid to experiment with bold prints, batiks, or even upcycled textiles like denim for a rustic twist. The beauty of this Quilt Carpenter’s Star – Tutorial is that it adapts wonderfully to any color palette you choose. Testing your fabrics side by side under good lighting will help you visualize how the final piece will look.
Accurate fabric preparation is the secret foundation of any successful quilting project. We highly recommend pressing all your fabrics with starch before you begin cutting to minimize stretching along the bias edges. This simple extra step ensures that your fabric remains stable and crisp throughout the entire construction process.
Keep in mind that the quantity of fabric you need will depend entirely on the final size of the quilt you plan to make. For a standard throw size, you will generally need a few yards of your background fabric and smaller cuts of your accent colors. Always buy a little extra fabric just in case you make a mistake during the cutting phase.
By taking the time to plan your colors and prepare your materials properly, you set yourself up for a stress-free sewing experience. A well-thought-out color scheme transforms a simple arrangement of fabric into a breathtaking work of art. Now that your fabrics are selected and pressed, you are ready to move on to the next crucial phase.
2 Precise Cutting and Preparing the Essential Blocks
The key to achieving flawless results in this Quilt Carpenter’s Star – Tutorial is absolute precision during the cutting process. Because this pattern relies on perfect geometric alignment, even a tiny error in cutting can compound as you sew the pieces together. Take your time, use a sharp rotary cutter blade, and always measure twice before making your cuts.
You will need to cut a combination of squares and rectangles from both your background fabric and your chosen star accent fabrics. To make the process smoother, organized quilters often use small labels or paper plates to keep their different cut sizes separated. Labeling your pieces by size and color will save you a lot of confusion later on.
A significant portion of the star’s stunning design is created using half-square triangles (HSTs), which form the dynamic outer points of the star. This Quilt Carpenter’s Star – Tutorial utilizes efficient piecing methods to create these triangles quickly and accurately. Learning to manage these diagonal seams is a fantastic skill that will serve you well in many future projects.
To make your HSTs, you will pair a background square with an accent square, draw a diagonal line on the back, and sew a quarter-inch seam on both sides of that line. Once you cut along the drawn line, you will open the pieces to reveal two perfect half-square triangles. Pressing these seams carefully toward the darker fabric prevents shadows from showing through.
After pressing your HSTs, it is incredibly important to trim them down to the exact size required for your pattern. Using a square quilting ruler with a 45-degree line makes this squaring-up process quick and highly accurate. Trimming away the tiny excess fabric bits ensures that your final rows will line up perfectly without puckering.
Consistency is your best friend during this stage, so make sure your cutting mat is flat and your ruler doesn’t slip. Once all your squares, rectangles, and half-square triangles are cleanly cut and neatly stacked, the hard work is done. You are now ready for the most exciting part of the project: watching the star come to life on your design wall.
3 Step by Step Assembly of the Star Center and Rows
Assembling your pieces is where the real fun begins, and following a structured Quilt Carpenter’s Star – Tutorial makes the assembly process smooth and enjoyable. We highly recommend using a design wall, a large table, or even a clean floor space to lay out all your cut pieces. Seeing the layout visually helps you ensure that every single block is facing the correct direction.
It is very easy to accidentally flip a half-square triangle the wrong way, which can disrupt the beautiful symmetry of the star. Take a moment to step back and double-check your layout against the master pattern image before you sew a single stitch. Once you are confident that the layout is correct, you can begin sewing the blocks into rows.
This pattern is typically assembled by joining individual blocks into horizontal or vertical rows, which are then sewn together to complete the top. To achieve professional results, use a precise quarter-inch seam allowance throughout the entire construction process. A quarter-inch sewing machine foot can be an invaluable tool to maintain this consistency.
When joining your pieces, chain piecing is a fantastic time-saving technique that keeps your workflow moving efficiently. Chain piecing involves feeding pairs of fabric through your sewing machine one after the other without cutting the threads in between. This method not only saves time but also conserves your sewing thread.
As you complete each row, press the seams of alternating rows in opposite directions. For example, press the seams of row one to the right, and the seams of row two to the left. This technique, known as nesting seams, allows the fabric joins to lock together perfectly when you sew the rows to each other.
Nesting your seams reduces bulk at the intersections, making it much easier to achieve perfectly sharp star points that look amazing. Pinning securely at each intersection before sewing the rows together prevents the fabric from shifting under the machine. Once all the rows are joined, give your completed quilt top a thorough, gentle press.
4 Professional Border Addition and Final Quilting Flourishes
Now that the central star of your Quilt Carpenter’s Star – Tutorial is fully assembled, adding borders is the next step to frame your work. Borders not only increase the overall size of your quilt, but they also give the central design room to breathe visually. You can choose a simple, solid border or a multi-layered border using coordinating fabrics.
When cutting your border strips, avoid the temptation to simply sew a long strip to the side of your quilt and cut off the excess. This shortcut can cause wavy edges and prevent your quilt from laying flat. Instead, measure the center of your quilt top and cut your border strips to that exact measurement.
Pin your border strips to the quilt top at the center, the ends, and at regular intervals in between, gently easing any fullness as you sew. This proper technique ensures that your finished project remains perfectly square and lies completely flat on a bed or wall. Once your borders are attached, your stunning quilt top is officially complete.
The next phase involves creating your quilt sandwich by layering the backing fabric, the batting, and your beautiful star quilt top together. Make sure your backing fabric is at least four inches larger than your quilt top on all sides to accommodate the quilting process. Smooth out all the layers carefully to eliminate wrinkles.
You can secure your quilt sandwich together using safety pins, a temporary basting spray, or traditional basting stitches. When it comes to the actual quilting, you can choose a simple straight-line design using a walking foot or try free-motion quilting. Straight lines running parallel to the star facets accentuate the geometric beauty of the design.
After the quilting is complete, trim away the excess batting and backing fabric so that the edges are perfectly square. Finish your project by applying a durable double-fold binding using your favorite method to secure the edges beautifully. Congratulations, you have successfully completed a masterpiece that will be cherished for many years to follow.
Frequently Asked Questions (FAQ)
What is the skill level required for this Carpenter’s Star pattern?
This pattern is ideal for confident beginners and intermediate quilters. While the final design looks incredibly complex, it is made entirely of basic squares, rectangles, and half-square triangles. If you can maintain a consistent quarter-inch seam allowance and cut fabric accurately, you can easily succeed with this project.
How do I prevent my star points from getting cut off when sewing rows?
To keep your star points perfectly sharp, look closely at the back of your pieces when sewing rows together. You will see the stitched “X” where your previous diagonal seams intersect. Always guide your needle directly through or just a hair to the right of that intersection to avoid cutting off the beautiful points.
Can I make this quilt using pre-cut fabrics like Layer Cakes or Charm Packs?
Yes, you can absolutely adapt this pattern for pre-cut fabrics. Layer Cakes (10-inch squares) work wonderfully for larger star blocks, while Charm Packs (5-inch squares) are perfect for a smaller, delicate baby quilt version. Just ensure you have enough matching background squares to complete the layout.
Why is it so important to press seams in opposite directions?
Pressing the seams of alternating rows in opposite directions allows them to “nest” or lock together perfectly when joining rows. This reduces fabric bulk at the corners, prevents your sewing machine from skipping stitches over thick areas, and helps you achieve perfectly aligned intersections.
What type of batting is best for this specific star quilt project?
The choice of batting depends on how you plan to use the finished item. For a cozy, traditional feel with beautiful stitch definition, 100% cotton batting is an excellent choice. If you want a lightweight throw with a bit more loft and minimal wrinkling, a high-quality cotton-poly blend works beautifully.
Conclusion
In this Quilt Carpenter’s Star – Tutorial, we have explored the entire creative journey of building a timeless geometric masterpiece from scratch. We covered how proper fabric contrast creates depth, the vital importance of precision cutting, and efficient methods for assembling half-square triangles.
We also discussed how nesting seams keeps your quilt flat and how proper border application ensures a perfectly square finish. With these foundational quilting skills in your crafting toolkit, you are fully equipped to create a gorgeous star design that showcases your dedication and creative flair.