Crochet Shell Stitch – Tutorial is exactly what you need to take your fiber art skills to the next level and create breathtaking, textured projects. Whether you are a complete beginner picking up a hook for the first time or a seasoned maker looking to add a classic pattern to your repertoire, this beautiful technique is incredibly versatile. By learning how to master this design, you will be able to fashion everything from cozy baby blankets to elegant summer shawls with ease.
The beauty of the Crochet Shell Stitch – Tutorial lies in its simplicity and the stunning visual impact it creates. At its core, the pattern is formed by working multiple stitches into a single base stitch, which causes the fabric to fan out naturally into a shape that resembles a seashell. It is a fantastic way to practice your tension, learn how to count stitches accurately, and build the confidence needed for more intricate lace patterns down the road.
In this comprehensive guide, we are going to break down the Crochet Shell Stitch – Tutorial step by step so you can master it without any frustration. We will cover the essential materials you need, the basic stitches required, a detailed walk-through of the pattern rows, and some expert tips to keep your edges perfectly straight. Grab your favorite yarn, find a comfortable spot to sit, and let’s dive right into this wonderful crafting journey together.
1. Essential Materials for Your Crochet Shell Stitch Tutorial
Choosing the right yarn is the first step to ensuring your project turns out beautifully. For beginners tackling this Crochet Shell Stitch – Tutorial, a worsted weight (medium number 4) acrylic or cotton yarn is highly recommended. These yarns offer excellent stitch definition, meaning you can easily see where to insert your hook for each shell.
Selecting the correct crochet hook is just as important as your yarn selection. Always check your yarn label for the recommended hook size, which is typically a 5.0mm (H-8) or 5.5mm (I-9) for worsted weight yarn. An ergonomic hook can also help prevent hand fatigue as you practice the repetitive motions of the crochet shell.
You will also need a few basic notions to keep your work organized and tidy. A sharp pair of yarn scissors is essential for cutting your thread when changing colors or finishing your project. A blunt tapestry needle, also known as a yarn needle, will be required to weave in your loose ends securely.
Stitch markers can be incredibly helpful when you are first learning the Crochet Shell Stitch – Tutorial. Placing a marker in the first and last stitch of each row ensures you do not accidentally drop stitches at the edges. This simple trick saves hours of ripping out work later on.
A flexible measuring tape is another great tool to keep in your crochet basket. It allows you to check your gauge and measure the width of your project as you go. Keeping track of your dimensions ensures your blankets or garments turn out exactly the size you intend.
Lastly, create a comfortable and well-lit crafting environment before you begin. Good lighting makes it much easier to see the individual loops of your crochet stitches. A relaxed posture and a clear space will make your learning experience completely enjoyable and stress-free.
2. Fundamental Stitches Required for the Shell Pattern
Before diving into the actual Crochet Shell Stitch – Tutorial, you need to be comfortable with a few foundational stitches. The first is the slip knot, which secures the yarn to your hook to begin. From there, you will create a foundation chain, which acts as the base for your entire project.
The single crochet is the next critical building block for this beautiful design. This short, sturdy stitch is often used to separate the fans and anchor them down to the row below. Mastering the single crochet ensures your crochet fabric has a solid structure and great stability.
The star of the show in this Crochet Shell Stitch – Tutorial is the double crochet stitch. Double crochets provide the height and fluid drape that allow the shells to fan out beautifully. You will be placing multiple double crochets into one single space to create the iconic shell shape.
Understanding stitch anatomy is another crucial skill you will develop during this process. You need to know how to identify the front loop, back loop, and the “V” shape at the top of each stitch. For a standard shell, you will insert your hook under both loops of the “V”.
Counting your chains correctly is vital because this pattern relies on a specific mathematical multiple. Usually, a standard shell pattern requires a multiple of 6 chains plus 1 extra chain for the foundation row. Keeping your chain count accurate ensures your pattern repeats align perfectly from edge to edge.
Practice makes perfect, so do not hesitate to make a small practice swatch before starting a large project. Working a few rows of basic stitches will warm up your hands and normalize your tension. Consistent tension is the secret ingredient to making your crochet shells look neat, uniform, and professional.
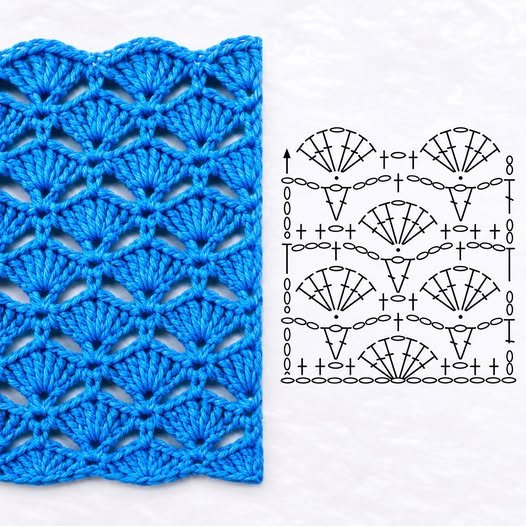
3. Step by Step Guide to Crafting the Shell Row
To begin the core section of our Crochet Shell Stitch – Tutorial, start by crocheting a foundation chain with a multiple of 6 + 1. For a quick practice swatch, you can chain 25 loops altogether. Once your chain is ready, turn your work to prepare for the very first row of stitching.
For the first row, skip the first chain from your hook and work a single crochet into the second chain. Then, skip two chains, and in the next chain, work 5 double crochets all into that same exact loop. You have just created your very first beautiful crochet shell stitch!
To anchor your fan, skip the next two chains and work one single crochet into the following chain. Repeat this sequence—skip two chains, work 5 double crochets in the next, skip two chains, work one single crochet—all the way across. Your row should finish with a single crochet in the very last chain.
For the second row, chain 3 (which counts as your first double crochet) and turn your work around. Work 2 double crochets into the very first single crochet stitch of the row below. This creates a half-shell, which keeps the edges of your fabric straight and even.
Next, skip the next two double crochets of the previous shell, and work a single crochet into the center double crochet of that fan. Then, work 5 double crochets directly into the single crochet from the previous row. Repeat this alternating pattern across the entire length of your work.
As you reach the end of the second row, work 3 double crochets into the final single crochet to finish the edge. From here, you will simply alternate between row 1 and row 2. This easy-to-remember repetition is what makes the Crochet Shell Stitch – Tutorial so soothing and fun to work on.
4. Top Tips for Perfect Tension and Straight Edges
The most common issue crafters face when learning the Crochet Shell Stitch – Tutorial is maintaining perfectly straight edges. Because the pattern alternates between full shells and half shells at the borders, it is easy to misplace the final stitch. Always count your stitches at the end of every row to stay on track.
If you notice your edges are curling inward or expanding outward, your stitch placement might be slightly off. Remember that a turning chain of 3 always counts as a double crochet stitch. Ensuring you work your final stitch into the top of that turning chain keeps your borders beautifully vertical.
Tension consistency is another key factor in making your handmade items look flawless. If you hold the yarn too tightly, your shells will look stiff and cramped rather than fluid. If you hold it too loosely, the fabric will become floppy and lose its gorgeous definition.
If you struggle with tight tension, try switching to a crochet hook that is one size larger than recommended. This simple adjustment automatically loosens your loops without forcing you to change your natural hand grip. It allows the double crochet stitches to bloom into beautiful, relaxed fans.
Blocking your finished project is a wonderful way to give it a polished, store-bought appearance. Blocking involves soaking your completed item in water, gently pressing out the excess moisture, and pinning it flat to dry. This process relaxes the yarn fibers and opens up the stitch pattern beautifully.
Do not be discouraged if your first few rows look a little uneven or messy. Crochet is a tactile skill that develops with muscle memory and patience over time. Keep practicing this Crochet Shell Stitch – Tutorial, and soon you will be flowing through the rows effortlessly.
FAQ – Frequently Asked Questions
What is the stitch multiple for the crochet shell stitch?
Most standard versions of this pattern use a multiple of 6 chains plus 1 extra chain for the foundation row. However, variations exist where you can create smaller shells using a multiple of 4 + 1, or larger shells using a multiple of 8 + 1.
Can a total beginner learn the shell stitch?
Yes, absolutely! If you already know how to make a chain, a single crochet, and a double crochet, you can easily master this pattern. It is an excellent next-step project for beginners looking to expand their skills.
Is the shell stitch a yarn eater?
Because this design groups multiple double crochets together into a single space, it does consume slightly more yarn than standard solid rows. It is highly recommended to buy an extra skein of yarn to ensure you do not run out mid-project.
What types of projects are best for this stitch?
This beautiful texture is incredibly versatile and works perfectly for baby blankets, afghans, winter scarves, lightweight shawls, and even textured washcloths. The natural waves add a gorgeous decorative touch to any home decor item.
How do I change colors smoothly in this pattern?
The best way to change colors is to introduce the new yarn during the final pull-through of the very last stitch of a row. This creates a clean color transition that makes your stripes look neat and professional.
Why is my crochet fabric curling at the bottom?
Curling usually happens if your initial foundation chain was made too tightly. To fix this common issue, try using a crochet hook that is one full size larger just for your starting chain, then switch back to your regular hook for the rest of the project.
Conclusion
Mastering the Crochet Shell Stitch – Tutorial opens up a world of creative possibilities for your crafting journey. Throughout this guide, we explored the essential materials needed, the foundational stitches, a complete step-by-step row walk-through, and professional tips for maintaining straight edges and perfect tension. This classic, elegant pattern is a wonderful way to bring rich texture and timeless beauty to your handmade blankets, wearables, and accessories.
We would absolutely love to hear from you! Please leave your sincere opinion and suggestions in the comments section below. Let us know how your practice swatch turned out, what projects you plan to create next, or if you have any questions about the steps outlined in this guide.