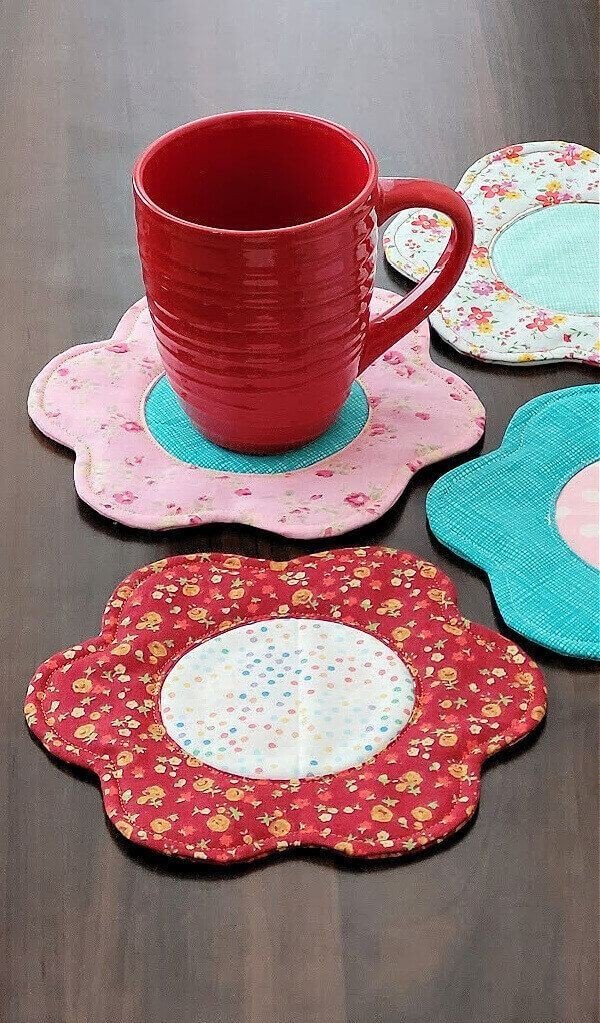
Fabric Flower-Shaped Coaster – Tutorial is the ultimate guide you need to create delightful, functional pieces of home decor while expanding your sewing skills. There is something incredibly satisfying about transforming small pieces of material into beautiful, practical items that protect your wooden tables from unsightly water rings. Whether you are searching for a relaxing weekend sewing project, a budget-friendly handmade gift idea, or a creative way to declutter your fabric bin, this project hits all the right notes.
The beauty of following this comprehensive Fabric Flower-Shaped Coaster – Tutorial lies in its absolute simplicity and its wonderful adaptability. You do not need an advanced sewing machine or years of professional experience to achieve a gorgeous, boutique-quality finish that looks stunning on any coffee table. By mastering the basic steps of cutting, layering, and stitching petals, you will be able to customize these blooming drink mats to match any seasonal decor or personal style preference.
In this detailed step-by-step walkthrough, we are going to dive deep into the entire creative process so you can succeed on your very first try. We will discuss selecting the perfect textiles, preparing your templates, assembling the individual flower petals, and adding those vital finishing touches that make your work look professional. Gather your favorite colorful cotton scraps, thread your sewing machine, and let us embark on this fun, eco-friendly crafting journey together.
1. Selecting the Right Materials for Your Fabric Flower Coaster
Choosing the proper textiles is the most critical decision you will make when starting this Fabric Flower-Shaped Coaster – Tutorial. For the best results, it is highly recommended to use 100% quilting cotton because it is easy to cut, iron, and sew without slipping. Cotton also absorbs condensation from cold glasses beautifully, making it the ideal choice for functional kitchen and dining accessories.
You can get incredibly creative by experimenting with different color combinations and bold patterns for your flower petals. Consider mixing vibrant floral prints, classic polka dots, subtle solids, or rustic ginghams to give your handmade coasters a charming, eclectic look. Utilizing fabric scraps from previous quilting or apparel projects is a fantastic, sustainable way to upcycle material and reduce waste.
In addition to your main outer textiles, you will need a reliable interior layer to provide necessary structure, thickness, and heat resistance. Low-loft cotton batting, insulated fleece, or heavy-duty fusible interfacing work wonderfully as the hidden core of your flower mat. This hidden layer ensures your finished craft lies perfectly flat and offers maximum protection for delicate furniture surfaces.
Having the right cutting tools on hand will make the entire assembly process much faster, smoother, and more precise. A sharp rotary cutter, a self-healing cutting mat, and a clear acrylic quilting ruler are excellent investments for achieving clean, straight lines. If you prefer traditional methods, a pair of high-quality fabric shears will work just as well for cutting out your curved shapes.
You will also need a few essential sewing notions that are likely already sitting in your sewing basket or crafting room. High-quality polyester or cotton matching thread, fine sewing pins, fabric clips, and a heat-erable fabric marking pen are absolute necessities. The marking pen is especially useful for tracing templates directly onto your material without leaving permanent ink stains.
Lastly, make sure your sewing machine is cleaned, oiled, and fitted with a fresh, sharp universal needle before you begin stitching. A standard size 80/12 needle is perfect for piercing through multiple layers of cotton and batting without skipping stitches. Having a hot iron and an ironing board nearby is also crucial for pressing your seams flat as you progress through the steps.
2. Creating the Flower Template and Cutting Your Pieces
The foundation of a gorgeous Fabric Flower-Shaped Coaster – Tutorial relies entirely on having an accurate, well-proportioned paper template. You can easily draw your own six-petal or eight-petal flower shape on a piece of sturdy cardboard or heavy cardstock paper. Alternatively, you can find a simple blossom silhouette online, print it out, and adjust the scale until it measures roughly five inches in diameter.
When designing your template, keep in mind that the petals should be slightly oversized to accommodate your planned seam allowances. A five-inch diameter ensures that once the edges are sewn and turned right-side out, the final product is spacious enough for large mugs. Cut your paper template out cleanly using regular paper scissors, making sure all the curves are smooth and uniform.
Once your template is ready, lay your selected textiles flat on your cutting mat and press out any stubborn wrinkles with your iron. Fold your material strategically to maximize your space and minimize the amount of left-over waste you produce. Place your sturdy template on the wrong side of the fabric and use your marking pen to trace the outline carefully.
For a standard double-sided drink mat, you will need to cut out two identical flower shapes—one for the front and one for the back. If you want a playful look, use a solid color for the top side and a coordinating patterned print for the bottom side. Take your time cutting along the marked lines, ensuring you follow the rounded curves of the petals precisely.
Next, use the exact same template to cut out one single layer of your chosen batting or fusible interfacing material. If you are using fusible interfacing, follow the manufacturer’s instructions to iron it directly onto the wrong side of one fabric piece. This step adds immediate body and stability to the cotton, making it much easier to handle during the sewing phase.
After completing this step, you should have three separate pieces ready for assembly: a front fabric flower, a back fabric flower, and a center core. Grouping these pieces neatly by color or project set will keep your workspace organized and efficient. Double-check that all three layers match up perfectly in size before moving forward to the sewing machine.
3. Assembling and Sewing the Petals with Precision
Now comes the exciting assembly stage of our Fabric Flower-Shaped Coaster – Tutorial, where your individual pieces begin to look like a real blossom. Start by placing your batting or interfacing layer flat on your workspace as the bottom foundation. Then, lay your backing fabric piece on top of the batting, ensuring the printed, right side is facing upward toward you.
Next, take your front fabric flower piece and place it directly on top of the backing fabric, with its right side facing downward. This method is known as placing the fabrics “right sides together,” which ensures your beautiful prints are protected on the inside while sewing. Align all the outer curved edges and petal points perfectly so that the three layers match up precisely.
Pin the three layers securely together using fine sewing pins or handy plastic fabric clips around the entire perimeter. Leave a small, straight two-inch opening along the edge of one flat petal section unpinned. This deliberate gap is absolutely crucial because it allows you to turn the entire item right-side out once the stitching is complete.
Take your pinned project to the sewing machine and position your needle at one side of the designated two-inch opening. Lower your presser foot and sew around the entire perimeter of the flower using a standard one-quarter-inch seam allowance. Sew slowly and carefully around each rounded petal curve, lifting your presser foot slightly to pivot at the deep inner corners.
When you return to the opposite side of the two-inch opening, backstitch securely a few times to lock your threads in place. Before turning the project right-side out, it is important to clip the excess fabric at the inner V-shaped corners between each petal. Use sharp embroidery scissors to snip into these corners, being extremely careful not to cut through your actual stitches.
Clipping these inner corners reduces bulk and allows the fabric to stretch naturally without pulling or puckering when turned. You should also notch small triangles out of the rounded outer curves of each petal for an extra smooth finish. These simple prep steps are the secret to achieving crisp, perfectly defined curves that look truly professional.
4. Turning Pressing and Adding Elegant Finishing Touches
With the stitching complete, carefully insert your fingers through the two-inch opening you left unsewn between the fabric layers. Gently pull the entire fabric flower through the gap, turning it right-side out so the beautiful prints are now facing exteriorly. Take your time during this step to avoid putting too much stress on the seams and ripping your lockstitches.
Use a blunt turning tool, a wooden chopstick, or a dull knitting needle to gently push out the rounded edges of each petal. Run the tool along the inside seams to ensure every single curve is fully extended and looking perfectly round. Avoid using sharp objects like scissors or pins for this step, as they can easily poke accidental holes through your cotton.
Take your turned blossom to the ironing board and use your fingers to roll the seams flat between your thumbs. Tuck the raw edges of the two-inch turning opening inward by one-quarter of an inch so they align perfectly with the sewn border. Press the entire coaster thoroughly with a hot steam iron to set the shape and make the edges crisp.
To secure the opening permanently and add an elegant border, you will perform a technique known as topstitching. Place the coaster back under your sewing machine foot and stitch a neat line one-eighth of an inch away from the edge. Sew completely around the entire perimeter of the flower shape, closing the gap seamlessly while providing a beautiful, professional border.
For extra detail and dimension, you can sew decorative intersecting lines from the inner corners to the center of the blossom. This extra stitching mimics the natural veins found in real flower petals and helps keep the interior batting from shifting during washes. You can use a contrasting thread color for this step to make the quilted details pop beautifully against your fabric.
Clip all your loose thread tails close to the fabric surface using your small embroidery scissors to finalize your project. Give your completed drink mat one final press with the hot iron to smooth out any remaining minor wrinkles. Congratulations, you have successfully completed this gorgeous project and now have a beautiful accessory ready to grace your home!
FAQ – Frequently Asked Questions
Can I wash these fabric flower coasters in a washing machine?
Yes, absolutely! Since they are crafted from durable quilting cotton and batting, you can easily wash them in your machine on a gentle cycle. It is best to use cold water and air-dry them flat to preserve their shape, followed by a quick press with a hot iron to restore their crisp look.
Is this sewing project suitable for an absolute beginner?
Yes, it is an excellent project for someone who is just learning how to operate a sewing machine. It teaches you how to control your machine’s speed, navigate smooth curves, pivot at tight corners, and turn projects right-side out. It offers quick results that build sewing confidence.
What is the best alternative if I do not have cotton batting?
If you do not have traditional cotton quilt batting, you can use pieces of leftover flannel fabric, dense felt, or even a layer of old denim. The goal is simply to add an absorbent, thick layer inside the coaster to insulate your tabletop from heat and cold moisture.
How long does it take to make one flower coaster?
Once you have your paper template drawn and your fabric pieces cut out, sewing a single coaster takes roughly fifteen to twenty minutes. It is a fantastic assembly-line project where you can cut multiple pieces at once and sew them in batches to save time.
Why are my flower petal curves looking bumpy after turning?
Bumpy or distorted curves usually happen if you forget to notch the outer rounded edges and snip the inner corners before turning. Clipping the excess fabric relaxes the tension within the seam allowance, allowing the cotton fabric to lay perfectly flat and smooth.
Can I sew this entire project by hand instead of a machine?
You certainly can! If you do not own a sewing machine, you can use a strong backstitch by hand with a regular hand-sewing needle and thread. It will take a bit longer to finish, but it gives you excellent control over the curves and results in a beautiful heirloom quality.
Conclusion
Completing this Fabric Flower-Shaped Coaster – Tutorial is a rewarding way to enhance your home decor with handmade charm while utilizing your beloved fabric stash.
Throughout this detailed guide, we have discovered how to choose the right absorbent materials, create a precise reusable template, sew smooth curves, and add professional topstitching details. These beautiful, blossom-themed drink mats are not only highly functional furniture protectors, but they also serve as wonderful conversation pieces or heartwarming gifts for friends and family.