
If you love unique, handmade accessories that combine functionality with charm, learning how to create a Tulip Fabric Bag via a step-by-step tutorial is the perfect weekend project. This beautiful, flower-inspired pouch has taken the crafting community by storm because it is both incredibly striking and surprisingly simple to assemble. Whether you are an experienced sewist looking for a quick and satisfying project or a complete beginner eager to dive into the world of textile arts, this guide will walk you through everything you need to know. By the end of this article, you will have a gorgeous, blooming accessory that is perfect for gifting, organizing your crafting supplies, or showing off on your next weekend outing.
The beauty of a Tulip Fabric Bag lies in its clever, organic structure. When the bag is open, it sits flat or gently flares out like a flower in full bloom, making it incredibly easy to see and access everything you have stored inside. When you pull the drawstrings, the fabric petals fold upward and nestle together, mimicking the elegant silhouette of a fresh spring tulip. It is a brilliant example of how intelligent pattern drafting can turn flat pieces of cotton into a three-dimensional work of art. In this tutorial, we will focus on maximizing that visual appeal while ensuring your finished piece is durable enough for everyday use.
Creating your own boutique-style items is not just a wonderful way to express your creativity; it is also a fantastic step toward a more sustainable, intentional wardrobe. For this Tulip Fabric Bag, you can dive into your scrap pile, upcycle old cotton garments, or pick out a few coordinating fat quarters from your favorite local textile shop. Because this project thrives on contrast, choosing the right combination of exterior and interior prints is half the fun. Let us prepare your sewing space, gather your coordinates, and dive straight into the ultimate Tulip Fabric Bag tutorial that will elevate your sewing journey.
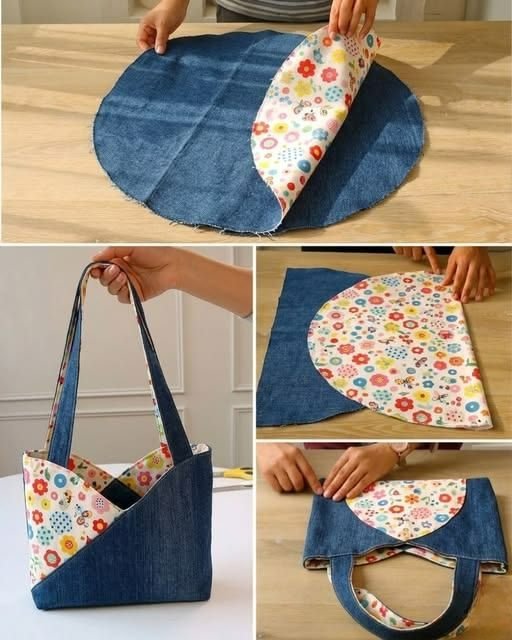
1. Choosing the Best Fabrics and Materials for Your Flower Pouch
Selecting the right materials is the absolute foundation of a successful Tulip Fabric Bag project. For the best results, you want to look for medium-weight woven fabrics that offer a balance between structure and flexibility. 100% quilting cotton is the absolute gold standard for this tutorial because it comes in thousands of vibrant prints, presses beautifully, and holds the crisp lines of the tulip petals without becoming overly bulky or stiff.
To create the distinct look of a blooming flower, you will need two contrasting fabrics: one for the outer petals (the exterior) and one for the lining (the interior). When the bag opens, the lining becomes highly visible, acting as the soft inner core of your flower. Consider using a solid color or a subtle texture for the outside, paired with a lively floral, geometric, or polka-dot print for the inside to create a beautiful visual surprise when the pouch is opened.
In addition to your main textiles, lightweight fusible interfacing is highly recommended to give your Tulip Fabric Bag the perfect amount of body. Interfacing acts as an invisible support system, preventing the cotton from drooping while still allowing the drawstrings to cinched smoothly. If your fabric is exceptionally lightweight, applying a thin layer of fusible webbing or interfacing to the petal pieces will keep your flower looking perky and well-formed.
Do not overlook the importance of your drawstrings and notions when gathering supplies for this tutorial. You will need high-quality matching sewing thread, a fabric marker or tailor’s chalk for transferring the pattern lines, and sharp fabric shears. For the closure, cotton macramé cord, satin ribbon, or handmade fabric tubes work beautifully to pull the bag together, adding a professional, boutique-quality finish to your handmade creation.
Before cutting into your precious materials, it is always a best practice to pre-wash and press your cotton fabrics. Woven cottons are notorious for shrinking during their first wash, which can warp your beautiful seams later on if the bag ever needs to be cleaned. A quick trip through the washing machine and a thorough steam press ensures your fabric is completely stabilized, flat, and ready for precision cutting.
Organization is key when setting up your creative workstation for this sewing adventure. Clear off your cutting mat, change out your sewing machine needle for a fresh universal size 80/12, and ensure your iron is hot and ready. Having a dedicated space with all your rulers, rotary cutters, and pins within arm’s reach will make following this Tulip Fabric Bag guide an incredibly relaxing and enjoyable experience.
2. Cutting Your Patterns and Preparing the Petal Templates
To give your Tulip Fabric Bag its iconic botanical silhouette, you will need to cut specific geometric or curved shapes that come together to form the petals. Most standard patterns utilize a series of overlapping circles, modified squares, or distinct leaf-shaped panels that form the outer shell. In this tutorial, we are focusing on a classic six-petal design that offers a wonderfully symmetrical look and a generous interior capacity.
Start by drawing your template on a sturdy piece of cardboard, template plastic, or freezer paper so you can trace it repeatedly with ease. The template should resemble a rounded petal with a flat base, which will eventually be joined to the bottom center of the bag. Precision during this drafting phase is critical, as uneven pieces will cause your Tulip Fabric Bag to close unevenly, ruining the delicate flower illusion.
Once your template is ready, lay your ironed fabric flat on your cutting mat, paying close attention to the grainline of the textile. Trace the template onto the wrong side of your exterior fabric six times, and repeat the exact same process on your lining fabric. If you are using a directional print—like a fabric with stripes or little animals facing one way—make sure your templates are aligned so the print looks upright when the bag is standing.
Next, it is time to cut out your coordinating fusible interfacing pieces using your sharp fabric scissors or a reliable rotary cutter. You will need six interfacing pieces cut slightly smaller than your fabric templates if you want to reduce bulk in your seam allowances, or cut to the exact same size for maximum structure. Take your time during the cutting process, as clean edges lead to much cleaner seams down the road.
Now, head over to your ironing board to fuse the interfacing to the wrong side of your exterior fabric pieces. Position the glue side of the interfacing against the back of the fabric, press down firmly with a hot iron, and hold it for a few seconds without sliding. This simple step adds the necessary weight and crispness that makes the Tulip Fabric Bag look so professional, structural, and visually striking.
The final step in your preparation phase is to mark the placement lines for your drawstring casings on your lining pieces. Use your erasable fabric pen to mark small dots or lines where the drawstrings will enter and exit the fabric later on. Keeping these markings precise across all your cut panels ensures that your bag will draw closed effortlessly and perfectly symmetrically when finished.
3. Step-by-Step Sewing Guide to Assembling Your Pouch
With all your pieces cut, interfaced, and meticulously marked, you are finally ready to sit down at your sewing machine and bring your Tulip Fabric Bag to life. We will begin by constructing the outer shell of the bag by pinning the exterior petal pieces together along their side edges, right sides facing. Sew down each seam using a standard 1/4-inch seam allowance, making sure to backstitch at the beginning and end of every line.
As you join the panels together, you will start to see a beautiful, cup-like dimensional shape form right before your eyes. Once all six exterior pieces are attached to one another, use your iron to carefully press all the seam allowances open. Pressing seams open is a crucial trick in this tutorial because it reduces bulk at the intersecting points, allowing your sewing machine to glide over them smoothly.
Repeat the exact same assembly process for your interior lining pieces, pinning them right sides together and stitching the side seams. However, leave a small 2-to-3-inch opening along one of the lining seams; this unstitched gap is essential because it will allow you to turn the entire bag right-side out later. Press these interior seams open gently, taking care not to distort the curves of the fabric.
Now it is time to nest the two layers together by inserting the exterior bag inside the lining bag so that their right sides are facing each other. Align the top scalloped edges and side seams perfectly, using plenty of sewing clips or pins to hold the layers securely in place. Take your time adjusting the fabric here, ensuring there are no puckers or misaligned edges before you start stitching.
Sew completely around the scalloped top edge of the bag, following the natural curves of the tulip petals with your machine needle. When you reach the valleys between the petals, pivot your machine carefully with the needle down to maintain a sharp, clean corner. Once stitched, clip small V-shapes into the curved seam allowances and snip the inner corners, being careful not to cut your threads, to help the fabric lay flat.
Reach through the opening you left in the lining seam and gently pull the exterior fabric through, turning the entire Tulip Fabric Bag right-side out. Use a blunt tool like a chopstick or a turning tool to gently push out the beautiful curves of each petal until they are perfectly rounded. Give the entire bag a beautiful, thorough steam press, topstitch around the upper edge, and sew the lining opening closed with a neat ladder stitch.
4. Creating Drawstring Casings and Adding Elegant Finishes
The magic of the Tulip Fabric Bag is fully unlocked by its functional drawstring mechanism, which allows the flat flower to instantly transform into a secure pouch. To create the channels for your cords, you will need to sew two parallel lines around the circumference of the bag, just below the scalloped petals. Use a sewing machine seam guide or a piece of tape on your machine bed to ensure these lines are perfectly straight and consistent.
The space between these two stitched lines will form the perfect casing where your drawstrings will live and glide. Ensure the channel is wide enough for your chosen cord to slide through without catching, typically around 1/2 inch to 3/4 inch deep. Stitch slowly around the entire bag, keeping the fabric flat and smooth to prevent catching the opposite side of the bag underneath your presser foot.
To install the drawstrings, you will need two equal lengths of cord, each roughly double the width of your finished bag. Attach a safety pin or a bodkin to the end of the first cord and insert it into one of the designated openings in your casing. Feed the cord all the way through the channel, running it completely around the bag until it exits out of the very same side where it entered.
Take your second piece of cord, attach your safety pin, and insert it into the opening on the opposite side of the bag. Guide this cord through the entire casing in the opposite direction, threading it around until it exits the side where you started this second loop. You should now have two cord loops running through the casing, with two raw tails hanging out of the left side and two out of the right side.
Tie the raw ends of the cords together on each side using a neat overhand knot to secure them, or slide on some beautiful decorative wooden beads before knotting. When you pull both knotted ends simultaneously outward, the fabric petals will elegantly fold inward, transforming into a gorgeous, secure tulip bud. Pulling them apart opens the bag back into a flat, accessible floral tray.
Take a moment to admire your incredible handiwork, giving the finished bag one final press with your iron to set all the shapes in place. This completed Tulip Fabric Bag is perfect for holding jewelry, cosmetics, sewing notions, or acting as an eco-friendly gift wrap that can be reused forever. Now that you have mastered this wonderful tutorial, you can experiment with larger dimensions, different fabric textures, or even add delicate hand embroidery to the petals!
Frequently Asked Questions (FAQ)
Can a beginner sew this bag?
Yes, absolutely! While the bag looks intricate, it uses basic straight and curved stitches. As long as you take your time when turning the fabric right-side out and sewing the curves slowly, a beginner can successfully complete this tutorial.
What size fabric pieces do I need?
For a standard-sized pouch, a few coordinating fat quarters (18″ x 22″ pieces of fabric) are perfect. You will easily be able to cut your petal pieces from two contrasting fat quarters, making it highly affordable.
Can I machine wash my finished pouch?
If you used 100% cotton and washable interfacing, you can absolutely wash it. We recommend using a gentle, cold cycle inside a mesh laundry bag to protect the drawstrings, followed by air drying and a quick iron.
Is interfacing completely necessary for this project?
While you can make it without interfacing, using it is highly recommended. Interfacing gives the tulip petals their upright, structural shape when the bag is open, preventing it from collapsing into a floppy pile.
How do I scale the pattern to make a larger bag?
You can easily scale this project up by enlarging your initial petal template on a printer or drawing it larger manually. Just remember to increase the length of your drawstrings accordingly so they can loop around the larger circumference.
Conclusion
In this comprehensive tutorial, we explored the delightful process of crafting your very own Tulip Fabric Bag from scratch. We covered everything from selecting the ideal medium-weight quilting cottons and applying structural interfacing, to cutting precise petal shapes, sewing the panels together, and installing a dual-drawstring system.
This project brilliantly combines utility with artistic textile design, leaving you with a functional pouch that doubles as a gorgeous piece of fabric art.