
If you are looking for a fun, fast, and incredibly adorable project to add to your crafting queue, a Crocs Keychain Crochet miniature shoe is the absolute perfect choice for this weekend. This delightful tutorial will guide you through the process of making a tiny, squishy version of the world’s most recognizable clogs using just a few scrap pieces of yarn. Miniature accessories have taken the crafting community by storm because they allow you to practice shaping techniques without committing to a massive, time-consuming blanket or sweater. Whether you want to spice up your own set of keys, make a whimsical zipper pull for a child’s backpack, or create an unforgettable handmade gift for a friend, this pattern is sure to bring a massive smile to anyone’s face.
The beauty of a Crocs Keychain Crochet project is that it requires very little investment in terms of time or materials, making it a fantastic stash-buster for yarn enthusiasts. In this easy-to-follow guide, we will break down the essential stitches, structural shaping tricks, and finishing details needed to capture that iconic, chunky clog aesthetic perfectly. Many beginners worry that working on such a small scale might be overly finicky or complicated, but our tutorial is designed to simplify every step of the journey. By breaking the construction down into logical phases, you will master the curves of the sole, the spacious toe box, and even that signature heel strap with absolute confidence and ease.
Creating these little yarn charms is also a fantastic way to experiment with vibrant color palettes and personalization, reflecting the true spirit of the footwear that inspired them. You can stick to classic bright neon shades, experiment with elegant pastels, or even add tiny felt cutouts to mimic custom shoe charms. This comprehensive Crocs Keychain Crochet guide is fully optimized with the best yarn tips, stitch secrets, and assembly methods to ensure your finished project looks absolutely pristine and professional. So, grab your favorite small-sized crochet hook, clear off your crafting table, and let us dive straight into the ultimate tutorial that will transform your yarn leftovers into a trendy, miniature masterpiece.
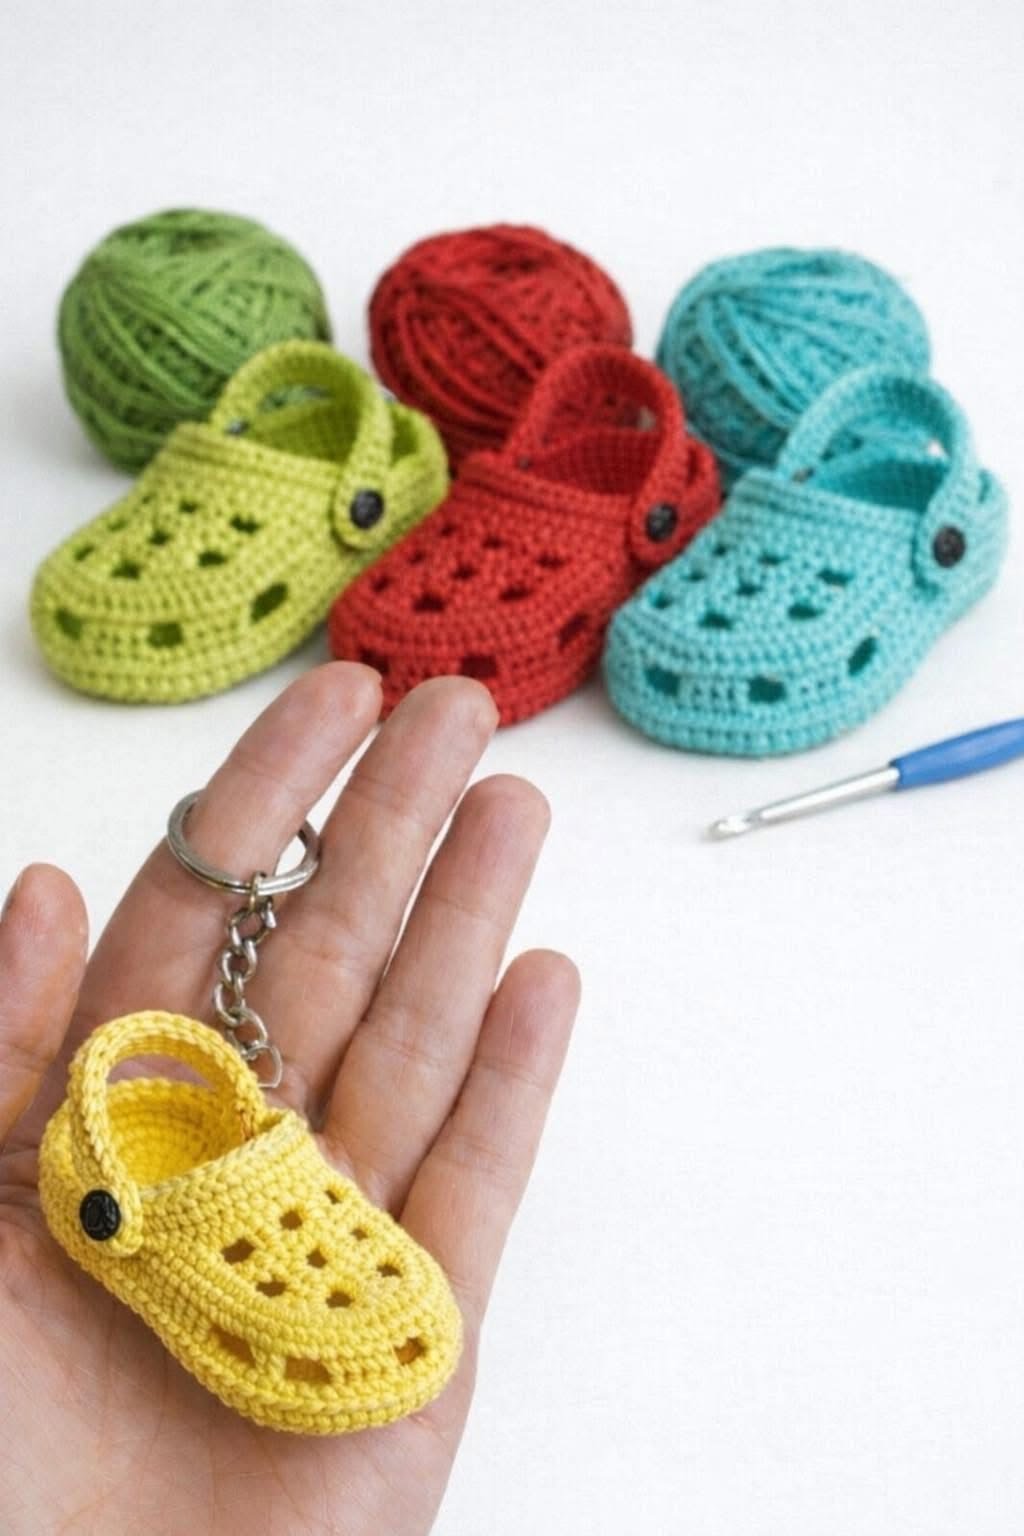
1. Essential Materials and Tools for Your Miniature Crochet Shoe
Before you jump into the first stitch of this Crocs Keychain Crochet project, it is essential to gather the correct tools to ensure a smooth and enjoyable crafting experience. Because we are making a highly detailed miniature item, your choice of yarn weight and hook size will directly impact the final scale and crispness of your tiny clog. A standard worsted weight yarn can work if you want a slightly larger charm, but choosing a sport weight or fingering weight cotton yarn is highly recommended for the cleanest stitch definition. Cotton yarn is ideal for this tutorial because it holds its shape beautifully, does not pill over time, and resists the wear and tear that everyday keys naturally inflict.
Pairing your chosen yarn with the correct crochet hook is the next crucial step in ensuring your tiny shoe does not end up loose or floppy. For a crisp, structural Crocs Keychain Crochet charm, you want to use a hook that is slightly smaller than what the yarn label typically recommends, such as a 2.0mm or 2.5mm hook. This deliberate mismatch creates tight, dense stitches that prevent the polyester fiberfill stuffing from peeking through the gaps. Keeping your tension firm and consistent throughout the tutorial will ensure that the sole remains flat and the upper toe box retains its iconic, curved, and structural shape.
In addition to your main yarn and hook, you will need a few essential notions to complete the assembly and give your miniature clog its functional purpose. A sharp tapestry needle with a large eye is absolutely vital for weaving in your yarn ends securely and sewing the heel strap to the main body of the shoe. You will also need a small handful of high-quality polyester fiberfill to lightly stuff the toe area, ensuring it stays plump and holds its form permanently. Finally, prepare your hardware, including a sturdy split ring, a metal lobster clasp, or a ball chain to officially transform your textile art into a portable keychain.
2. Stitching the Sole and Building the Upper Toe Box Structure
The foundation of your Crocs Keychain Crochet charm begins at the very bottom, starting with a simple chain that will form the central spine of the sole. In this phase of the tutorial, you will work in continuous rounds or joined ovals around both sides of that initial chain, creating a flat, symmetrical footbed shape. By utilizing strategic increases of single crochet stitches at the heel and the toe ends, you will mimic the natural anatomy of a foot. It is incredibly important to use a stitch marker to keep track of the first stitch of each round, as a single miscounted loop can cause your tiny sole to warp or twist.
Once your flat sole reaches the correct width and length, it is time to transition into the three-dimensional walls of the shoe. To create a clean, distinct border between the bottom of the clog and the sides, you will work one full round of single crochets strictly into the back loops only. This simple textile technique creates a crisp ridge that helps the Crocs Keychain Crochet charm sit flat on a table, perfectly capturing the chunky profile of the real footwear. After completing this transition round, you will work another round or two of standard single crochets around the perimeter to build up the necessary vertical height.
Now comes the most exciting part of the tutorial, where we shape the signature roomy toe box that makes this style of footwear instantly recognizable. To achieve this sloped, covered front, you will execute a series of rapid single crochet decreases across the front half of the shoe while maintaining normal stitches around the heel. By joining two or three stitches together over consecutive rows, the fabric will naturally pull inward and fold over the top of the footbed. Take your time during these decrease rows to pull your yarn tight, ensuring the front of your miniature clog looks smooth, rounded, and perfectly proportioned.
3. Crafting the Iconic Heel Strap and Adding Holes for Ventilation
No Crocs Keychain Crochet piece would be complete without the signature adjustable heel strap that provides the ultimate blend of style and whimsical functionality. For this part of our tutorial, you can choose to join your yarn directly to the side of the shoe or crochet a completely separate narrow strip of fabric to sew on later. A simple chain followed by a single row of slip stitches or single crochets provides the perfect amount of flexibility and strength for this strap. If you want to make it extra authentic, you can even attach it using tiny decorative buttons or plastic safety eyes to simulate the look of real rivets.
One of the funniest and most defining features of this iconic footwear style is the pattern of ventilation holes running across the top of the toe box. While we cannot easily punch physical holes into crocheted fabric without compromising its structural integrity, we can creatively simulate them using smart embroidery techniques. Using a contrasting thread, a darker shade of yarn, or a fine-tip permanent marker, you can place small dots across the upper surface. In this tutorial, we highly recommend using a tapestry needle and a strand of black embroidery floss to stitch tiny, neat French knots or simple straight stitches to mimic the vents.
If you want to take the personalization of your Crocs Keychain Crochet charm a step further, this is the perfect moment to think about custom decorations. Real clogs are famous for their collectible plug-in charms, and you can recreate this look by sewing on tiny star buttons, micro felt cutouts, or miniature acrylic gems. This extra step adds an incredible layer of texture and visual interest to your handmade accessory, making it stand out as a premium boutique item. Ensure all these extra embellishments are anchored tightly to the interior of the shoe so they can withstand being tossed around in a purse or pocket.
4. Final Assembly, Hardware Attachment, and Pro Crafting Tips
With all the individual components stitched and decorated, you are ready for the final assembly phase of this Crocs Keychain Crochet guide. Before permanently fastening the heel strap down, take a very small pinch of polyester fiberfill stuffing and push it into the front toe cavity of the clog. You do not want to overstuff the shoe, as it should remain lightweight and slightly flexible, but a small amount of padding ensures the toe box never collapses. Once the stuffing is nestled comfortably inside, use your tapestry needle to securely sew the ends of the heel strap to the sides of the upper rim.
Next, you will want to weave in all your remaining yarn tails with extreme care, ensuring they are completely hidden within the body of the shoe. Pass your needle back and forth through the dense internal stitches several times before clipping the thread close to the fabric surface. This meticulous finishing step is emphasized throughout this tutorial because loose threads can easily unravel over time due to the frequent friction that keychains experience. Giving your miniature shoe a gentle squeeze and manual shaping with your fingers will set the stitches beautifully into their final, permanent positions.
The very last step of this Crocs Keychain Crochet adventure is to securely mount your choice of metal hardware to the fabric. You can slip a metal jump ring directly through one of the sturdy stitches at the back heel or pass a ball chain through the top curve of the strap. Ensure the metal ring is closed tightly using a pair of crafting pliers so it cannot slip out of the yarn loops during daily use. Now, your adorable, ultra-trendy miniature shoe charm is officially finished, fully functional, and ready to be displayed proudly or gifted to a fellow enthusiast!
Frequently Asked Questions (FAQ)
What is the best yarn weight to use for this project?
For the absolute best results, we recommend using sport weight or fingering weight cotton yarn. These finer weights allow you to create clean, defined stitches on a small scale, ensuring the final keychain is compact, lightweight, and highly detailed.
Can a total beginner complete this tutorial?
Yes, a beginner who knows basic stitches like the chain, single crochet, and single crochet decrease can definitely complete this project. Because it is small and quick to make, it serves as an excellent practice piece for mastering your stitch tension and shaping.
How long does it take to make one miniature shoe?
An intermediate crocheter can easily finish one tiny clog in about 30 to 45 minutes, while a beginner might take an hour. This rapid production time makes it an incredibly satisfying and addictive project for weekend crafting sessions.
Do I need to stuff the entire keychain with fiberfill?
No, you only need to place a small pinch of stuffing inside the front toe box to help it maintain its rounded, hollow structure. The back heel area should remain completely open and empty, just like a real wearable shoe.
How do I attach the keychain hardware securely so it doesn’t fall off?
The safest method is to open a metal jump ring using pliers and loop it directly under two or three dense yarn strands at the back heel of the shoe. Closing the ring tightly ensures the weight of your keys won’t pull the hardware free from the textile.
Conclusion
In this comprehensive tutorial, we learned how to design, stitch, and assemble a whimsical Crocs Keychain Crochet charm from start to finish. We explored the ideal yarn and hook combinations for miniature crafting, built a sturdy flat sole, shaped a beautiful curved toe box, and attached a realistic heel strap with proper hardware.
This quick and engaging project is an incredible way to clear out your colorful yarn scrap basket while creating trendy, functional accessories that everyone will love.