
Easy Crochet Heart-Shaped Coaster – Tutorial: Creating handmade items for your home is one of the most rewarding ways to express your creativity and add a touch of warmth to your living space. If you are looking for a quick, charming, and practical project to sink your hooks into, you have come to the right place. A crochet heart coaster is the perfect blend of functionality and romance, making it an ideal project for beginners and seasoned crafters alike who want to protect their wooden surfaces while showcasing their love for textile arts.
Whether you want to spruce up your dining table for a romantic dinner, create a thoughtful Valentine’s Day gift, or simply practice your stitching skills, this comprehensive guide will walk you through the entire process step by step. Crafting a handmade yarn coaster allows you to experiment with different textures and vibrant colors without committing to a massive, time-consuming project like a blanket or a sweater. Plus, these little fabric gems are fantastic stash-busters that utilize those leftover scraps of yarn sitting in your crafting basket.
In this detailed Easy Crochet Heart-Shaped Coaster – Tutorial, we will explore everything from selecting the right materials to mastering the specific stitches required to achieve that perfect asymmetrical heart curve. By the end of this read, you will possess the confidence and knowledge to whip up a whole set of these delightful items in an afternoon. Grab your favorite hook, select a beautiful skein of yarn, and let us dive into the wonderful world of seasonal fiber arts.
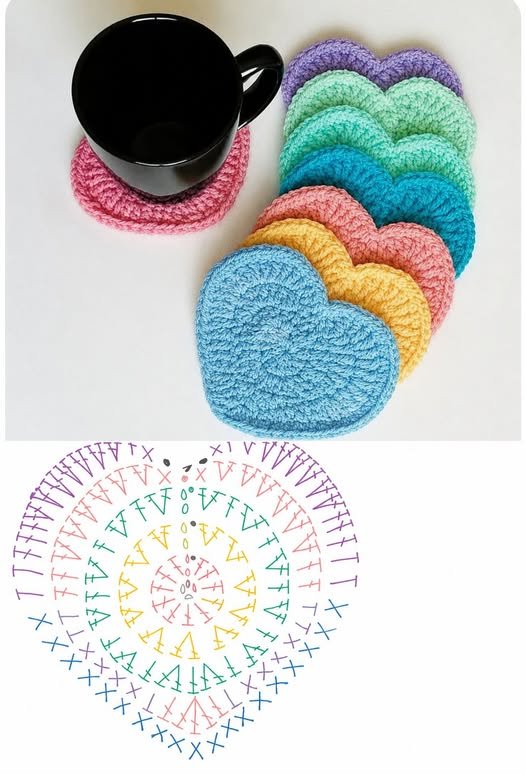
1. Choosing the Best Materials for Your Heart Coaster
Selecting the right yarn and hook combination is the foundational step in ensuring your finished project looks professional and functions correctly. For a durable, absorbent, and heat-resistant table protector, 100% cotton yarn is widely considered the absolute gold standard in the crafting community. Cotton fibers handle moisture from condensation beautifully and will not melt if you place a steaming mug of morning coffee directly on top of them.
When looking at yarn weights, a medium worsted weight yarn (often labeled as number 4) is highly recommended for those who are just starting out with this specific Easy Crochet Heart-Shaped Coaster – Tutorial. This thickness allows you to see your loops clearly, making it much easier to count your stitches and identify any mistakes before you move too far along. Avoid using overly fuzzy or textured novelty yarns, as they obscure stitch definition and make shaping the heart curves frustrating.
To match your medium weight cotton thread, a size G/4.0mm or H/5.0mm crochet hook is typically the ideal choice to achieve the perfect tension. If your stitches are naturally loose, opting for the smaller hook will help keep your coaster dense and structured, preventing liquids from seeping through the gaps onto your furniture. A tighter gauge ensures the finished piece retains its beautiful romantic silhouette even after multiple trips through the washing machine.
In addition to your primary yarn and hook, you will need a few essential notions to complete this project successfully. A sharp pair of crafting scissors is necessary for cleanly cutting your yarn tails without fraying the delicate fibers. You will also need a blunt-tipped yarn needle or tapestry needle to weave in your loose ends securely at the very end of your crafting session.
For beginners, using removable stitch markers can be an absolute lifesaver when tracking the center points and apexes of your heart curves. Placing a marker in the exact stitch where your increases happen ensures you never lose your place if you get distracted. Having these basic tools neatly organized on your workspace before you begin will create a seamless, relaxing, and highly enjoyable crafting experience.
Experimenting with colors is where your personal style can truly shine through the stitches. While classic shades of crimson, blush pink, and ruby red are timeless choices for a romantic theme, do not feel limited by tradition. Neutral tones like cream, slate gray, or soft beige can give your handmade table decor a modern boho chic aesthetic that complements contemporary interior design styles effortlessly.
2. Understanding Essential Stitches and Techniques
Before loop coordination begins, familiarizing yourself with the core techniques utilized in this Easy Crochet Heart-Shaped Coaster – Tutorial will guarantee your success. The foundation of this entire project relies heavily on the magic ring technique, sometimes referred to as a magic circle. This adjustable loop allows you to work multiple stitches into a single center point and then pull the tail tight, completely eliminating any unsightly holes in the middle of your heart.
Once your center ring is established, you will primarily use a combination of three classic stitches to create the dramatic highs and lows of the heart shape. The double crochet stitch (dc) provides the necessary height to build out the rounded lobes of the upper portion of the design. Mastering the cadence of wrapping your yarn, inserting the hook, and pulling through loops smoothly is key to maintaining consistent stitch height throughout the round.
To create an even taller stitch for the ultimate dramatic curve at the top lobes, we will utilize the treble crochet stitch (tr). By wrapping your yarn twice around the hook before entering the designated loop, you create a elongated column of fabric. Alternating these tall trebles with standard double crochets is the secret design formula that transitions the circle into a gorgeous, instantly recognizable romantic emblem.
Conversely, the lower point of the heart requires a sharp, crisp definition, which is achieved by transitioning down to a single crochet stitch (sc) and a well-placed chain stitch. By rapidly decreasing the height of your stitches as you approach the bottom center, you naturally force the fabric into an elegant, tapering point. This intentional variation in stitch height is what gives the coaster its structural integrity and balance.
Joining your rounds seamlessly is another crucial skill that elevates the overall quality of your finished project. The slip stitch join (sl st) is employed to connect the final stitch of your round back to the initial chain space without adding unwanted bulk or distortion. Keeping your slip stitches relatively tight will prevent the outer border of your heart from looking warped or uneven.
Maintaining proper crochet tension control throughout the process is what separates an amateur project from a beautifully flat, functional home accessory. If you pull your yarn too tightly, the edges of your coaster will begin to cup and curl upward, preventing your mug from sitting flat. If your tension is too loose, the fabric will become wavy and floppy; focusing on a steady, relaxed rhythm will yield the best results.
3. Step-by-Step Round Instructions for the Coaster
To begin the actual construction phase of our Easy Crochet Heart-Shaped Coaster – Tutorial, start by forming your magic ring and securing it with a single chain. Inside this adjustable loop, you will work your first foundational round by chaining three, which acts as your very first double crochet stitch. Follow this by working three treble crochets, three double crochets, a chain one, one more treble crochet to form the bottom point, another chain one, three double crochets, and three treble crochets.
Once that sequence is complete, chain three and slip stitch directly back into the center of your magic ring before pulling the tail firmly to close the central hole tightly. You will immediately see a miniature, adorable heart shape forming right before your eyes, which serves as the solid core of your coaster. This clever arrangement of varying stitch heights within a single loop naturally establishes the symmetrical geometry required for the project.
For the second round, you will build upon this foundation to expand the size of the accessory so it can comfortably accommodate large mugs and tumblers. Chain three, then work a single crochet and a half double crochet into the top of the first chain-three space from the previous round. In the next three stitches, which are your peak trebles, you will work three half double crochets into each loop to rapidly expand the rounded upper lobes.
As you work your way down the side toward the bottom point, place one single crochet into each of the next three stitches to gradually taper the edge. When you reach the central treble crochet at the very bottom, work a single crochet, chain two, and another single crochet all into that single stitch space. This specific crochet increase technique creates a beautifully sharp, pronounced point at the base of your heart.
To mirror the shape on the opposite side, work one single crochet into each of the next three stitches as you climb back up toward the second lobe. In the following three treble stitches, repeat the expansion pattern by working three half double crochets into each of those loops to match the bulk of the first side. Finish the round by working a half double crochet and a single crochet into the final chain space, then chain three and slip stitch into the central ring.
If you desire an even larger surface area for your kitchen mugs, a third round consisting entirely of single crochets and strategic increases can be added around the perimeter. Simply work one single crochet in each stitch around, making sure to place two single crochets into the apexes of the upper lobes to keep the fabric perfectly flat. Always finish your final round with a clean slip stitch to create a smooth, unbroken outer border.
4. Finishing Touches, Blocking, and Care Tips
Now that your stitching is complete, executing proper finishing techniques will ensure your handmade drink mat looks polished and stands the test of time. Cut your working yarn, leaving a generous six-inch tail, and pull the loop straight through the final stitch to secure it. Thread this tail onto your yarn needle and carefully weave it back and forth through the dense stitches on the wrong side of the fabric.
Weaving your ends in multiple directions is a vital step that prevents the yarn from working its way loose during daily use or when subjected to the washing machine. Repeat this exact process with the center tail from your magic ring, ensuring it is pulled as tight as humanly possible before securing it. Cut the remaining yarn flush with the fabric surface, taking extra care not to accidentally snip your actual stitches.
Because cotton yarn can sometimes hold memory from being handled during the making process, wet blocking your crochet items is highly recommended to achieve a perfectly flat shape. Submerge your completed heart coaster in lukewarm water mixed with a drop of gentle, rinse-free wool wash for about ten minutes. Gently squeeze out the excess moisture by rolling the wet coaster inside a clean, dry towel without wringing or twisting the fabric.
Place the damp coaster onto a specialized foam blocking board or a thick towel, smoothing out the fabric with your fingers to emphasize the heart shape. Use rust-proof T-pins to pin the edges down securely, placing emphasis on stretching out the upper curves and pulling the bottom point taut. Allow the piece to air dry completely in a well-ventilated area away from direct sunlight before removing the pins.
Once blocked, your beautiful creation is ready to defend your coffee table from moisture rings and heat damage with style. When it comes to regular maintenance, cotton coasters are incredibly easy to care for and keep clean over the years. You can toss them into a mesh laundry bag and wash them on a gentle cycle with similar colors using cold water to prevent fading.
To dry, lay them flat on a flat surface to maintain their blocked shape rather than throwing them into a hot dryer, which can cause natural cotton fibers to shrink. If the edges ever begin to curl slightly after intensive use, a quick blast of steam from a household iron will instantly restore their crisp, flat appearance. These simple care routines will keep your handmade treasures looking brand new for years to come.
Frequently Asked Questions (FAQ)
Q: Can I use acrylic yarn instead of cotton for this project?
A: While you can technically use acrylic yarn to practice the shape, it is not recommended for functional kitchen accessories. Acrylic is a synthetic plastic-based fiber that does not absorb liquid effectively, meaning condensation from cold drinks will simply pool on top or slide off. Furthermore, acrylic fibers have a low melting point and can easily singe or warp if you place a piping hot mug of tea directly onto the surface.
Q: My heart coaster is curling up at the edges instead of laying flat. How do I fix this?
A: Edge curling is a very common issue in circular and shaped fiber arts, usually caused by tight tension or a lack of sufficient increases. If your stitches are too tight, try restarting the project using a hook that is one half-millimeter larger to naturally loosen your gauge. Additionally, ensure you are not skipping any of the required increase stitches around the upper lobes, as these extra loops provide the necessary fabric to allow the piece to lie perfectly flat.
Q: How long does it take an average crafter to complete one coaster?
A: One of the greatest benefits of this specific pattern is its incredible speed and low time investment. A beginner who is carefully reading through the step-by-step instructions might take roughly twenty to thirty minutes to complete their first piece. Once you memorize the basic stitch sequence, you can easily produce a complete coaster in under ten minutes, making it an excellent assembly-line project for gifts or craft fairs.
Q: Is this pattern suitable for absolute beginners who have never crocheted before?
A: Yes, this pattern is completely approachable for beginners, provided you possess a basic understanding of how to hold a hook and yarn. If you are entirely new to the craft, practicing the individual stitches—like the double and treble crochet—on a simple square swatch first can be helpful before tackling the shaping variations. The inclusion of a magic ring might feel tricky at first, but with a little patience, it quickly becomes second nature.
Conclusion
In summary, this Easy Crochet Heart-Shaped Coaster – Tutorial has provided you with all the essential tools, stitch breakdowns, and material insights needed to create beautiful, functional table decor.
From selecting robust 100% cotton yarn to mastering the strategic stitch variations that form the romantic shape, you now have the blueprint for handmade crafting success. These charming accessories are a fantastic way to protect your furniture while injecting a sense of cozy, personalized style into your home environment.