
Oven Glove – Tutorial: Creating your own kitchen essentials is one of the most rewarding ways to blend functionality with personal style. Whether you are a seasoned quilter or a beginner looking for a practical weekend project, mastering a comprehensive oven glove tutorial will allow you to craft a beautiful, heat-resistant barrier that protects your hands while matching your kitchen decor. In this extensive guide, we will walk you through every single step necessary to design, cut, and assemble a durable, professional-quality insulated mitt from scratch.
When it comes to kitchen safety, a high-quality insulated oven mitt is absolutely indispensable, yet store-bought options often lack personality or fail to offer the exact level of heat protection you desire. By choosing to make your own using our detailed step-by-step oven mitt guide, you gain complete control over the materials, thickness, and aesthetic appeal of the final product. We will explore how combining the right outer fabrics with specialized heat-resistant batting ensures your hands stay perfectly safe when handling scorching baking sheets or heavy cast-iron skillets.
Beyond the obvious safety benefits, diving into a creative DIY heat-resistant glove project is an excellent way to practice fundamental sewing techniques such as quilting, binding, and working with thick layers. This article is meticulously structured to provide you with all the insights, material recommendations, and construction methods needed to achieve flawless results. Grab your fabric shears, dust off your sewing machine, and let us dive straight into the ultimate oven glove tutorial designed to elevate both your sewing skills and your culinary safety.
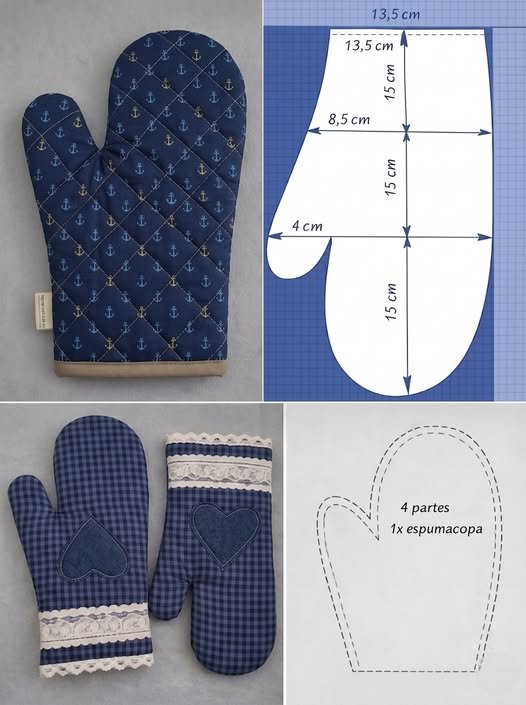
1. Choosing the Right Materials for Ultimate Heat Protection
Selecting the proper components is the absolute foundation of a successful oven glove tutorial, as the primary function of the finished item is to shield your skin from dangerous temperatures. For the exterior fabric, you should always opt for 100% cotton fabric for kitchen crafts because synthetic fibers like polyester will melt instantly when exposed to hot oven racks. Heavyweight fabrics such as denim, canvas, or linen-cotton blends are spectacular choices for the outer shell because their dense weave adds an extra layer of structural integrity and durability over time.
Inside the mitt, the magic of heat resistance happens through a combination of specialized materials, most notably Insul-Bright insulation or similar needle-punched metalized polyester film layered between cotton batting. This specific type of batting reflects hot or cold energy back to its source, providing a highly advanced thermal barrier that standard cotton fills simply cannot achieve on their own. To achieve maximum safety, it is highly recommended to sandwich one layer of this thermal material with at least one or two layers of traditional 100% cotton batting for sewing.
The interior lining of your glove should be just as comfortable and heat-safe as the outside, making soft cotton flannel or standard quilting cotton ideal candidates for this layer. Because you will be washing your finished kitchen gear frequently to remove food stains and grease, it is crucial to pre-wash all your fabrics before cutting them to prevent future shrinkage. Skipping the pre-washing stage can cause your perfectly sized glove to warp, pucker, or shrink drastically after its very first trip through the laundry cycle.
When preparing your thread and notions, make sure to select a strong, high-quality 100% cotton sewing thread rather than a standard polyester thread, which can degrade or melt under extreme heat conditions. You will also need sturdy straight pins or fabric clips to hold the multiple thick layers together, along with a heavy-duty sewing machine needle, such as a size 90/14 or 100/16 denim needle. Gathering these specific, heat-safe materials from the beginning guarantees that your DIY oven mitt project is built to last and completely safe to use.
Additionally, consider the aesthetic value of your material choices by coordinating your outer fabrics with your existing kitchen color scheme or seasonal decorations. You can use vibrant prints, classic stripes, or geometric patchwork designs to give your workspace a modern, customized look while maintaining top-notch functionality. By investing time into sourcing premium, heat-resistant ingredients, you establish a solid groundwork that transforms a simple crafting project into an essential, professional-grade culinary tool.
2. Drafting and Cutting Your Custom Oven Mitt Pattern
Before you begin cutting into your beautiful fabric, you need a precise template, which is a vital part of any comprehensive oven glove tutorial aimed at achieving a comfortable fit. You can easily create a custom pattern by placing your hand flat on a piece of paper, spreading your fingers slightly, and tracing a generous outline around your hand and wrist. Make sure to leave at least two to three inches of extra space all around your hand shape to account for the thick insulation layers and the required seam allowances.
When drafting the thumb section of your DIY kitchen glove pattern, ensure that the valley between your thumb and index finger is deep enough to allow for easy gripping movement without straining the seams. Extend the cuff of the pattern several inches past your wrist line so that your lower arm is fully protected from the scorching edges of open oven doors and racks. Once you are satisfied with the overall shape and proportions on paper, carefully cut out your template, which will serve as your master guide for the project.
To begin cutting your fabric pieces, fold your prepared outer cotton fabric in half with the right sides facing together, pin your paper template securely, and cut out two mirrored pieces. Repeat this identical process for your lining fabric, ensuring you have a distinct left and right side piece so that the smooth interior faces your skin properly when assembled. At this stage, you should have four fabric pieces in total: two for the outer shell and two for the internal lining.
Next, you will need to cut your heat-resistant layers using the exact same master template to ensure they line up perfectly with your fabric pieces. Cut two pieces of the Insul-Bright thermal batting and two pieces of traditional natural cotton quilting batting using your paper pattern. Having these four pieces of insulation ready means you are fully prepared to build the protective sandwich that makes this heat-resistant mitt tutorial so incredibly effective.
Organization is key when handling so many individual layers, so it helps to group your cut pieces into two distinct piles—one pile for the front of the hand and one pile for the back. Keeping the pieces stacked in their correct order prevents confusion and saves precious time when you move over to your sewing workstation. Double-check that all edges are clean, uniform, and free of fraying before proceeding to the next structural stage of construction.
Remember that accuracy during the drafting and cutting phase directly influences how easily the thick layers will line up under your sewing machine needle later on. If your pattern is too small, the finished glove will feel constrictive and difficult to pull off quickly in a busy, fast-paced kitchen environment. Taking your time to measure twice and cut once ensures that your custom-made gear provides an ergonomic, relaxed fit that makes cooking an absolute pleasure.
3. Quilting the Layers and Assembling the Glove Structure
Quilting the individual layers together is a critical step in this oven glove tutorial because it permanently anchors the insulation to the fabric, preventing bunching during use and washing. Start by creating a sandwich for the front piece: place the outer fabric face down, layer the cotton batting on top, add the thermal insulation layer, and top it with the inner lining fabric face up. Secure this multi-layered sandwich thoroughly using numerous straight pins or fabric clips to prevent the slippery metallic materials from shifting as you sew.
Set your sewing machine to a slightly longer stitch length, around 3.0mm to 3.5mm, which helps the machine feed smoothly through these dense, bulky materials. You can stitch simple parallel lines, a classic diamond matrix, or creative free-motion designs across the sandwich to execute your quilted kitchen mitt design. For perfectly straight lines, use a masking tape guide or a quilting arm attachment on your presser foot, working from the center outward to eliminate fabric puckering.
Repeat the entire quilting procedure for the back-of-the-hand sandwich so that both halves of your future glove possess identical thickness, stability, and beautiful quilted textures. Once both panels are completely quilted, trim away any uneven edges or stray batting fibers that may have shifted outward during the stitching process. This trimming step ensures your edges are completely flush and clean, making the final perimeter assembly vastly easier to execute on your machine.
Now, place the two quilted panels together so that the outer fabric sides are facing each other directly, matching up the thumb shapes and wrist lines precisely. Pin or clip the heavy perimeter securely, paying extra attention to the curved area between the thumb and the index finger, which undergoes the most stress. Sew carefully around the entire outer boundary using a generous half-inch seam allowance, leaving the straight bottom cuff area completely open so you can insert your hand.
To prevent the seams from ripping under constant pressure, backstitch heavily at the beginning and end of your stitch line, and reinforce the delicate thumb crotch with a second row of stitches. After sewing the perimeter, use sharp fabric shears to clip small notches into the curved areas and the thumb valley, being careful not to cut through your actual thread line. Clipping these curves releases fabric tension, allowing the bulky glove to turn right-side out smoothly without creating ugly internal lumps.
Gently reach inside the open cuff and turn the entire quilted assembly right-side out, using a blunt tool like a chopstick or a turning tool to fully push out the thumb and fingertip curves. Take a moment to press the exterior seams flat with a hot steam iron, molding the heavy fabric into its final, recognizable shape. Your project is now structurally complete, looking beautifully rustic, and ready for the final finishing touches that deliver a clean, professional appearance.
4. Finishing the Cuff with Custom Bias Binding
The final phase of our comprehensive oven glove tutorial involves finishing the raw, exposed edges of the bottom cuff to ensure it looks neat and never frays in the washing machine. Using a coordinating strip of double-fold bias tape is the most efficient and aesthetically pleasing method to encase the thick, quilted edges of your opening. You can either purchase pre-made half-inch bias binding or easily create your own custom version using matching fabric scraps and a hot iron.
If you wish to hang your completed glove from a kitchen hook, you can easily incorporate a handy DIY fabric hanging loop during this final binding stage. Simply cut a small four-inch strip of bias tape, sew down the open edge to close it, and fold it into a clean U-shape loop. Position this loop against the back seam of the glove’s open cuff, pinning it securely so that it faces inward before you apply the main binding strip.
To attach the binding, open up one side of your double-fold bias tape and align its raw edge with the raw edge of the glove’s open cuff, starting near the back seam. Wrap the tape all the way around the circular opening, overlapping the starting end by a half-inch to create a clean, tucked fold that hides raw threads. Stitch carefully along the first fold crease of the tape, going slowly around the circular cuff while guiding the bulky layers evenly under your presser foot.
Once the first side is securely anchored, flip the remaining half of the bias tape over the raw edge to the opposite side of the cuff, encasing all layers completely. Pin or clip this turned edge flat on the interior, ensuring the folded fabric extends just slightly past your original line of stitching. From the outside of the glove, carefully stitch in the ditch or topstitch very close to the binding edge to catch the back layer securely in place.
Take your time during this final stitching step, maintaining a slow, steady pace to ensure your topstitching looks uniform, professional, and completely straight all the way around. Pull your thread tails through to the inside of the mitt, tie them into secure knots, and trim away any excess threads close to the fabric surface. Give the entire finished piece one final, thorough pressing with your steam iron to relax the stitches and set the beautiful shape of your new kitchen accessory.
Congratulations, you have successfully transformed raw materials into a highly functional, beautiful piece of kitchen protective gear by completing this oven glove tutorial. Slip the finished mitt onto your hand to test the comfortable fit, check the mobility of your thumb, and admire your hard work. This beautiful piece is now fully prepared to handle hot baking pans, protect your arms during family barbecues, or serve as a thoughtful, handmade housewarming gift for friends.
Frequently Asked Questions (FAQ)
What is the best heat-resistant batting to use for an oven glove tutorial?
The absolute gold standard for thermal protection in kitchen crafts is Insul-Bright insulation. This material features needle-punched polyester fibers interspersed with a metalized film that effectively reflects heat back toward its source. However, because it conducts heat if touched directly without a buffer, you must always pair it with at least one layer of 100% natural cotton batting to ensure comprehensive thermal safety for your hands.
Can I use regular polyester fabric or fleece to make a protective oven mitt?
No, you should never use synthetic fabrics like polyester, nylon, or standard fleece for the exterior or lining of an oven mitt. Synthetic materials melt rapidly when exposed to high heat or direct contact with hot metal racks, which can cause severe burns to your skin. Always utilize 100% cotton fabric for kitchen crafts, including canvas, denim, or heavy quilting cotton, which can tolerate high oven temperatures safely.
How do I clean and wash my homemade quilted oven glove?
Since your homemade mitt is constructed using 100% cotton and washable thermal batting, it is entirely machine washable. Wash the glove on a gentle cycle with cold or warm water and a mild detergent to keep the colors vibrant and remove kitchen grease. Air drying flat is highly recommended to preserve the structural integrity of the internal insulation layers, though you can tumble dry on a very low heat setting if necessary.
Why is my sewing machine skipping stitches while sewing the final layers?
Skipping stitches usually happens when your sewing machine needle is too thin or dull to pierce through the multiple dense layers of cotton and thermal batting. Switch to a brand-new, heavy-duty needle designed for thick fabrics, such as a size 90/14 or 100/16 denim sewing needle. Additionally, increasing your stitch length and using a walking foot will vastly improve fabric feeding and eliminate skipped stitches entirely.
Is it necessary to pre-wash my cotton fabrics before starting this project?
Yes, pre-washing is an absolutely essential step that should never be skipped when working on a DIY heat-resistant glove. Natural cotton fibers shrink significantly during their first exposure to hot water and dryer heat. If you skip pre-washing, your finished glove will likely pucker, warp, and shrink dramatically after its first cleaning cycle, potentially rendering it too small or uncomfortable to wear.
Conclusion
In this comprehensive oven glove tutorial, we have thoroughly explored how to create a professional, heat-resistant, and beautifully customized kitchen mitt from scratch. We covered everything from choosing safe, 100% cotton materials and advanced thermal insulation to drafting a custom pattern, quilting the layers together, and applying a clean bias tape finish.
By following these structured steps, you have created a durable and stylish accessory that ensures maximum protection against high temperatures while cooking or baking.