
If you love functional fashion and handmade style, learning how to create a Hexagon Crochet Bag – Tutorial is the perfect next project for your crafting journey. Crochet bags have completely taken over the fashion world, transitioning from simple beach accessories to everyday wardrobe staples that showcase personal creativity. Among the various styles available, a bag constructed from basic geometric shapes stands out because it offers a brilliant mix of structural integrity and visual appeal. Whether you want to use up some leftover yarn from your stash or dive into a brand-new color palette, this project will guide you through every single step to ensure a beautiful, professional finish.
The beauty of focusing on a hexagon crochet bag lies in the pure simplicity of its construction and the versatility of the design. By using just two large six-sided motifs, you can create a spacious, durable, and incredibly trendy accessory that looks highly complex but is actually beginner-friendly. This specific pattern is highly adaptable, meaning you can easily adjust the final size of your tote simply by adding or subtracting rows from your initial shapes. In this comprehensive guide, we will break down the entire process from selecting your materials to seaming the pieces together, ensuring you feel confident throughout the experience.
As you dive into this detailed Hexagon Crochet Bag – Tutorial, you will discover how easy it is to customize this piece to match your unique personal style or create a thoughtful gift for a loved one. Crafting your own accessories allows you to control the quality of the stitches, choose sustainable fibers, and embrace the slow fashion movement with pride. Grab your favorite hook, find a cozy spot to sit, and let’s explore the wonderful world of geometric crochet as we transform simple yarn into a gorgeous, wearable masterpiece that you can flaunt anywhere.
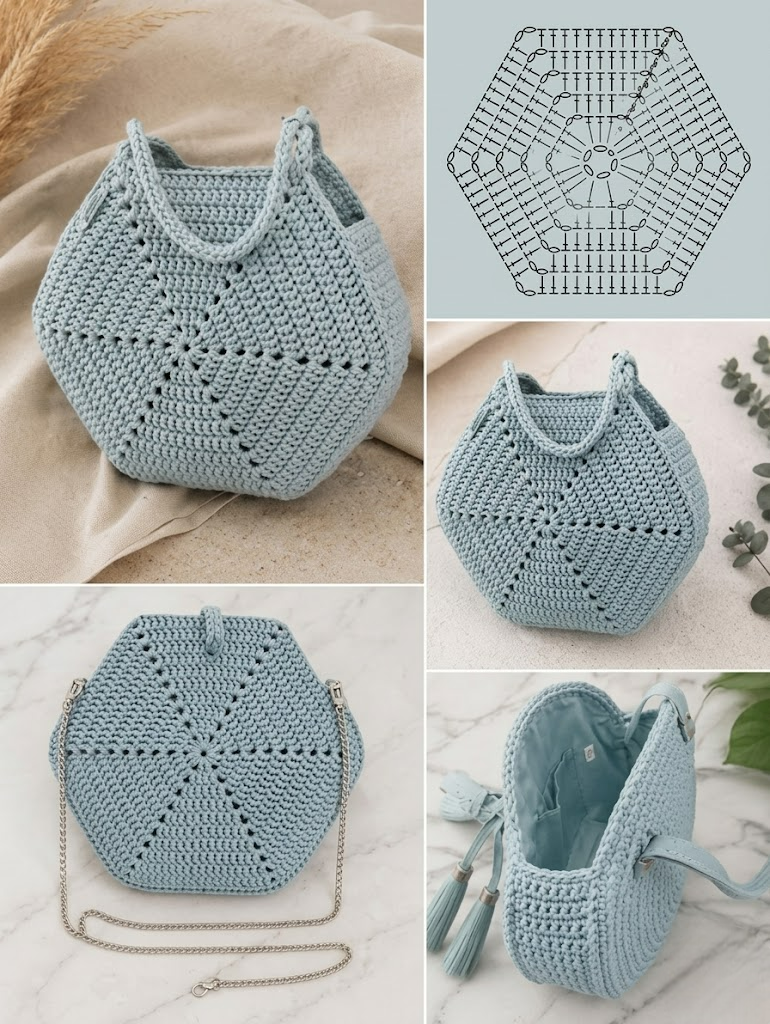
1 Understanding the Anatomy of a Hexagon Crochet Bag
Before picking up your hook, it helps to understand exactly how two flat, six-sided shapes transform into a fashionable three-dimensional tote. The magic of this design relies entirely on clever folding techniques that turn flat crochet work into a deep, wearable pouch. When you fold a standard crochet hexagon in half, it naturally forms a unique “L” shape that creates the perfect sides and bottom for a sturdy bag. By joining two of these folded shapes together, you immediately get a fully formed bag body with a natural opening at the top.
Choosing the right materials is the most critical first step for ensuring your finished project lasts for years without stretching out of shape. For a durable hexagon crochet bag, we highly recommend choosing a sturdy cotton yarn or a high-quality blend of cotton and acrylic. Cotton fiber offers excellent stitch definition, which makes your geometric patterns pop, and it possesses very little stretch, ensuring your bag holds its shape even when loaded with heavy items. You will also need a crochet hook that matches your yarn weight, a reliable tapestry needle for weaving in ends, a pair of sharp scissors, and several stitch markers to keep your corners perfectly aligned.
The foundation of any great geometric crochet project is maintaining a consistent stitch tension throughout your work. Because this specific construction method relies on two identical pieces fitting together perfectly, any major changes in your tension can cause uneven sides during assembly. If you tend to crochet very tightly, you might want to move up half a hook size to keep your stitches fluid and flexible. On the other hand, if your stitches are naturally loose, using a slightly smaller hook will create a dense fabric that prevents small items from falling through the gaps of your completed bag.
One of the greatest advantages of this specific construction method is that it is incredibly forgiving for crocheters of all skill levels. You do not need to worry about complex shaping, increasing in the middle of rows, or managing difficult garment sizing charts. You simply focus on working in a continuous round, making sure your corner increases stay consistent as the shape grows larger with every row. Once you master the basic rhythm of the first few rounds, the project becomes incredibly relaxing and repetitive in the best way possible.
To make your project truly stand out, you should also think about your color choices right from the very beginning of the process. You can create a beautiful solid-colored minimalist tote, or you can change yarn colors every few rounds to create a vibrant, retro-inspired granny square hexagon effect. Utilizing self-striping yarn is another fantastic, low-effort option that creates beautiful color transitions without leaving you with dozens of loose yarn tails to weave in at the end. Whichever colorway you decide to choose, make sure the yarn weights are identical so your shapes remain perfectly balanced.
Ultimately, understanding the basic geometry of this design gives you the creative freedom to experiment and customize your work without fear. Once you see how the flat pieces fold and interlock, you can easily visualize how changes in row counts will affect the depth and width of your final accessory. This foundational knowledge takes the guesswork out of your crafting, allowing you to focus entirely on the joy of creating a beautiful handmade item. Now that you know exactly how the pieces work together, you are ready to prepare your workspace and start crocheting.
2 Step by Step Guide to Crocheting the Hexagons
To begin your Hexagon Crochet Bag – Tutorial project, you will start by creating a classic magic ring, which allows you to pull the center absolutely tight with no visible hole. Inside your magic ring, chain three to count as your very first double crochet stitch, then work another double crochet, followed by a chain of two. You will repeat the pattern of working two double crochets and chaining two a total of six times around the ring. Once you have your six distinct clusters and six chain-two spaces, pull the yarn tail tightly to close the center and slip stitch into the top of your initial chain to complete the very first round.
For the second round, slip stitch across to the very first chain-two space, chain three, and work one double crochet, chain two, and two double crochets all within that same corner space. This specific sequence creates your very first official corner increase, which allows the shape to expand while remaining perfectly flat on your table. Move to the next chain-two space, and work the exact same sequence of two double crochets, two chains, and two double crochets. Continue this exact pattern in every single corner space around the perimeter, finishing the round with a slip stitch into your starting chain.
As you move into the third round and beyond, you will start to notice flat straight edges forming between your six corner points. In these straight sections, you will simply work regular double crochet stitches into the tops of each stitch from the previous row. Whenever you reach a corner chain-two space, you must always work the increase cluster consisting of two double crochets, two chains, and two double crochets. This repetitive rhythm of working flat along the sides and increasing at the corners is what keeps your six-sided motif growing perfectly.
Keep crocheting and repeating this exact sequence until your motif reaches the specific size you desire for your final accessory. For a standard, medium-sized everyday tote, you will generally want to crochet around ten to twelve complete rounds for each individual piece. Make sure to count your stitches along each flat side regularly to ensure that all six sides have the exact same number of double crochets. Once your first piece is complete, fasten off your yarn, leave a short tail, and repeat the entire process from the magic ring to create your second identical shape.
As you work through these rounds, it is highly recommended to use stitch markers in the corner spaces to avoid accidentally skipping an increase. It can be very easy to lose track of your corners when watching television or listening to music, and a missed increase will quickly distort the geometric shape. If your edges ever begin to ripple or wave, it usually means your tension has loosened up significantly or you accidentally added extra stitches along the straight walls. If the work begins to bowl up like a dish, you may have accidentally skipped a corner increase entirely.
Once both of your large six-sided pieces are finished, lay them completely flat on a hard surface to inspect your handiwork before moving on to the next step. They should look like identical twins, matching perfectly in size, row count, and overall stitch tension when placed directly on top of each other. If one piece appears slightly larger due to natural tension shifts, do not worry too much, as a quick session of steam blocking can easily fix minor size differences. With your two beautiful geometric shapes successfully completed, you are now ready to learn how to fold and join them.
3 Folding Assembly and Joining Techniques
Now comes the most exciting part of our Hexagon Crochet Bag – Tutorial, where your flat crochet work magically transforms into a functional fashion accessory. Lay your two completed pieces flat on your workspace, making sure the right sides of your stitches are facing upwards toward you. Take the far left corner and the far right corner of one piece, and fold them downward toward the bottom center point. You will instantly see the flat piece fold into a distinct “L” shape, creating an immediate front, back, and bottom panel for one side of your tote bag. Repeat this exact folding process with your second piece so you have two identical mirrored shapes.
Place the two folded pieces directly next to each other on your table so that the long bottom edges and back seams are touching perfectly. You will immediately see the complete silhouette of your tote bag take shape right before your eyes, with two pointed peaks at the top forming the handles. Use your trusty stitch markers to pin the touching edges together securely, ensuring that the stitches and corners line up perfectly across both pieces. Pinning your work beforehand prevents the fabric from shifting out of place while you are in the middle of seaming the bag together.
There are several excellent techniques you can choose from to join your crochet panels together, depending on the specific aesthetic finish you prefer. For an invisible and completely flat seam, you can use a tapestry needle and a matching strand of yarn to perform the mattress stitch through the back loops only. If you prefer a highly durable and slightly raised decorative ridge, you can use your crochet hook to join the pieces using a row of slip stitches or single crochet stitches. Whichever joining method you decide to use, make sure to keep your joining tension consistent so the seams do not pull or pucker the bag body.
Start your joining process at the bottom center of the bag, working your way up the back seam toward the top opening using your preferred stitch. Once the back seam is fully secure, fasten off your yarn securely and attach your yarn at the bottom center once again to seam up the front section. Always check that you are inserting your hook or needle through the corresponding stitches on both panels so that your geometric alignment stays perfectly straight. Take your time during this assembly stage, as neat and tidy seams are the secret to achieving a professional, store-bought look.
After completing the main body seams, you will want to reinforce the very bottom join of the bag, as this area will experience the most weight and stress during daily use. You can easily add an extra row of stitching across the bottom floor of the interior to give the base maximum structural strength. Once all your structural seams are finished, turn your bag right-side out to admire the beautiful clean lines of your newly assembled geometric tote. You will now see the beautiful v-shaped openings at the top of the bag that are ready for custom borders and handles.
If you notice any tiny gaps or loose spaces at the very center where all the corners meet, simply use your tapestry needle to weave a small strand of yarn through the opening and pull it tight. Secure all your yarn tails internally by weaving them through multiple stitches in opposite directions to ensure they never unravel in the washing machine. With the main body of your tote securely assembled and structurally sound, you can now move on to crafting the perfect handles and adding gorgeous finishing touches.
4 Crafting Handles and Adding Professional Finishing Touches
A gorgeous tote bag deserves beautiful, strong, and highly comfortable handles that allow you to carry your daily essentials with complete ease. To attach your handles, join your yarn at one of the top pointed peaks of your folded pieces using a simple slip stitch. Chain a sequence of stitches until your strap reaches your absolute desired length, keeping in mind that crochet handles will naturally stretch a bit over time under weight. For a standard over-the-shoulder tote, a chain of sixty to seventy stitches is usually ideal, whereas a shorter hand-carry style will only require around thirty to forty chains.
Once your initial chain reaches the perfect length, secure it to the opposite peak on the same side of the bag using a firm slip stitch, being careful not to twist the chain. Turn your work around and crochet back along your chain using a row of dense single crochet or half double crochet stitches to give the strap its thickness. For a truly durable and heavy-duty handle, we highly recommend working three to four complete rows of single crochet across the strap width. Repeat this exact process on the other side of the bag’s top peaks to create your second matching handle.
To give your finished piece a clean and truly professional appearance, it is highly recommended to work a complete border round around the entire top opening of the bag. Join your yarn at any spot along the top rim and work a continuous row of single crochet stitches all the way around the opening, including up and down the sides of your newly attached handles. This single row of border work ties the entire design together visually, hides any messy yarn joins, and reinforces the opening of the bag against future stretching. For a lovely retro texture, you could also use a beautiful crab stitch or a delicate shell border along the top rim.
If you plan on carrying small items like pens, lip balm, or keys, you might want to consider adding a fabric lining to the interior of your new accessory. You can easily cut a piece of cotton fabric using your flat crochet pieces as a template, sew the edges together, and slip it inside the completed bag. Use a needle and matching sewing thread to hand-sew the fabric lining to the inside top border of your crochet bag using an invisible blind stitch. Adding a fabric lining not only protects your items but also completely prevents the crochet fabric from sagging when you carry heavy items.
For those who want extra security for their belongings, adding a closure system to the top opening of your tote is a fantastic upgrade. You can easily sew a magnetic snap closure to the inside rim, or install a beautiful, large vintage wooden button with a corresponding crochet loop chain. If you love boho-chic fashion, you can also add beautiful yarn tassels or long fringe to the bottom corners of your bag for extra movement and style. These small, thoughtful customizations are what make handmade fashion so incredibly rewarding and unique compared to mass-produced items.
The final crucial step in your creative journey is to thoroughly weave in every single loose yarn tail using your tapestry needle to ensure a pristine finish. Once all your ends are neatly tucked away, give your completed tote a gentle steam with an iron to relax the cotton fibers and crisp up your geometric edges. Step back and admire your beautiful, fully functional, and incredibly stylish new accessory that you created completely from scratch. You now possess a wonderful wardrobe staple that is ready to accompany you on beach days, farmer’s markets, or casual coffee dates.
Frequently Asked Questions (FAQ)
What is the best yarn weight to use for a hexagon crochet bag?
The absolute best yarn weight for this specific project is either a Medium Category 4 worsted weight yarn or a Category 3 light worsted cotton yarn. These specific weights offer the perfect balance between structure, durability, and ease of stitching. Using a yarn that is too thin will result in a flimsy bag that sags easily, while a yarn that is too thick can make the finished bag feel overly bulky and heavy to carry around all day.
How do I prevent my crochet bag from stretching out over time?
To stop your bag from stretching out, always choose non-stretchy fibers like 100% mercerized cotton yarn or durable linen blends. Additionally, working with a slightly smaller crochet hook than what is recommended on the yarn label will create a much denser, tighter fabric that naturally resists sagging. For the ultimate stretch prevention, sewing a simple cotton fabric lining into the interior of your completed bag will completely absorb the weight of your items.
Can a total beginner successfully complete this hexagon crochet bag tutorial?
Yes, absolutely! This project is an excellent next step for a beginner who already understands basic stitches like the chain stitch and the double crochet stitch. Because the entire bag body is built using simple geometric shapes worked in a predictable, repetitive round, you do not have to worry about complex stitch patterns or confusing garment shaping. If you can crochet a standard granny square, you can easily complete this beautiful accessory.
How many skeins of yarn will I need to finish this project?
For a standard medium-sized everyday tote bag, you will generally need between 200 to 300 grams of worsted weight cotton yarn, which typically equates to about two to three standard-sized skeins. If you plan on adding exceptionally long shoulder straps, heavy decorative fringes, or large exterior pockets, it is always a safe idea to purchase an extra skein of yarn just to ensure you do not run out before finishing.
Is it necessary to block my crochet hexagons before assembling the bag?
While blocking is not an absolute mandatory requirement, it is highly recommended if you want to achieve a flawless, professional finish. Steam blocking your two completed six-sided shapes before seaming them together helps relax the fibers, flattens out any slight corner curling, and ensures that both pieces are exactly identical in size. This makes the final alignment and joining process significantly easier and much more precise.
Can I wash my handmade hexagon crochet bag in a washing machine?
Yes, you can absolutely wash your bag, provided you chose a machine-washable fiber like cotton or acrylic during the material selection phase. To keep your stitches looking brand new, always place the bag inside a mesh laundry bag and use a gentle, cold water cycle with mild detergent. Lay the bag completely flat on a clean towel to air dry, reshaping the geometric corners manually while it is still damp to maintain its beautiful silhouette.
Conclusion
In this Hexagon Crochet Bag – Tutorial, we have explored how to transform simple yarn into an incredibly trendy, durable, and highly functional everyday accessory using basic geometric principles.
We covered everything from selecting the perfect non-stretch cotton fibers and mastering the continuous six-sided corner increase, to folding the panels into an “L” shape and securing them with beautiful, clean seams. You also learned how to reinforce your bag handles, add clean edge borders, and customize your piece with optional linings or closure snaps for a truly professional boutique-quality finish. This project is a wonderful testament to how simple stitches can create complex, stunning structures.