A Walker Bag for Organized Mobility – Tutorial is exactly what you need to bring comfort, independence, and style back into your daily routine. For individuals who rely on standard walkers, rollators, or folding mobility frames, carrying personal belongings can present a frustrating safety challenge. Holding items in your hands while trying to navigate spaces compromises stability and increases the risk of falls. This step-by-step crafting guide will teach you how to create a custom, durable, and highly functional organizational accessory that attaches directly to a mobility aid, keeping hands completely free for safe operation.
Crafting your own medical equipment accessory allows you to prioritize upcycling and sustainability while tailoring the final product to your exact physical and aesthetic needs. Traditional, mass-produced mobility accessories are often clinical, plain, and lack personality. By choosing to build a DIY walker tote bag, you have the creative freedom to select durable fabrics, incorporate favorite colors, and design specialized compartments for everyday essentials. Whether you are sewing this project for yourself or creating a thoughtful, practical gift for a loved one, this handmade project bridges the gap between medical utility and beautiful, personalized textile art.
This comprehensive guide focuses heavily on using durable materials like denim fabric from old jeans, heavy cotton duck, or canvas to ensure longevity and resilience. Throughout this tutorial, we will explore everything from precise fabric cutting and stabilizing your panels to sewing secure fastening straps and designing multi-functional pockets. You do not need to be an expert sewist to achieve professional, sturdy results. Grab your sewing machine, gather your supplies, and let’s dive into creating a customized organizer that transforms a standard mobility device into a powerhouse of convenience.
1. Selecting Durable Fabrics and Essential Materials
To ensure your handmade project withstands daily wear and tear, choosing the right textiles is the most critical first step. A walker bag for organized mobility needs to be constructed from heavy-duty fabrics that can support the weight of items like water bottles, hardback books, cell phones, and heavy keychains without sagging or tearing. Utilizing denim fabric from old jeans is an exceptional, eco-friendly choice for this project. Denim is inherently tightly woven, highly resistant to abrasion, and provides excellent natural structure, making it the perfect foundation for utilitarian bags.
If you do not have old jeans on hand, alternative heavy-weight materials include canvas, duck cloth, or outdoor upholstery fabrics. These materials ensure that the body of your tote remains stable and doesn’t flap around when the user is in motion. In addition to your primary exterior textile, you will need a smooth, complementary fabric for the inner lining, such as lightweight quilting cotton. This contrast lining makes it much easier to see small items settled at the very bottom of the pockets.
Structure is paramount when building a bag that hangs from a moving frame. To prevent your pockets from drooping, you must incorporate a high-quality fusible interfacing or heavy stabilizer between the exterior and interior fabric layers. Interfacing provides the stiffness required to keep pocket openings easily accessible for individuals who might have limited hand dexterity or arthritis. For this design, a medium-to-heavy weight woven fusible stabilizer is highly recommended for all major panels.
Fastenings are another crucial component to plan before cutting your cloth. Since this accessory will hang from the top and side bars of a mobility aid, the attachment method must be incredibly secure yet easy to remove for washing. Heavy-duty hook and loop fasteners (commonly known as Velcro) are ideal for this application, offering quick adjustment capabilities. Alternatively, large plastic snap fasteners or sturdy webbing straps with side-release buckles can be integrated into the top tabs of your design.
Beyond the main fabrics and stabilizers, you will need standard sewing notions to guarantee a smooth crafting process. Ensure you are using heavy-duty sewing machine needles, specifically labeled as denim or jeans needles (size 90/14 or 100/16). Standard universal needles will likely bend or break when trying to stitch through multiple layers of thick denim and interfacing. You will also want to select a strong polyester thread, which offers superior tensile strength compared to traditional cotton thread.
Before initiating any cuts, take a moment to measure the specific mobility device the bag will live on. While this tutorial provides a universal template suitable for most standard folding walkers, rollators can vary widely in width and brake cable placement. Measure the horizontal distance between the two front vertical bars to confirm your finished piece will hang flat without bunching. Once your dimensions are verified, wash and iron all your fabrics thoroughly to eliminate any future shrinkage.
2. Fabric Cutting Guide and Panel Stabilization
Precision during the cutting phase lays the absolute groundwork for a symmetrical, professionally finished walker bag for organized mobility. For a standard universal fit, you will need to cut one large main body panel that measures 16 inches wide by 36 inches long from both your exterior fabric and your lining fabric. This long rectangle will eventually drape completely over the crossbar of the walker, forming a dual-sided storage system with accessible compartments on both the front and the back faces.
Next, you will cut the pieces dedicated to creating the exterior multi-compartment pockets. Cut two pieces of your exterior fabric measuring 16 inches wide by 10 inches long for the main front and back pockets. To add extra organization, you can also cut contrast strip inserts from leftover cotton or denim to form smaller interior slip pockets for pens, glasses, or medication organizers. Don’t forget to cut identical pieces of your chosen fusible interfacing for every single exterior and pocket piece.
The attachment straps require their own dedicated fabric sections to ensure they can bear the weight of the loaded bag. Cut four rectangles measuring 4 inches wide by 8 inches long from your sturdiest denim or canvas pieces. These will become the top hanging tabs that loop over the walker bars. If your mobility device has side supports that cause the bag to swing forward, cut two additional smaller straps of the same width to anchor the lower section of the tote to the vertical legs.
Once all your fabric pieces are carefully sliced using a rotary cutter and a clear acrylic quilting ruler, it is time to apply the fusible interfacing. Lay your exterior denim and pocket pieces wrong-side up on your ironing board. Place the adhesive side of the interfacing against the wrong side of the fabric. Using a hot iron with plenty of steam, press firmly downward for 10 to 15 seconds per section, moving systematically across the fabric rather than sliding the iron, which can warp the shapes.
Allow the fused pieces to cool completely on a flat surface before handling them further. This cooling period sets the chemical adhesive permanently, preventing the layers from bubbling or separating during future machine washing cycles. If you are using salvaged denim with uneven thicknesses or pre-existing seams, pay special attention to pressing the edges firmly so the stabilizer adheres deeply into the weave of the fabric.
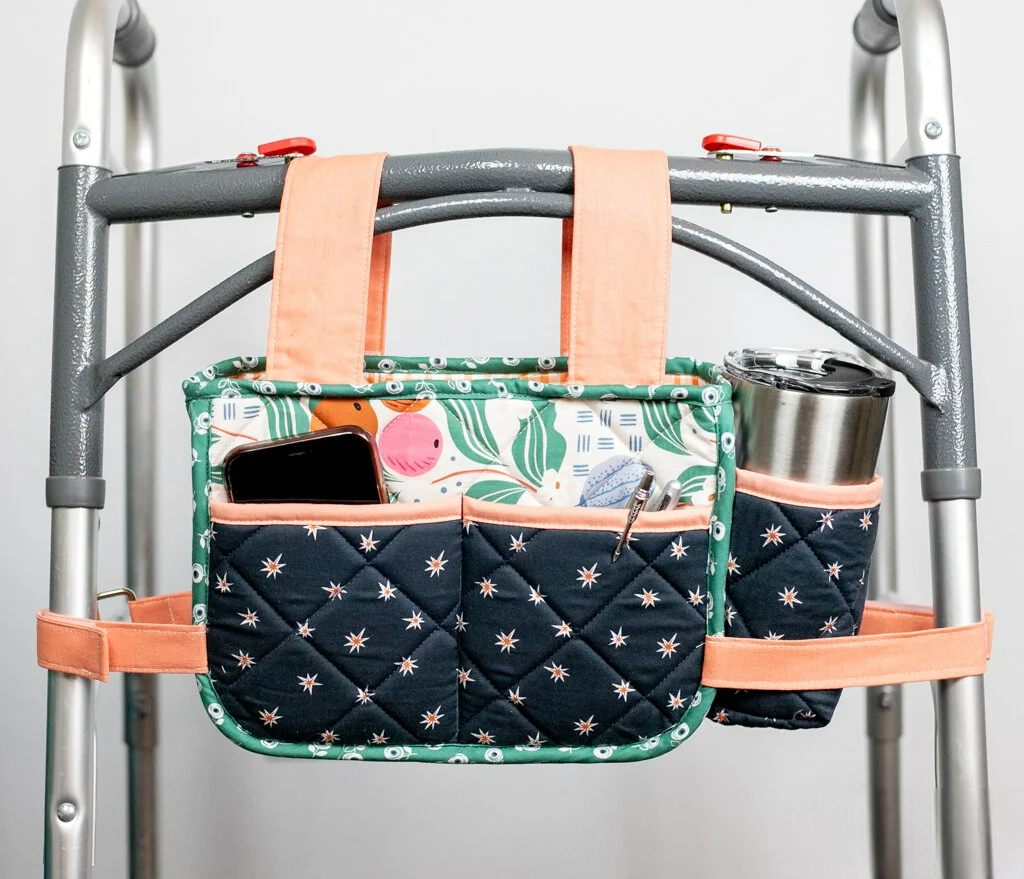
With all components stabilized, take a fabric marking pen to map out your pocket dividers on the right side of your pocket panels. For maximum utility, divide one pocket panel in half to create two large sections perfect for a water bottle and a notepad. On the opposite pocket panel, divide the width into three sections to safely house smaller items like a smartphone, keys, and reading glasses. Preparing these markings now saves significant time once you move over to your sewing machine.
3. Step-by-Step Pocket Assembly and Construction
Now that your materials are prepped, it is time to assemble the pocket system for your walker bag for organized mobility. Take your front pocket panels and place them right sides together with their corresponding lining pieces. Pin or clip along the top 16-inch edge. Sew across this top edge using a 1/2-inch seam allowance. Once stitched, flip the pieces right side out, press the seam flat with your iron, and topstitch 1/4 inch away from the finished edge to create a crisp, clean border.
Repeat this exact finishing process for the second pocket assembly. Now, place your main exterior body panel right side up on your workspace. Align the bottom edge of your finished pocket assembly with the lower 16-inch edge of the main body panel, matching the raw side edges. Pin the sides and bottom securely in place. Using the lines you marked in the previous step, stitch directly down the pocket panel, backstitching securely at the top edge to create the individual compartments.
To ensure these pockets can handle heavy items without ripping away from the main frame, reinforce the top openings with a small sewn box or a stitched triangle pattern. This technique distributes the physical stress across a wider area of fabric rather than putting pressure on a single thread. Once the divider channels are sewn, baste the outer raw edges of the pocket to the main body panel using a 1/4-inch seam allowance to keep everything aligned for final assembly.
Turn your attention to the opposite end of the long main body panel to attach your second pocket array, following the exact same procedure. This dual-sided design ensures that the user has immediate access to storage facing toward them while walking, as well as outward-facing pockets for public use or larger items. Take care to ensure that both pocket openings are facing toward the outer short edges of the main fabric layout.
Next, we must assemble the hanging tabs that will anchor our finished tote to the walker framework. Take your 4-inch by 8-inch strap pieces, fold them in half lengthwise with right sides together, and stitch along the long edge using a 1/2-inch seam allowance. Turn the fabric tubes right side out and press them completely flat, positioning the seam directly down the center of the back side so it remains hidden from view. Topstitch down both long sides for a clean look.
Fold each prepared strap in half to create a loop, and position them along the top edges of your main body panel layout. Space them evenly so they align perfectly with the horizontal support bar of the destination mobility device. Baste these loops securely in place along the raw edges. If you are integrating adjustable hook and loop fasteners, sew the scratchy loop side to the body of the bag and the soft hook side to the underside of the tabs at this stage.
4. Final Seaming, Finishing, and Attachment Methods
With all individual components basted to the main exterior sheet, you are ready to unite the exterior shell with the inner lining to complete your walker bag for organized mobility. Place the large interior lining rectangle directly on top of the fully assembled exterior panel, ensuring right sides are facing each other. Pin or clip extensively around the entire perimeter, making sure that all pocket edges, straps, and raw seams are tucked neatly inside and pointing toward the center.
Using your heavy-duty denim needle, sew around all four outer edges of the large rectangle using a precise 1/2-inch seam allowance. It is absolutely crucial to leave a 6-inch opening along one of the side sections—ideally between the pocket areas—to allow the bag to be turned right side out later. As you sew over the areas containing the pocket edges and hanging straps, slow down your machine speed and double-stitch back and forth to provide extra structural reinforcement.
Once the perimeter is completely sewn, clip the four corners diagonally close to the stitching line, being careful not to cut through your threads. Clipping corners removes excess fabric bulk, allowing for sharp, crisp points when the project is inverted. Reach inside the 6-inch unsewn gap you left in the side seam and carefully pull the entire bag right side out, gently pushing the corners out using a bone folder or a blunt chopstick.
Press the entire turned organizer thoroughly with a hot iron, ensuring the raw edges of the 6-inch opening are folded inward neatly by 1/2 inch so they line up perfectly with the rest of the finished seam. Pin this opening closed. Take your bag back to the sewing machine and edge-stitch around the entire perimeter of the bag, staying roughly 1/8 inch away from the outer edge. This topstitching automatically closes the turning gap while providing a beautiful, store-bought finish.
If you chose not to sew your hook and loop fasteners onto the straps earlier, you can now apply heavy-duty sticky-back hook and loop strips reinforced with machine stitching, or install heavy plastic snaps using a snap setting tool. Ensure that the placement allows the tabs to wrap tightly around a 1-inch diameter standard walker tube, preventing the bag from sliding side to side when the user navigates tight corners or bumpy outdoor pathways.
Your custom organizational accessory is now officially complete and ready for deployment. Simply drape the central unpocketed bridge section over the front crossbar of your walker, loop the secure fastener straps over the top rail, and click or press them firmly into place. Fill the specialized compartments with daily essentials, test the balance of the mobility aid to ensure smooth, unencumbered movement, and enjoy a renewed sense of independent, organized freedom.
Frequently Asked Questions (FAQ)
How do I clean and wash my handmade mobility bag?
Because this bag is constructed using robust materials like denim fabric from old jeans and heavy canvas, it is completely machine washable. Close all hook and loop fasteners prior to washing to prevent them from snagging the fabric or collecting lint. Wash the bag in cold water on a gentle cycle with mild detergent, and reshape it by hand before letting it air dry completely. Avoid high heat dryers to preserve the longevity of the internal fusible interfacing.
Can this design pattern be adapted for a wheelchair or a rollator?
Yes, this universal design is highly adaptable. For a rollator with under-seat storage or handbrakes, you can easily shorten the main body panel length and adjust the placement of the top straps. For wheelchairs, the exact same construction method works perfectly by shifting the hanging loops to attach directly to the rear push handles or the armrest bars, allowing for versatile, hands-free utility anywhere.
What is the best way to prevent the bag from swinging when walking?
To eliminate unwanted swaying or swinging, add two lower stabilization straps to the bottom corners of the bag panels during construction. These lower loops can wrap tightly around the vertical legs of the folding mobility frame using Velcro, anchoring the organizer firmly against the framework and keeping it completely steady even when navigating outdoor sidewalks or ramps.
How can I make the pockets safer for carrying valuable items?
If you plan to carry highly sensitive items like a wallet, prescription medication, or credit cards, you can easily integrate a zipper closure across one of the main pocket panels instead of leaving it open. Alternatively, you can add a simple fold-over fabric flap secured with a large snap or magnetic button over the smartphone compartment to keep valuables completely hidden from view.
Conclusion
In this Walker Bag for Organized Mobility – Tutorial, we have covered the entire creative journey of crafting a durable, stylish, and highly practical mobility aid organizer from scratch.
By carefully selecting rugged textiles like upcycled denim fabric from old jeans, stabilizing your panels with heavy-duty fusible interfacing, and reinforcing your stitching at major stress points, you have created a reliable accessory built to last. This project not only breathes new life into old materials through sustainable crafting but also provides immense everyday value, security, and independent freedom to anyone navigating life with a mobility device.