Learning how to create a beautiful crochet cord can completely transform your fiber arts journey, taking your projects from standard to spectacularly professional. This comprehensive tutorial is designed to guide you through the process, whether you are a complete beginner or a seasoned crafter looking to expand your toolkit. By mastering this simple yet versatile technique, you will unlock endless possibilities for adding structural integrity and decorative flair to your handmade creations.
The beauty of a crochet cord lies in its incredible versatility and strength compared to a standard chain stitch. When you first start crocheting, you quickly realize that a single foundation chain can be flimsy and stretch out of shape far too easily. Learning a dedicated crochet cord tutorial method gives you a dense, sturdy, and often reversible strand that holds its shape beautifully under tension. It is the ultimate secret weapon for elevating the quality of your finished items.
In this ultimate guide, we will explore the essential techniques, materials, and step-by-step methods required to master this skill. We will break down everything from the basic definitions to advanced tips so you can confidently integrate these techniques into your next design. Grab your favorite hook, a skein of yarn, and let’s dive into the wonderful world of textile crafting.
1. Understanding the Fundamentals of the Crochet Cord
The foundation of any great project starts with understanding what a crochet cord actually is and why it is so fundamentally different from a regular chain. When you follow a standard tutorial, you learn that a cord is a multi-dimensional, thick strand created by working into specific loops of a stitch. This process adds bulk and elasticity while preventing the yarn from stretching out over time.
Choosing the right materials is the first critical step toward success in this crochet cord tutorial. You can use almost any yarn weight, from delicate lace weight to chunky t-shirt yarn, depending on your final goal. For beginners, a medium worsted weight cotton yarn paired with an ergonomic crochet hook is highly recommended because it offers excellent stitch definition.
Stitch definition is incredibly important because it allows you to see exactly where to insert your hook for the next step. If you use a dark or highly textured novelty yarn, you might lose track of the loops, leading to frustration. Stick to light-colored, smooth yarns while you are learning the ropes of this tutorial to ensure a smooth, stress-free crafting experience.
Tension control is another fundamental element that can make or break your final product. If you pull your yarn too tightly, inserting your hook into the side loops will become an absolute nightmare. Conversely, if your tension is too loose, your work will look sloppy and lose its structural integrity, defeating the purpose of making a sturdy strand.
As you practice, focus on maintaining a fluid, relaxed rhythm with your hands to keep your stitches consistent. Remember that consistency is always more important than speed when working through a new tutorial. With just a little bit of patience, your muscle memory will take over, and you will find yourself flying through the steps automatically.
Ultimately, mastering the fundamentals allows you to adapt this technique to any pattern you encounter in the future. Whether you are building a delicate strap for a summer top or a heavy-duty handle for a market bag, the core principles remain exactly the same. Now that you understand the basics, let’s look at the essential tools you will need to get started.
2. Essential Tools and Materials for Your Tutorial Success
To achieve the best results with this crochet cord guide, having the right tools by your side is absolutely paramount. You do not need an expensive setup, but investing in a comfortable, high-quality aluminum or wooden crochet hook will make a world of difference. The size of your hook should generally match the recommendation on your yarn label, though going down a size can yield a tighter result.
Yarn selection plays a massive role in the final texture, durability, and appearance of your finished project. Natural fibers like merino wool or breathable cotton yarn are fantastic choices for garments and accessories due to their softness and strength. For utilitarian items like rugs or large baskets, synthetic fibers or thick nylon cords might be more appropriate.
Aside from your primary hook and yarn, you will also want to keep a few basic notions in your crafting basket. A sharp pair of embroidery scissors is essential for clean cuts that prevent your yarn from fraying at the ends. Additionally, having a few colorful stitch markers nearby can help you keep track of your turning chains and specific loops.
A tapestry needle, also known as a yarn needle, is another non-negotiable tool for finishing your work professionally. Once you complete your crochet cord, you will need to weave in the loose yarn tails securely so your hard work doesn’t unravel. A blunt-tipped needle ensures you can glide through the fibers without splitting the yarn accidentally.
Understanding how different hook materials affect your tension can also elevate your overall crafting experience. In this tutorial, we find that plastic hooks can sometimes drag, while smooth metal hooks allow the yarn to glide effortlessly. Experiment with different materials to find what feels most comfortable in your hands over long crafting sessions.
By setting up an organized workspace with all your essential tools within arm’s reach, you create a relaxing environment for learning. Preparation minimizes distractions and allows you to focus entirely on the hand movements required for the stitches. With your materials ready, we can move on to the actual step-by-step creation process.
3. Step-by-Step Guide to Creating the Perfect Crochet Cord
Now it is time to get your hands moving and create your very first high-quality crochet cord using a beginner-friendly method. To start this tutorial, create a standard slip knot on your hook, leaving a generous yarn tail for weaving in later. Chain two stitches loosely, making sure not to pull the yarn tight against the shaft of your hook.
Next, insert your hook into the very first chain stitch you made, yarn over, and pull up a loop. You should now have two loops sitting comfortably on your hook, resembling the start of a traditional single crochet. Yarn over once more and carefully pull through both loops on your hook to complete the initial setup stitch.
Here is where the magic happens: instead of chaining, rotate your piece slightly to find the small horizontal loop on the side. Insert your hook under this single side loop, yarn over, and pull up a loop so you have two loops on your hook again. Yarn over and pull through both loops to lock the stitch in place.
For the next step, rotate your work slightly once more, and you will now see two distinct loops running along the edge. Insert your hook under both of these side loops, yarn over, and pull through those first two loops on your hook. Finally, yarn over and pull through the remaining two loops to complete the sequence.
Repeat this exact rotation and insertion process continuously until your strand reaches your desired length. You will quickly notice a beautiful, rounded, and incredibly strong crochet cord growing directly from your hook. Keep your eyes on those twin side loops, as they are the secret to maintaining the perfect shape throughout the tutorial.
Once your piece is as long as you need it to be, simply yarn over and pull through the final loops one last time. Fasten off your yarn, leaving a tail of about six inches, and pull it securely through the loop to knot it. Congratulations, you have successfully completed the main practical portion of this hands-on guide!
4. Practical Creative Applications for Your Finished Projects
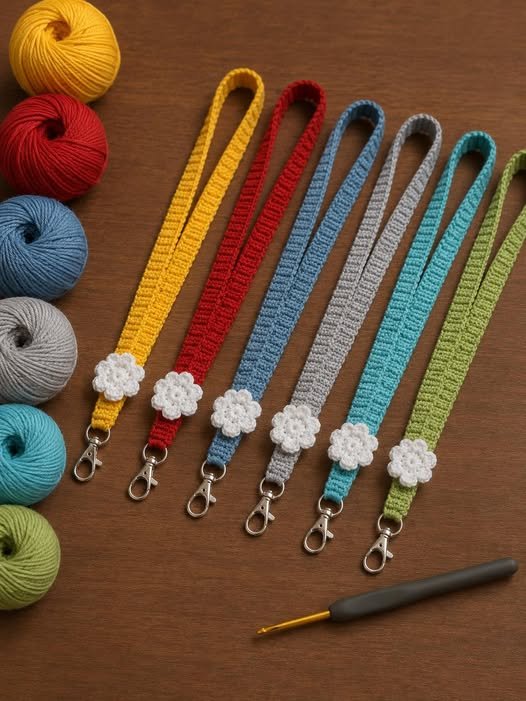
The true joy of learning how to make a crochet cord is discovering the massive variety of ways you can use it. One of the most popular applications is creating durable, non-stretch handles for a handmade crochet tote bag or backpack. Standard chains sag under the weight of books or groceries, but this specialized cord remains firm and reliable.
You can also use this tutorial technique to create beautiful, minimalist jewelry pieces like boho bracelets, chokers, or statement necklaces. By threading wooden beads, metallic charms, or sea glass onto the yarn before you begin, you can create stunning multimedia accessories. It is a fantastic, budget-friendly way to create custom gifts for your friends and family.
In the realm of home decor, a thick crochet cord can be coiled and sewn together to create rustic coasters, placemats, or hot pads. You can also use them as elegant curtain tie-backs, hanging loops for kitchen towels, or structural drawstrings for laundry bags. The added thickness gives these functional household items a beautiful, high-end look.
For garment makers, this technique is absolutely invaluable for creating functional drawstrings in hoodies, sweatpants, or cozy cardigans. It can also be used as delicate spaghetti straps for summer dresses, or trim detailing along the edges of a blanket. The smooth texture ensures comfort against the skin while providing excellent durability through multiple laundry cycles.
If you enjoy holiday crafting, you can easily turn these sturdy strands into beautiful festive garlands for your home. Simply crochet a very long cord and use a tapestry needle to attach festive felt shapes, pinecones, or colorful tassels. It provides a wonderful, cozy aesthetic that fills your living space with handmade warmth and charm.
Don’t be afraid to experiment with unique yarn textures, such as metallic threads or variegated colorways, to see how they look. Every single variation opens up a completely new aesthetic world for your future fiber arts projects. The skills you have learned in this comprehensive guide will undoubtedly serve you well for many years to come.
Frequently Asked Questions (FAQ)
What is the best yarn for making a crochet cord?
For the absolute best results, a smooth, tightly spun cotton yarn is highly recommended for this tutorial. Cotton offers fantastic stitch definition, zero stretch, and incredible durability. However, you can use acrylic, wool, or nylon depending on what your specific project requires.
Why is my cord twisting automatically as I work?
A slight natural twist is completely normal due to the spiral nature of the stitch rotation technique. However, if it is twisting excessively, your tension might be a bit too tight. Try loosening your grip slightly or switching to a hook that is half a size larger to fix this issue.
Can a beginner successfully complete this crochet cord tutorial?
Yes, absolutely! While it might feel a little bit fiddly during the first two or three rows, it uses basic stitches that anyone can learn. Once you visualize where the side loops are, the rhythm becomes incredibly repetitive and easy to follow.
How do I calculate how much yarn I need for a specific length?
As a general rule of thumb, this type of dense cord uses about three to four times the length of yarn compared to the final size. If you need a 10-inch strap, make sure you have at least 40 inches of yarn available to avoid running out mid-project.
Is this specific type of cord reversible?
Yes, one of the greatest benefits of this method is that the finished strand is completely uniform on all sides. This means you do not have to worry about a “right side” or “wrong side” when attaching it to bags or garments.
Conclusion
In this crochet cord – tutorial, we have thoroughly explored the essential fundamentals, required materials, step-by-step creation methods, and various practical applications for this incredibly versatile technique.
By mastering the art of rotating your work and utilizing the side loops, you now possess the skills to create strong, beautiful, and professional-grade strands for any fiber arts project. This simple upgrade will instantly elevate the quality, durability, and overall aesthetic of your handmade bags, garments, and home decor items.