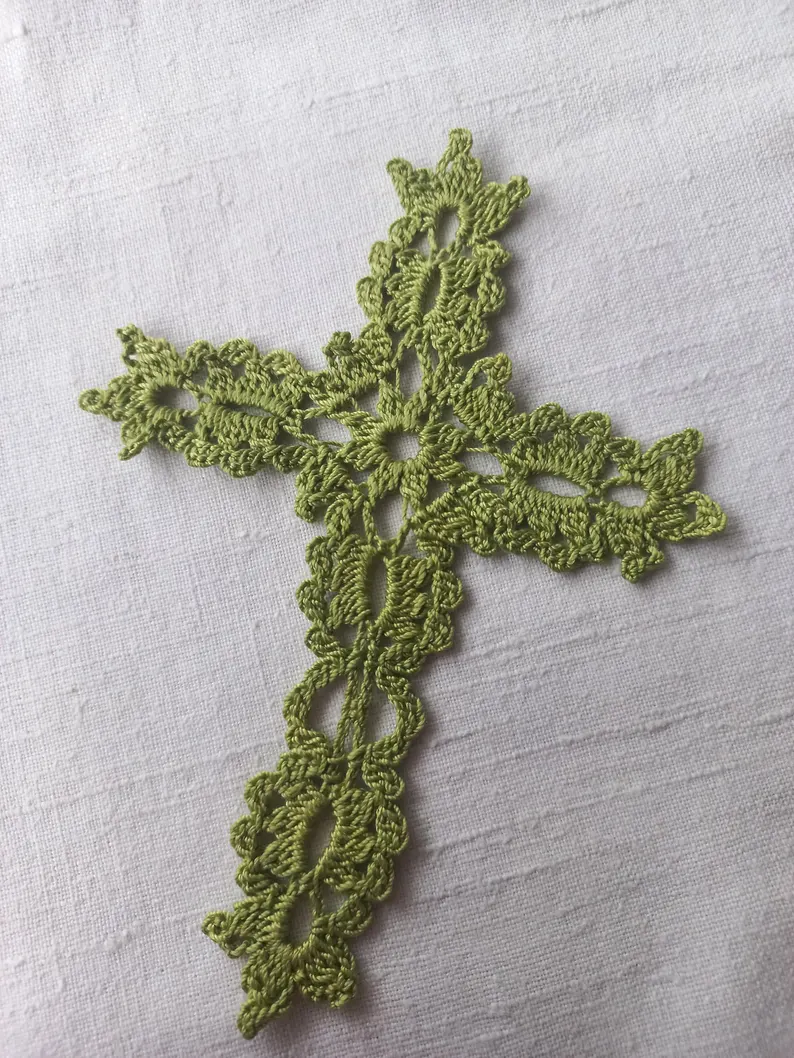
Making a Christian Cross crochet – Tutorial is a beautiful way to combine your crafting skills with a deeply meaningful symbol of faith. Whether you are looking to create a heartfelt gift for a baptism, a comforting keepsake for a loved one, or a delicate bookmark for your own Bible, learning how to crochet a cross is a rewarding project. This step-by-step guide is designed to help crocheters of all skill levels navigate the process with ease, ensuring a stunning and durable final piece.
Crocheting spiritual items allows you to slow down and intentionalize your craft, turning simple yarn into a cherished heirloom. Many crafters find that working on a Christian Cross crochet – Tutorial provides a peaceful, meditative experience that grounds their thoughts. By choosing the right materials and mastering a few foundational techniques, you can create a crisp, well-defined cross that holds its shape beautifully over time.
In this comprehensive guide, we will explore the essential elements that make a crochet cross project successful, from selecting the perfect yarn to executing advanced finishing techniques. We will break down key terminology, look at structural considerations, and guide you through the process of stiffening your finished project. Let’s dive into the core concepts and techniques you need to know to create a flawless crocheted cross.
1. Choosing the Right Yarn and Hook for Your Cross
The foundation of any successful crochet project lies in matching your fiber type with the correct hook size. For a delicate item like a crochet cross, using a high-quality cotton thread or a fine-weight yarn is highly recommended because it provides excellent stitch definition. If your yarn is too bulky or fuzzy, the clean lines and intricate details of the cross design can easily get lost.
When selecting your crochet hook, it is often best to go down a size or two from what the yarn label recommends. This adjustment creates tighter, more compact stitches, which prevent the final piece from sagging or stretching out of shape. A tight tension ensures that the central intersections and arms of the cross remain distinct and sharp.
Experimenting with different fiber blends can also yield unique textures for your religious keepsakes. For instance, a mercerized cotton gives the cross a beautiful, subtle sheen that catches the light elegantly. On the other hand, a soft bamboo blend can offer a matte finish with a delicate drape, perfect for bookmark applications.
Color choices play a significant role in the overall presentation and emotional impact of your crocheted cross. Traditional white, cream, and ecru are incredibly popular for religious ceremonies like first communions or weddings. However, soft pastel shades or rich liturgical colors like purple and burgundy can add deep personal meaning to your work.
Before jumping into the main pattern, it is always a wise practice to crochet a quick gauge swatch. This small test helps you determine if your personal tension matches the look you want to achieve. If your stitches look too loose and full of gaps, simply switch to a smaller hook to tighten things up.
Ultimately, taking the time to carefully select your materials ensures that your Christian Cross crochet – Tutorial results in a professional-looking masterpiece. High-quality materials not only make the crafting process more enjoyable but also guarantee that the finished keepsake will withstand the test of time.
2. Structural Techniques and Stitch Variations
Understanding how to construct the geometric shape of a cross is essential for preventing your work from curling or warping. A standard cross requires a longer vertical bottom arm, two symmetrical horizontal side arms, and a shorter top section. Achieving these proportions requires precise stitch counting and an understanding of where to attach your yarn for separate sections.
Many traditional cross patterns utilize a combination of basic stitches like the chain stitch, single crochet, and double crochet. Advanced designs might incorporate the treble crochet to create elongated, airy spaces that mimic classic lace or stained-glass windows. Mixing these heights effectively creates the iconic peaks and valleys of decorative religious art.
Another excellent technique to incorporate into your work is the picot stitch, which adds a decorative, pointed edging to the borders. Picots are created by chaining three or four loops and slipping back into the base stitch, forming a tiny decorative knot. Placing these strategically at the tips of the cross arms adds an elegant, vintage flair.
Working in the back loops only (BLO) is another fantastic stylistic choice to consider for your design. This subtle variation creates a raised horizontal ridge across your rows, adding depth and a beautiful structural texture to the fabric. It helps the cross look less flat and gives it a more sculptural, three-dimensional presence.
Managing your stitch transitions smoothly when moving from the main vertical stem to the horizontal arms prevents weak spots in the fabric. You may need to use slip stitches to travel across a row without adding bulk, ensuring a seamless flow. Consistency in your tension during these structural transitions is key to keeping the arms perfectly level.
By mastering these stitch variations, you elevate your work from a simple geometric cutout to an intricate work of art. The interplay of dense stitches and open spaces creates a captivating visual balance. With these techniques in your toolkit, your finished cross will boast clean lines and beautiful architectural symmetry.
3. Assembling and Joining Components Seamlesly
Some cross patterns are worked entirely in one continuous piece, while others require you to create separate motifs that are joined later. If your chosen design involves assembling individual pieces, using an invisible joining method is crucial for a clean look. A messy seam can distract from the elegant symmetry that a holy symbol naturally demands.
Using a sharp yarn needle and a technique known as the mattress stitch can help you achieve nearly invisible seams. This method involves sewing through the corresponding loops of both pieces in a zig-zag pattern, pulling the yarn taut to lock them together. When done correctly, the thread disappears completely into the surrounding stitches.
If you prefer to join your pieces using your crochet hook rather than a sewing needle, a slip stitch join is an excellent alternative. By inserting your hook through the inner loops of both pieces simultaneously, you can create a flat, secure connection. This technique keeps your hands on the hook and speeds up the final assembly phase.
Weaving in your loose yarn tails securely is just as important as the actual joining process. With an item that may be handled frequently or placed inside a holy book, loose ends can easily peek out and unravel. Weave your ends in multiple directions through the densest parts of the stitches to lock them permanently in place.
While assembling the pieces, always work under good lighting and periodically lay the project flat on a table. This allows you to check that the side arms are perfectly aligned and perpendicular to the main vertical shaft. Catching a misalignment early saves you from the frustration of having to undo your hard work later.
A seamless assembly transforms separate fragments of crochet into a cohesive, structurally sound heirloom. It showcases your attention to detail and dedication to precision crafting. Taking your time during this phase guarantees a clean, polished appearance that looks professional from every angle.
4. Blocking and Stiffening for a Flawless Finish
Once the physical crocheting is complete, your cross might look a bit soft, wavy, or slightly misshapen from being handled. This is completely normal and is easily remedied through a transformative process known as blocking. Wet blocking involves submerging the piece in water, gently pressing out the excess moisture, and pinning it to shape.
To achieve that crisp, rigid look often seen in heirloom lace bookmarks, applying a stiffening agent is highly recommended. You can use a commercial fabric stiffener, a homemade cornstarch solution, or even a mixture of school glue and water. Submerge your finished cross into the stiffening mixture until it is thoroughly saturated, then gently squeeze out the excess.
Pinning your wet, stiffened cross to a blocking mat requires patience and precision to ensure total symmetry. Use rustproof stainless steel pins to secure the central intersection first, then pull the arms outward evenly and pin the outer tips. Ensure that all lines are perfectly straight and that the side arms are level before leaving it to dry.
Allow the cross to dry completely in a well-ventilated area away from direct sunlight, which can sometimes yellow white cotton threads. This drying process can take anywhere from twelve to twenty-four hours depending on the humidity levels in your home. Resist the temptation to unpin the project early, as the stiffening agent needs to set completely.
Once fully dry, carefully remove the pins and gently lift the stiffened cross from your blocking surface. You will notice that the fabric now holds its shape perfectly, feeling firm to the touch and holding every intricate stitch detail aloft. This rigidity makes the cross highly functional as a bookmark or a hanging wall ornament.
Proper blocking and stiffening turn a floppy piece of crochet into a stunning, durable keepsake. It highlights the intricate lacework and ensures that the symbolic geometry remains true over years of display or use. This final step is the secret to achieving boutique-quality results in your fiber art journey.
FAQ
Can a beginner complete this Christian Cross crochet – Tutorial successfully?
Yes, this project is highly accessible for beginners who are comfortable with basic stitches like the chain, single crochet, and double crochet. Choosing a slightly thicker yarn, like a sport weight, can make it easier to see your stitches when starting out.
What is the best way to wash a stiffened crochet cross if it gets dusty?
If your cross has been treated with a water-soluble stiffener like starch or glue, submersing it in water will dissolve the stiffness. To clean it, gently wipe the surface with a damp cloth, or wash it completely and repeat the stiffening and blocking process.
How long does it typically take to complete a crochet cross?
Because of its compact size, a crochet cross is a relatively quick project that can usually be completed in one to two sittings. The blocking and drying process takes the most time, typically requiring overnight drying to set properly.
Can I add beads or sequins to my crocheted cross design?
Incorporating beads adds a gorgeous, personal touch to your religious keepsakes. You can string the beads onto your yarn before you begin crocheting and slide them into place as you work your stitches along the edges.
Conclusion
This Christian Cross crochet – Tutorial provides you with all the foundational knowledge required to create a stunning, meaningful textile piece. We explored the critical steps of selecting the right cotton thread and hook, mastering structural stitch variations like picots, joining elements cleanly, and applying the perfect stiffening finish.
By following these steps, you can create beautiful religious keepsakes that will be cherished for generations to come.