If you are looking for a creative, relaxing, and incredibly rewarding hobby, diving into a flowers crochet – tutorial is the perfect way to start your journey. Crafting crochet flowers allows you to transform simple strands of yarn into everlasting blossoms that can brighten up any space or accessory. Whether you want to embellish a cozy blanket, decorate a sun hat, or create a stunning bouquet that never wilts, learning this craft opens up a world of endless artistic possibilities.
The beauty of a flowers crochet – tutorial lies in its accessibility for crafters of all skill levels, meaning you do not need to be an expert to achieve breathtaking results. With just a few basic tools and a little bit of patience, you can master the essential techniques required to bring these textile florets to life. In this comprehensive guide, we will walk you through everything you need to know, from selecting your materials to mastering the stitches that give each petal its unique shape.
By following this flowers crochet – tutorial, you will not only learn a new skill but also experience the therapeutic benefits that handcrafts naturally offer. Repetitive stitching has been shown to reduce stress, improve focus, and provide a wonderful sense of accomplishment once your project is complete. So, grab your favorite yarn, find a comfortable spot to sit, and let us explore the vibrant and colorful world of handmade crochet floral designs together.
1. Essential Materials for Your Flowers Crochet – Tutorial
Before you begin working on your very first petal, it is crucial to gather the right supplies to ensure your crafting experience is smooth and enjoyable. The most basic tools you will need include a high-quality crochet hook, some vibrant yarn, a pair of sharp scissors, and a tapestry needle to weave in your loose ends. Having these items ready by your side will keep your momentum going as you follow along with the steps.
When selecting your medium, choosing the right yarn weight plays a massive role in how your final project will look and feel. For delicate, intricate blossoms, a lightweight yarn like lace or fingering weight works beautifully, while a medium worsted weight yarn is ideal for beginners because it is much easier to see and count your stitches. The material matters too, as cotton yarn offers excellent stitch definition and structure, whereas acrylic yarn provides a softer texture and a massive variety of bright colors.
Equally important to your yarn selection is choosing the correct hook size, which directly influences the tension and overall size of your finished flower. If your hook is too large for the yarn, your petals will look loose, floppy, and full of unwanted gaps; if it is too small, your hands will tire quickly from working with stitches that are far too tight. Always check the manufacturer’s label on your yarn skein, as it will explicitly recommend the perfect hook size to achieve the best results.
2. Basic Stitches to Master for Beautiful Petals
To successfully complete this flowers crochet – tutorial, you need to familiarize yourself with a few foundational stitches that form the building blocks of almost every pattern. Do not worry if you are completely new to this, as these movements are easy to learn with a little bit of practice. The magic of creating petals comes from combining stitches of different heights to create natural, organic curves.
The absolute foundation of almost every project begins with the chain stitch, which is used to create your starting row or to transition between different parts of your pattern. You will also frequently use the slip stitch, a technique that does not add any height to your work but is vital for joining rounds together, securing your yarn, or moving your hook across a row seamlessly without adding bulk.
To build the body of your petals, you will progress from the short single crochet to the intermediate half double crochet, and finally to the taller double crochet stitch. By smoothly increasing the height of your stitches in the middle of a petal and then decreasing them back down at the edge, you create that classic, rounded leaf shape that makes handmade blooms look remarkably authentic and lifelike.
3. Step-by-Step Guide to Creating a Simple Flower
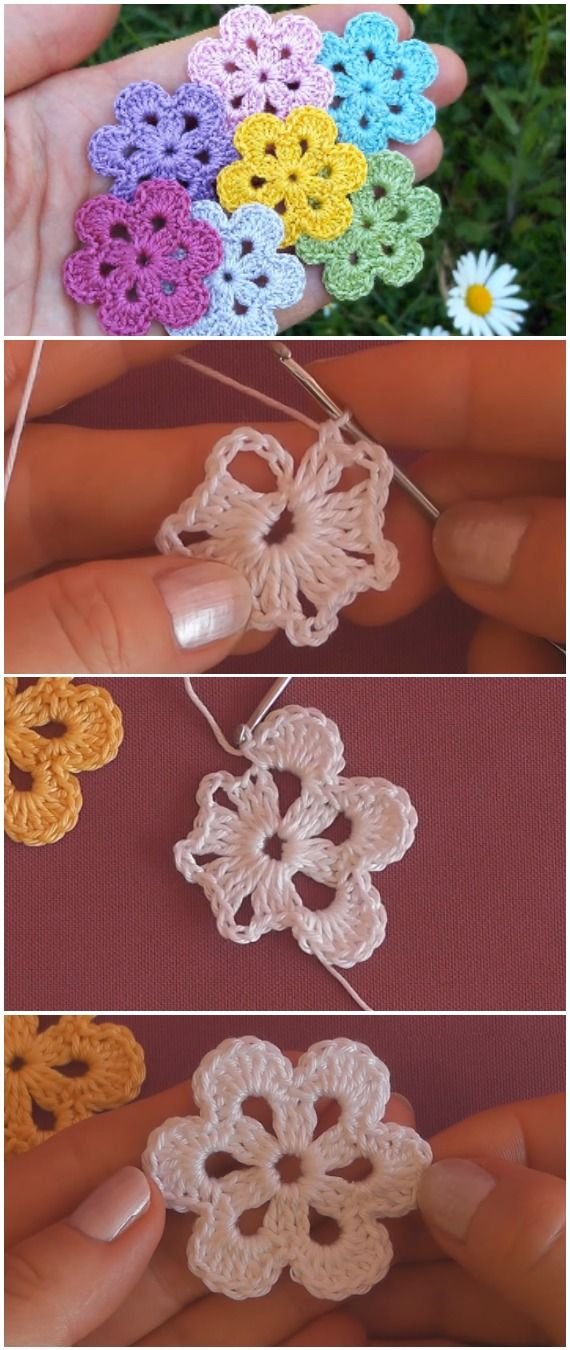
Now that you have your materials ready and understand the basic stitches, it is time to put them into action and start your first official project. We will begin by creating a secure foundation loop, often referred to as a magic ring or a adjustable loop, which allows you to pull the center of your flower tightly closed so that there is no visible hole in the middle of your work.
Once your center ring is secured, you will work a series of stitches into the loop to form the core of your blossom, usually changing to a contrasting yarn color to make the center stand out. After completing the center round, you will connect the ends with a slip stitch, fasten off your yarn, and prepare to attach your primary petal color to the outer edges of the core.
To form each individual petal, you will chain upward, work your combination of short and tall stitches into a single space to create height, and then slip stitch into the next space to bring the petal back down. Repeat this rhythmic sequence all the way around your central loop until you have created five or six beautiful, uniform petals that complete the circular shape of your gorgeous handmade bloom.
4. Creative Ways to Use and Style Your Crochet Blooms
Once you finish practicing this flowers crochet – tutorial, you will likely find yourself with a colorful collection of yarn blossoms and wonder how to best showcase them. One of the easiest and most popular ways to use your creations is by turning them into wearable fashion accessories, such as sewing them onto headbands, beanies, or canvas tote bags for a touch of bohemian style.
You can also use these durable textile decorations to elevate your home decor by attaching them to throw pillows, creating a whimsical floral garland for a nursery, or gluing them onto wire stems to arrange a permanent centerpiece. Because these low-maintenance creations require absolutely no water or sunlight, they make wonderful, long-lasting gifts for friends and family members who appreciate unique, handcrafted items.
Finally, do not be afraid to experiment with different textures, color combinations, and embellishments like sewing a shiny pearl or a rustic wooden button directly into the center of your flower. The more you practice and play with different styles, the more confident you will become in your crafting abilities, allowing you to design personalized masterpieces that reflect your own unique artistic vision.
Frequently Asked Questions (FAQ)
What is the best yarn for someone doing a flowers crochet – tutorial for the first time?
For beginners, a 100% cotton yarn in a worsted weight (medium size 4) is highly recommended. Cotton yarn holds its shape remarkably well, does not split easily while you are working, and provides excellent stitch definition, making it much easier for you to see exactly where to insert your hook.
How do I prevent my crochet flowers from curling up tightly at the edges?
Curling usually happens when your stitch tension is too tight or if you are not putting enough stitches into a single round. Try relaxing your hands to loosen your grip on the yarn, or switch to a slightly larger hook size to give your stitches more breathing room to lie completely flat.
Can I wash items that have these handmade flowers attached to them?
Yes, but the washing method depends heavily on the fiber content of the yarn you used. If you used cotton or acrylic yarn, you can generally wash the item on a gentle cycle inside a mesh laundry bag, but it is always safest to lay the project flat to air dry so the petals keep their original shape.
What does it mean to work in the front loop only or back loop only?
Standard stitches are worked through both loops at the top of a row, which look like a small “V”. Working in the front loop only (FLO) or back loop only (BLO) means you only insert your hook through one of those strands, which creates a beautiful ridges effect and adds realistic texture to your floral petals.
Conclusion
In this flowers crochet – tutorial, we have covered all the fundamental steps required to create your very own stunning yarn blossoms, from gathering your essential tools to mastering the basic stitches and shaping your petals.
Learning this craft is a wonderful way to express your creativity, relax your mind, and produce beautiful decorations that will last for years to come. With a little bit of practice, you will soon be able to whip up these charming designs effortlessly.