Creating a stunning Used Denim Bag and Scraps – Tutorial is one of the most rewarding ways to dive into sustainable crafting while clearing out your closet. Instead of letting old, worn-out jeans gather dust or end up in a landfill, you can transform them into a durable, stylish, and highly functional accessory. This step-by-step guide is designed to help crafters of all skill levels breathe new life into textile waste, turning everyday fabric remnants into a unique fashion statement.
When you embark on a Used Denim Bag and Scraps – Tutorial, you are not just making a bag; you are participating in the eco-friendly movement of upcycling. Denim is an incredibly resilient material, meaning your finished piece will withstand daily wear and tear beautifully. By combining larger panels of old jeans with smaller fabric remnants, you can create intricate patterns, rustic textures, and beautiful color contrasts that make your final product entirely one-of-a-kind.
Throughout this comprehensive Used Denim Bag and Scraps – Tutorial, we will explore the essential techniques needed to prepare your materials, assemble a patchwork canvas, and construct a sturdy tote. Whether you want to use a sewing machine or stitch by hand, the process is highly adaptable and incredibly satisfying. Get ready to gather your old jeans, thread your needles, and discover how easy it is to turn discarded textiles into a beautiful masterwork of functional art.
1. Preparing Your Reclaimed Materials and Fabric Scraps
Before you begin sewing your Used Denim Bag and Scraps – Tutorial project, you need to properly prepare your source textiles to ensure a smooth crafting experience. Start by collecting old jeans, denim jackets, or skirts that are no longer wearable due to stains, rips, or fit issues. Look for pieces with different washes—ranging from deep indigos to faded light blues—as this contrast will add incredible visual depth to your final bag design.
Once you have selected your garments, launder them thoroughly without fabric softener, which can sometimes leave a residue that affects how the fabric feeds through a machine. Inspect the items for hardware like metal zippers, rivets, and heavy buttons, and carefully remove them using seam rippers or heavy-duty fabric shears. Save these metallic elements, as they can often be reused later as rustic embellishments or functional closures for your finished tote.
Next, carefully deconstruct the clothing by cutting along the inseams and outseams to maximize the amount of flat, usable fabric panels available. Pay close attention to the back pockets, waistbands, and belt loops, as these elements can be preserved intact and integrated directly onto the exterior of your bag for instant storage and character. Once flattened, use a hot iron to press out all the creases, making it much easier to measure and cut precise shapes.
Sorting your smaller fabric scraps is just as vital as prepping the main denim bodies for a successful Used Denim Bag and Scraps – Tutorial. Gather leftover cotton prints, linen remnants, or even smaller strips of contrasting denim from previous quilting and sewing projects. Sort these pieces by size, color, or pattern style so you can easily grab them when it comes time to piece together your decorative patchwork sections.
Having a clean, flat working surface will drastically improve your cutting accuracy and overall enjoyment during the crafting process. Use a rotary cutter, a self-healing cutting mat, and a sturdy acrylic quilting ruler to square up your fabric pieces into uniform squares, rectangles, or strips. If you prefer a more organic look, you can certainly leave the edges irregular for a free-form improv quilting style that looks wonderfully rustic.
Organizing your workspace beforehand saves valuable time and prevents frustration once the creative momentum takes over. Keep your heavy-duty sewing machine needles, strong polyester threads, and fabric pins within arm’s reach so you do not have to interrupt your workflow. With your materials neatly prepped, pressed, and sorted, you are fully equipped to move on to the artistic process of designing your patchwork layout.
2. Designing and Assembling the Patchwork Canvas
The true magic of this Used Denim Bag and Scraps – Tutorial lies in designing the patchwork layout that forms the exterior shell of your bag. Lay your prepared denim and fabric scraps out on a large flat table or a design wall to experiment with different structural arrangements. You can choose a classic grid layout using uniform blocks, a trendy herringbone design, or a completely random improvisational patchwork approach.
As you arrange the pieces, focus on balancing the heavy weight of the denim with the lighter weight of your decorative cotton or linen scraps. Interspersing bright pops of color or intricate floral patterns between columns of deep indigo creates a striking visual rhythm that draws the eye. Don’t be afraid to mix different textures, as the contrast between soft woven cotton and rugged twill denim adds amazing tactile appeal.
Once you are satisfied with the visual arrangement, it is time to start pinning the individual scraps together face-to-face, preparing them for the sewing machine. Use a generous amount of straight pins or quilting clips to keep the thick denim layers from shifting out of place as you handle them. If you are working with very small or lightweight scraps, you might consider chain-piecing them in long rows to speed up the assembly.
Stitch the pieces together using a standard quarter-inch seam allowance, ensuring your sewing machine is fitted with a sharp denim needle to pierce the thick layers easily. Take your time when crossing over pre-existing seams, slowing down the machine or manually turning the handwheel to prevent thread breakage or skipped stitches. Consistency in your seam allowances at this stage will guarantee that your final patchwork panels lie perfectly flat.
After sewing each row or section together, head back to the ironing board to press your seams flat to one side or open. Pressing denim seams open is highly recommended for this Used Denim Bag and Scraps – Tutorial because it drastically reduces bulk at the intersecting corners. A well-pressed patchwork panel will look incredibly professional and will be much easier to quilt or line during the final construction phases.
Trim the completed patchwork panel to your desired final dimensions for the bag body, ensuring the corners are perfectly square and true. If you want a more structured and durable tote, you can fuse a layer of medium-weight interfacing to the back of your newly created patchwork canvas. This added step provides excellent stability, ensuring your finished bag retains its shape beautifully even when carrying heavy items.
3. Constructing the Main Bag Body and Sturdy Straps
Now that your beautiful patchwork canvas is complete, you can begin the physical assembly of your custom Used Denim Bag and Scraps – Tutorial project. Fold your main patchwork panel in half with the right sides facing together, aligning the side edges and the bottom edge perfectly. Pin securely along the sides and bottom, making sure any horizontal patchwork lines match up across the seams for a polished, continuous look.
Sew down the sides and across the bottom of the bag using a sturdy half-inch seam allowance, reinforcing the start and finish with backstitching. To give your tote a professional, flat-bottomed shape that allows it to stand upright, you will want to box the bottom corners. Pinch the bottom corners flat so the side seam aligns perfectly with the bottom seam, creating a triangle shape, then sew across it perpendicularly.
Creating durable straps is essential for making your tote comfortable to wear and capable of carrying everything from books to groceries. You can easily make straps by cutting long strips from the waistbands or long leg seams of your original old jeans. Alternatively, sew custom straps by folding a four-inch-wide strip of denim inwards from both sides to meet in the middle, then folding it in half again and topstitching.
Securely basting the straps onto the main bag body before adding the interior lining ensures they stay perfectly aligned and symmetrical. Position the strap ends on the right side of the bag’s upper edge, spacing them evenly from the side seams, and stitch them down within the seam allowance. This temporary hold prevents them from shifting out of place when you perform the final perimeter stitching around the bag opening.
Next, cut and assemble an interior lining from a lightweight cotton fabric scrap using the exact same dimensions as your main denim exterior panel. You can incorporate interior slip pockets into this lining layer to keep your phone, keys, and smaller accessories organized and easy to find. Leave a generous five-inch opening along the bottom seam of the lining fabric, which will be used to turn the whole bag right-side out later.
Slip the main denim bag body inside the lining bag so that their right sides are facing one another, ensuring the straps are tucked safely inside between the layers. Pin the entire upper raw edge securely, matching the side seams of the exterior patchwork with the side seams of the interior cotton lining. Stitch all the way around the top opening, creating a strong, secure bond between your rugged exterior and soft interior.
4. Final Details, Topstitching, and Creative Embellishments
With the structural sewing complete, pull the entire Used Denim Bag and Scraps – Tutorial masterpiece through the opening left in the lining. Gently push out the boxed corners from the inside using a blunt tool, like a wooden chopstick, to achieve clean, crisp edges. Once the bag is fully turned right-side out, sew the opening in the bottom of the lining closed using a neat ladder stitch or a close machine edge-stitch.
Tuck the finished lining down into the denim shell, smoothing out any interior fabric folds so that it sits completely flush against the bottom and sides. Take your bag back to the ironing board and press the upper edge thoroughly, rolling the seam slightly toward the inside so the lining doesn’t peak out. A crisp, flat top edge is vital for achieving a high-quality finish that rivals boutique-bought eco-fashion accessories.
Topstitch around the entire top opening of your bag, roughly a quarter-inch away from the edge, using a contrasting heavy-duty topstitching thread. This step is not just decorative; it provides immense structural reinforcement, anchoring the straps firmly in place and keeping the lining from shifting over time. For extra durability, sew a small decorative square with an ‘X’ inside over the base of each strap attachment point.
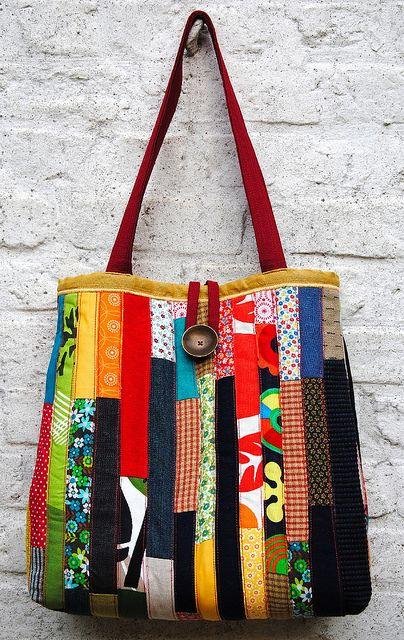
Now comes the most creative part of the process: adding personalized accents to celebrate your hard work and unique artistic vision. You can attach a vintage metal button, a heavy-duty magnetic snap, or even a salvaged denim loop closure to keep your bag securely shut. If you have leftover small scraps, craft a matching denim tassel or a removable fabric flower brooch to clip onto the handle.
Take a moment to carefully clip away any stray threads, loose denim frays, or temporary basting stitches that might be visible on the surface. If you love a rugged, distressed look, you can deliberately fray some of the raw patchwork edges using a stiff bristle brush or a piece of sandpaper. This creates a wonderful texture contrast against the crisp, clean lines of your structural topstitching.
Your gorgeous upcycled tote is now fully completed and ready to be shown off to the world as a testament to sustainable style. This versatile bag makes a wonderful daily companion for running errands, heading to the local craft store, or gifting to a fellow handmade enthusiast. By mastering these techniques, you can easily scale the process to create matching pouches, device sleeves, or larger travel duffels using the same principles.
Frequently Asked Questions (FAQ)
What type of sewing machine needle is best for stitching thick denim?
When working on a project like this, it is highly recommended to use a dedicated denim or jeans needle, typically in sizes 90/14 or 100/16. These needles feature a reinforced blade and a very sharp, slender point designed to pierce through multiple layers of heavy, tightly woven twill without bending, breaking, or causing skipped stitches.
Can I complete this entire tutorial using only hand-sewing techniques?
Yes, absolutely! While a sewing machine speeds up the process, you can sew the entire bag by hand using a strong backstitch and durable polyester or upholstery thread. Hand-stitching denim gives your project a beautiful, organic, slow-fashion aesthetic and allows for intricate control over bulky intersections and delicate scrap placement.
How do I prevent my sewing machine from jamming at bulky patchwork intersections?
To prevent jams when crossing thick seams, you can use a bulky seam jumper tool (often called a hump jumper) or a folded piece of cardboard placed under the back of your presser foot. This keeps the foot level as it climbs over the thick denim mounds, ensuring smooth fabric feeding and consistent stitch length.
Is it necessary to wash the old jeans before starting the project?
Yes, laundering your denim before cutting is crucial. It removes dirt and oils, shrinks the fabric to its true final size, and softens the fibers, making them much easier to cut and sew. It also ensures that any excess indigo dye is washed away, preventing it from bleeding onto your lighter decorative fabric scraps later on.
What are the best types of fabric scraps to combine with reclaimed denim?
Medium to heavy-weight woven fabrics work beautifully alongside denim. Cotton quilting fabrics, linen, canvas, corduroy, and flannel scraps are excellent choices. Avoid using highly stretchy knits unless you stabilize them first with iron-on interfacing, as stretchy fabrics can distort the structural integrity and shape of your bag.
How do I care for and clean my completed upcycled denim bag?
Your finished bag can generally be machine washed on a gentle, cold-water cycle with similar colors, especially if you used pre-washed cotton lining and denim. To preserve the vibrant colors of your fabric scraps and protect any delicate embellishments, it is best to line dry the bag naturally and press it with a hot iron to reshape.
Conclusion
In conclusion, this Used Denim Bag and Scraps – Tutorial demonstrates just how simple and satisfying it is to turn textile waste into a gorgeous, durable fashion statement.
By repurposing old jeans and incorporating colorful fabric remnants, you have created a functional piece of art that reduces waste while showcasing your personal creative flair. From prepping your materials and building a sturdy patchwork canvas to executing the final topstitching, these practical skills open up endless possibilities for future sustainable crafting ventures.