Crochet Rose – Tutorial: Creating beautiful, timeless floral pieces with just yarn and a hook is one of the most rewarding projects you can undertake. Whether you are a seasoned crafter or just starting out, learning how to make a crochet rose opens up a world of creative possibilities for home decor, garments, and personalized gifts. In this comprehensive guide, we will walk you through every single step required to master this classic pattern, ensuring your final flower looks stunningly realistic and professionally crafted.
The beauty of a crochet rose pattern lies in its incredible versatility and the pure joy of watching a flat, simple strip of stitches curl into a gorgeous, dimensional blossom. By mastering a few fundamental techniques, you can easily customize the size, fullness, and texture of your flowers to suit any project. This step-by-step crochet rose tutorial is specifically designed to be easy to follow, highly detailed, and thoroughly optimized to help you achieve perfect results on your very first try.
As you dive into this craft, you will quickly discover that working on a DIY crochet rose is not only a fantastic way to utilize your favorite yarn scraps but also a wonderfully relaxing, therapeutic activity. Throughout this article, we will cover everything from selecting the ideal materials to shaping your petals flawlessly. Grab your favorite hook, select a beautiful skein of yarn, and let’s explore the wonderful world of crochet flowers together.
1. Material Selection for Your Crochet Rose Tutorial
Choosing the right yarn is the absolute foundation of a successful crochet rose – tutorial experience, as the fiber content dictates the final look, drape, and durability of your flower. For beginners, a 100% cotton medium-weight yarn is highly recommended because it provides excellent stitch definition, keeping your petals crisp, structured, and distinct. Cotton also holds its shape beautifully over time, preventing your finished handmade crochet flower from sagging or losing its realistic, blooming form.
If you prefer a softer, more delicate appearance, you can opt for a lightweight acrylic yarn or even a fine sports weight thread for miniature designs. Acrylic offers a slight sheen and a wide array of vibrant colors, which can make your crochet flower arrangement look incredibly lively and bright. However, avoid overly fuzzy or textured yarns for this specific project, as they can obscure your stitches and make the assembly process much more difficult.
Equally important to your yarn choice is selecting the correct crochet hook size to match your material perfectly. For a standard medium-weight yarn, a 3.5mm (E-4) or 4.0mm (G-6) crochet hook usually yields the best results. You want your stitches to be slightly tight and firm so that the petals have enough internal structure to stand up on their own without needing internal wires or heavy starching.
In addition to your hook and yarn, you will need a few essential crochet notions to complete your project smoothly. A sharp pair of scissors and a sturdy tapestry needle are absolutely non-negotiable for weaving in your loose ends and sewing the rose together. You may also want to keep a few stitch markers nearby to help you track your foundation chain, especially if you decide to scale up the pattern for a larger blossom.
For those looking to create a complete floral display, consider gathering some floral wire and green floral tape to construct realistic stems. Adding a stem allows you to place your finished creations into vases or assemble a stunning crochet rose bouquet for weddings, anniversaries, or Mother’s Day gifts. Preparing these materials in advance ensures a seamless, enjoyable crafting process from the very first loop to the final stitch.
Ultimately, the materials you select for this crochet rose – tutorial will reflect your personal style and the intended use of the finished piece. Don’t be afraid to experiment with unique color palettes, such as deep burgundy, soft pastel pinks, or even variegated yarns for a modern twist. The right combination of high-quality tools and beautiful yarn will set you up for ultimate crafting success.
2. Step-by-Step Stitches for the Perfect Rose Pattern
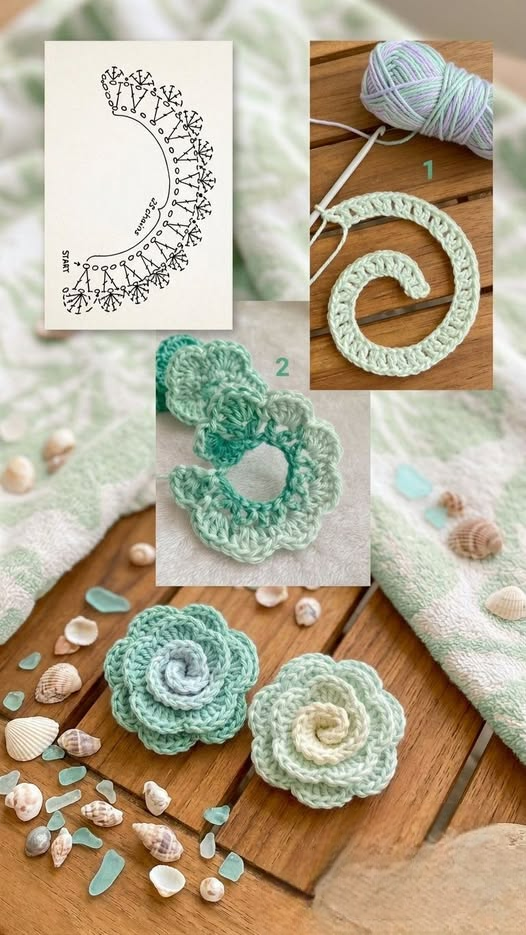
To begin your crochet rose – tutorial, you will start by creating a long foundation chain, which forms the backbone of your entire flower. For a standard-sized rose, chain a total of 51 stitches, ensuring your tension remains even and moderately loose. This initial length determines how many rows of petals your finished flower will have, directly impacting its overall volume, thickness, and realistic depth.
Once your foundation chain is complete, Row 1 focuses on building the foundational network of open windows using the v-stitch technique. To do this, work a double crochet, chain two, and another double crochet into the fifth chain from your hook, then skip two chains and repeat the process. This specific sequence creates a beautiful, flexible mesh row that allows the fabric to curve effortlessly when you begin rolling it later on.
Row 2 is where the true magic happens, as you begin transforming that simple mesh row into beautiful, distinct crochet petals. In each of the chain-two spaces created in the previous row, you will work a combination of half double crochets, double crochets, and treble crochets. By gradually increasing and then decreasing the height of your stitches within a single space, you create a perfectly rounded, natural petal shape.
As you progress across the row, it is highly beneficial to increase the size of the petals by adding more stitches to the final spaces. For instance, the first few spaces can hold small petals made of simple double crochets, while the middle and end spaces feature taller treble crochet stitches. This clever design element mimics nature perfectly, transitioning seamlessly from tiny, tight inner buds to large, fully expanded outer petals.
Once you reach the very end of your row, fasten off your yarn, leaving a long tail of at least 18 inches for assembly. This remaining strand of yarn is critical, as you will use it to sew the base of the flower together securely. Before moving on, take a moment to gently smooth out your row of petals with your fingers, ensuring none of your stitches are twisted or distorted.
Mastering this specific stitch combination is the secret to a flawless easy crochet rose pattern that looks intricate but remains simple to execute. The repetitive nature of the stitches makes it an incredibly soothing project, perfect for practicing your tension and stitch consistency. Once you familiarize yourself with this rhythm, you can easily complete a row of petals in just one sitting.
3. Assembling and Shaping Your Handmade Crochet Flower
With your long strip of finished petals complete, it is time to transition into the assembly phase of our crochet rose – tutorial. Thread the long yarn tail you saved into your tapestry needle, ensuring it is secure and ready for stitching. Lay your crocheted strip flat on a clean, stable surface with the right side of the stitches facing upward toward you.
Start at the end of the strip that features the smallest petals, as this will form the tight inner bud of your rose. Gently roll the edge inward tightly upon itself, creating a small, compact cylinder that looks like a flower getting ready to bloom. Secure this initial core with a small, precise stitch through the bottom edge to prevent it from unravelling as you continue working.
Continue rolling the strip of petals around the central bud, keeping the bottom edges completely flush, straight, and neatly aligned. As you wrap the fabric, try not to pull the petals too tightly; allowing a bit of slack gives the flower a beautifully full, realistic, and lifelike appearance. Each subsequent layer should wrap around the previous one, naturally expanding the width of your crochet blossom.
After every turn or two of the fabric, flip the flower over and push your tapestry needle through all the layers at the base to lock them into place. This frequent sewing technique ensures that the center of your 3D crochet flower remains perfectly stable and will not pop out or shift over time. Make sure your stitches penetrate through the foundation chains of every single wrapped layer for maximum structural integrity.
Once the entire strip is fully rolled and securely stitched across the bottom, knot your yarn firmly against the base of the flower. Weave the remaining tail end invisibly into the stitches of the bottom row, trimming any excess yarn cleanly away with your scissors. Flip the flower back over to the front side to inspect the final shape and prepare for the final styling adjustments.
The assembly process is truly where your artistic vision comes to life, turning a simple flat strip into a breathtaking crochet rose. Take your time during this step, adjusting the tightness of your roll until you achieve the exact floral aesthetic you desire. With a little patience, you will have a sturdy, perfectly formed flower ready to be showcased anywhere.
4. Creative Ways to Use and Style Your Finished Flowers
Now that you have successfully completed the core section of this crochet rose – tutorial, you can explore countless ways to display your art. One of the most popular trends is creating a long-lasting crochet bouquet by attaching your flowers to wire stems wrapped in green yarn. These gorgeous everlasting arrangements are perfect for home decor, adding a touch of rustic, cozy charm to any room without ever fading.
Another spectacular application is transforming your creations into wearable fashion accessories, such as a romantic crochet flower brooch or hair clip. Simply stitch a standard metal brooch pin or an alligator clip securely to the flat bottom base of your finished rose. This allows you to effortlessly embellish denim jackets, sun hats, canvas tote bags, or cozy winter scarves with a personalized handmade touch.
For passionate quilters and fabric crafters, these roses serve as excellent dimensional elements for applique quilting projects. You can stitch multiple flat-bottomed roses onto throw pillows, baby blankets, or wall hangings to create incredible texture and visual interest. Blending the world of traditional patchwork quilting with dimensional crochet opens up endless creative avenues for mixed-media textile art.
You can also use these beautiful flowers to elevate your gift-wrapping game, replacing disposable plastic bows with a reusable handmade yarn rose. Tying a crochet flower onto a holiday package or a birthday gift adds a deeply thoughtful, sentimental touch that the recipient can cherish forever. It turns the packaging itself into a lovely keepsake that can be repurposed as a magnet or a keychain.
If you enjoy making home organization items, try sewing a cluster of these roses onto an upcycled denim organizer or a storage basket. The contrast between rugged denim fabric and soft, intricate crochet stitches creates a stunning bohemian aesthetic that is highly sought after. It’s an exceptional way to combine sustainable crafting practices with beautiful, decorative design.
Finally, consider scaling the pattern down using fine lace thread to create exquisite, dainty crochet rose jewelry like earrings or statement necklaces. No matter how you choose to style your finished projects, the skills you developed in this guide will allow you to create beautiful pieces. Keep practicing with different colors, textures, and yarn weights to build your very own unique, colorful handmade garden.
FAQ
What is the best type of yarn for a beginner making a crochet rose?
The absolute best yarn for beginners tackling a crochet rose – tutorial is a standard 100% cotton yarn in a medium (worsted) weight. Cotton yarn provides incredible stitch definition, doesn’t split easily while you work, and offers the structural firmness needed to keep petals upright without losing shape.
how do I stop my crochet rose from drooping or losing its shape?
To prevent your flower from drooping, ensure you use a slightly smaller hook than recommended on the yarn label to create tight, firm stitches. Additionally, when assembling your DIY crochet rose, make sure to sew securely through all the foundation layers at the base to lock the shape permanently into place.
Can I wash items that have crochet roses attached to them?
Yes, you can wash them, but it largely depends on the fiber content of the yarn you used. If you used premium cotton or acrylic yarn, you can gently hand wash the item in cold water and lay it completely flat to air dry, carefully reshaping the petals with your fingers while they are damp.
How many chains do I need to make a larger or smaller rose?
To adjust the size of your crochet flower, simply alter your initial foundation chain using multiples of three plus one. A shorter foundation chain will yield a small, delicate rosebud, while a much longer chain will create a massive, multi-layered, fully blooming blossom with lots of volume.
Conclusion
In this detailed crochet rose – tutorial, we have thoroughly explored everything required to create an exquisite, professional-looking yarn flower from scratch.
From selecting the ideal cotton yarn and mastering the essential v-stitches and treble crochets, to carefully rolling and securing your petals, you now possess all the fundamental skills needed for success. These beautiful creations are perfect for bouquets, fashion accessories, applique quilting, and unforgettable handmade gifts.