Easy Patchwork Baby Bib Sewing – Tutorial is the ultimate guide you need to create a beautiful, functional, and completely customized accessory for the little one in your life. Welcoming a new baby brings endless joy, but it also brings a fair amount of mess, which is exactly why a durable and absorbent bib is an absolute necessity for parents. Crafting your own baby items adds a deeply personal touch that store-bought products simply cannot replicate, making this project an ideal choice for unique baby shower gifts or practical everyday use.
If you have a collection of fabric scraps left over from larger quilting projects, this easy patchwork baby bib sewing – tutorial serves as the perfect weekend activity to clear out your stash while creating something incredibly useful. Patchwork quilting is a timeless art form that allows you to play with vibrant colors, whimsical patterns, and various textures without requiring a massive investment of time or money. Even if you are a complete novice on the sewing machine, this step-by-step breakdown ensures you will achieve a professional, boutique-quality finish.
In this comprehensive easy patchwork baby bib sewing – tutorial, we will walk you through every single phase of the creation process, from selecting the right skin-friendly fabrics to mastering the final topstitch. By focusing on sustainable crafting, smart material choices, and simple piecing techniques, you will learn how to transform basic fabric squares into a stylish shield against spills and drool. Let us gather our materials, set up our creative workspace, and dive straight into the wonderful world of handmade baby gear.
1. Gathering Materials and Fabric Selection
Choosing the perfect textiles is the foundational step of our easy patchwork baby bib sewing – tutorial because a baby’s sensitive skin requires the softest, safest materials available. For the front patchwork panel, you will want to select 100% premium quilting cotton scraps, ensuring they are thoroughly pre-washed to prevent any future shrinking or warping. Mixing and matching complementary pastel tones, playful geometric prints, or cute animal motifs will give your handmade project its distinct, charming character.
For the absorbent backing of your bib, look for high-quality utility fabrics like organic cotton terry cloth, plush chenille, or ultra-soft bamboo fleece. These materials are exceptional at catching drool and liquids, keeping the baby’s clothes dry and clean throughout the day. Additionally, you will need a lightweight cotton batting layer sandwiched in the middle to provide structure and extra moisture protection without making the finished piece too stiff.
Beyond the fabric, you will need basic sewing notions including high-quality polyester or cotton thread that matches your primary fabric scheme. A reliable fabric marking pen, a sharp rotary cutter, an acrylic quilting ruler, and a self-healing cutting mat are essential for achieving precise geometric cuts. Do not forget a collection of sturdy sewing pins or wonder clips to hold your layered fabric pieces securely in place before you head over to your sewing machine.
To secure the bib around the infant’s neck, you must choose a safe, reliable, and durable fastening method that withstands constant washing. Plastic resin snaps are highly recommended because they are incredibly secure, easy to apply with snap pliers, and won’t scratch delicate skin like metal alternatives. Alternatively, soft sew-on hook-and-loop tape can be used, though you must ensure the soft loop side faces the neck to avoid any potential skin irritation.
Before making your first cut, it is vital to print or draw a reliable baby bib template that fits comfortably on an infant from three to twelve months old. You can easily find free standard bib outlines online or draft your own by tracing a well-fitting commercial bib onto a piece of sturdy cardboard. Make sure your template accounts for a standard one-quarter-inch seam allowance, which is the golden rule for successful patchwork quilting projects.
Once your materials are organized on your crafting table, take a moment to admire your chosen color palette and envision the final product. Laying out your components beforehand ensures a smooth, uninterrupted sewing session and keeps your creative energy flowing beautifully. With your workspace prepped and your tools at the ready, you are fully prepared to take the next step in this rewarding sewing journey.
2. Cutting and Arranging the Patchwork Squares
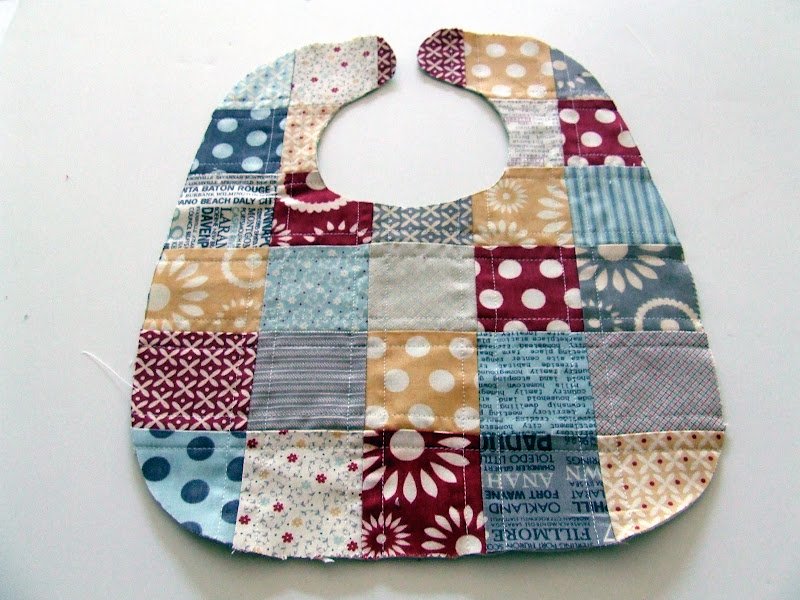
The true magic of this easy patchwork baby bib sewing – tutorial begins when you start cutting your fabric into uniform pieces to build the main design. For a standard-sized infant bib, cutting twenty-four individual fabric squares measuring two and a half inches by two and a half inches is a fantastic baseline. Using your rotary cutter and acrylic ruler on the cutting mat guarantees perfectly straight edges, which makes aligning the pieces later an absolute breeze.
Once your squares are precisely cut, it is time to channel your inner designer by arranging them into a cohesive grid pattern on your table. Experiment with different layouts, alternating between busy patterned prints and solid colors to create a visually striking balance across the surface. Take a step back or snap a quick photo with your smartphone to inspect the distribution of colors and ensure no identical prints are directly touching.
Your layout grid should ideally be four squares wide by six squares long, creating a solid rectangular fabric block that easily covers your bib template. This stage of the process allows for maximum artistic freedom, allowing you to create ombre gradients, checkerboard designs, or completely random, eclectic color collisions. Enjoy this playful experimentation phase, as it is precisely what makes your handmade creation completely unique and filled with personal love.
After finalizing your layout, organize the rows systematically so you do not lose track of your design when moving the fabric to the sewing machine. Stack the squares of each row from left to right, placing a small numbered sticky note on top of each pile to maintain the proper order. This simple organizational trick saves an immense amount of time and prevents the frustration of accidentally sewing the wrong pieces together.
Next, you will want to rough-cut your backing fabric and middle batting layer so they are slightly larger than your final paper bib template. Cutting these pieces to roughly ten inches by twelve inches provides a comfortable margin of error during the assembly and quilting stages later on. It is always much better to have a little excess fabric around the perimeter that can be neatly trimmed away rather than running short.
Keep your fabric scissors sharp and dedicated exclusively to textiles, as cutting paper patterns with them will dull the blades and cause fabric fraying. Properly prepared fabric pieces are the secret to achieving crisp corners and beautiful, flat seams that look professional. With all your patchwork components cut and methodically arranged, you are ready to start stitching your rows together seamlessly.
3. Sewing the Rows and Pressing Seams
Now that your grid is organized, it is time to start piecing the front panel of our easy patchwork baby bib sewing – tutorial with precise stitching. Take the first two squares from your top row, place them right sides together, and align the raw edges perfectly along the right-hand side. Chain-stitch these pieces together using a precise one-quarter-inch seam allowance, keeping your sewing speed steady to maintain a straight line.
Continue adding the remaining squares to that first row, sewing them one by one until your four-square strip is completely connected. Repeat this exact process for the remaining five rows, always maintaining that consistent one-quarter-inch seam allowance to ensure all your rows end up the exact same length. Consistent seam allowances are the absolute backbone of successful quilting, preventing mismatched intersections and distorted fabric panels.
Once all six rows are successfully stitched into individual strips, move over to your ironing board for an incredibly important step: pressing the seams. To ensure your patchwork nests together perfectly, press the seams of row number one to the right, row number two to the left, and alternate this pattern for every subsequent row. This alternating technique reduces bulky fabric buildup at the intersections, allowing your sewing machine needle to glide smoothly over the seams.
With the individual rows beautifully pressed, place row one and row two right sides together, carefully matching and nesting the fabric seams. Pin securely at each intersection, ensuring the interlocking pressed seams lock together tightly like puzzle pieces to create perfectly aligned corners. Sew the rows together along the long edge, removing the pins just before your needle reaches them to avoid breaking your equipment.
Stitch all six rows together sequentially until you have a fully formed, gorgeous rectangular patchwork panel that showcases your hard work. Give the completed patchwork panel a final, thorough press with a warm iron on the right side to ensure the entire surface is completely flat. A flat, well-pressed panel is significantly easier to work with when it comes time to cut out the final curved shape of the bib.
Take a moment to appreciate the beautiful grid work you have just created with your own two hands. The vibrant colors and clean intersections are a testament to your patience and precision during these crucial foundational steps. Your beautifully pieced fabric block is now officially ready to be transformed into the final iconic shape of a functional baby bib.
4. Assembling and Finishing the Bib
Place your finalized patchwork panel face up on a clean flat surface, then position your cardboard bib template directly over the center of the grid. Trace the outline carefully using your water-soluble fabric marker, ensuring the neck curve and outer edges look perfectly centered and balanced. Once you are satisfied with the placement, use sharp fabric scissors to cut along the drawn line, revealing your gorgeous patchwork bib front.
Next, layer your components using the classic “in-the-hoop” method: place your absorbent backing fabric right side up, lay the patchwork front right side down directly on top of it, and finally place the lightweight batting layer underneath everything. Align all the outer curved edges precisely and use plenty of sewing clips around the entire perimeter to prevent the layers from shifting while you sew. Leave a clearly marked three-inch opening along the straight bottom edge of the bib, which will be used for turning the project right side out later.
Carefully stitch around the entire perimeter of the bib using a standard one-quarter-inch seam allowance, making sure to backstitch securely at the beginning and end of your opening. When navigating the tight curves around the neckline, slow your sewing machine down and pivot the fabric gently with the needle down in the fabric. Taking your time around these curves guarantees a smooth, round neckline that fits comfortably around a baby’s neck.
To ensure the curves turn beautifully and lay completely flat without bunching up, use pinking shears or snip small V-shaped notches into the seam allowances around the curved areas. Be incredibly careful not to cut through your actual stitches while making these relief cuts, as that would cause the seams to unravel during future washes. Reach your fingers inside the three-inch bottom opening and gently pull the entire bib right side out, pushing the seams out completely with a blunt turning tool.
Tuck the raw edges of the three-inch turning opening neatly inside so they align with the rest of the seam line, and press the entire bib flat with your iron. To give your project an ultra-professional look and seal that bottom opening permanently, topstitch around the entire outer perimeter approximately one-eighth of an inch from the edge. This final topstitch not only adds beautiful structural stability but also ensures the bib retains its shape through hundreds of laundry cycles.
The final step of this easy patchwork baby bib sewing – tutorial is installing your chosen closure mechanism at the ends of the neckline straps. Use your snap pliers to securely attach a male plastic snap to one strap and a female snap to the opposing strap, ensuring they line up perfectly when overlapped. Double-check the security of the snaps by pulling on them gently, and just like that, your beautiful, handmade patchwork baby bib is officially ready for use.
Frequently Asked Questions (FAQ)
What is the best fabric for the backing of a baby bib?
The absolute best fabrics for bib backings are highly absorbent materials such as 100% cotton terry cloth, organic bamboo fleece, or premium cotton chenille. These fabrics excel at trapping moisture and preventing liquids from soaking through to the infant’s clothing. They are also incredibly gentle on delicate baby skin and can withstand frequent hot machine washes without losing their plush texture or structural integrity.
Can I use a regular sewing machine needle for this patchwork project?
Yes, a standard universal sewing machine needle (size 80/12 or 90/14) works beautifully for this project since you are primarily stitching through standard quilting cotton, lightweight batting, and knit backing. If your backing fabric is particularly thick, such as a heavy-duty terry cloth towel, upgrading to a specialized denim or quilting needle can help prevent skipped stitches. Always ensure your needle is fresh and sharp before starting a new baby project.
How do I wash and care for a handmade patchwork baby bib?
Handmade patchwork bibs should be machine washed on a gentle, cool, or warm cycle with a mild, hypoallergenic, baby-safe detergent to preserve the vibrant colors of the cotton prints. It is highly recommended to tumble dry on low heat or line dry flat to minimize fabric shrinkage and maintain the softness of the backing material. To prevent the hook-and-loop tape from snagging your delicate patchwork stitches in the wash, always fasten the closures securely before throwing the bib into the washing machine.
What size should a standard baby bib template be for a newborn?
A standard infant bib template generally measures roughly eight to nine inches in total width and ten to twelve inches in total length, fitting infants from three to twelve months comfortably. For a tiny newborn, you will want to scale the entire template down by roughly fifteen percent, paying close attention to reducing the inner neckline circumference so it fits snugly without leaving gaps. Always ensure your pattern includes a proper seam allowance around all edges before cutting your fabric pieces.
Why is pressing seams so important in patchwork quilting?
Pressing seams with a warm iron is an absolutely vital step because it flattens the stitched fabric layers, allowing your patchwork squares to lay completely flush against one another. Alternating the direction of your pressed seams across different rows allows the intersections to “nest” together perfectly, resulting in crisp, beautifully aligned corners. Skipping the iron leads to bulky, distorted seams that are difficult to sew over and can cause your final bib shape to warp.
Is it safe to use metal safety pins or buttons on a baby bib?
It is strongly recommended to completely avoid using traditional buttons or metal safety pins on any baby accessory, as they pose a significant choking hazard if they ever become detached. Plastic resin snaps or soft, sew-on hook-and-loop fasteners are the gold standards for safety because they are incredibly secure and flat. Always prioritize child safety by thoroughly testing the strength of your attached closures before allowing an infant to wear the item.
Conclusion
In this easy patchwork baby bib sewing – tutorial, we have successfully explored the entire creative process of crafting an adorable, highly functional, and durable accessory for infants. From selecting high-quality, skin-friendly cotton fabrics and highly absorbent backings to precisely cutting your squares, nesting your seams, and applying secure plastic snaps, you now possess all the practical knowledge required to create a stunning boutique-quality piece.
This sustainable sewing project is not only a fantastic, rewarding way to utilize your favorite fabric scraps, but it also allows you to craft a thoughtful, heartfelt gift that parents will use and cherish every single day.