Learning How to Make Crochet Owl – Tutorial style is one of the most rewarding projects you can undertake as a yarn enthusiast because these charming creatures bring joy to anyone who sees them. Crocheting has evolved from a traditional hobby into a vibrant form of modern artistic expression, allowing crafters to transform simple strands of fiber into complex, adorable three-dimensional figures. Whether you want to create a meaningful handmade gift for a loved one, decorate a cozy nursery room, or simply challenge your crafting abilities, mastering this specific design will elevate your entire skill set.
When you dive into a comprehensive How to Make Crochet Owl – Tutorial, you are not just following basic instructions; you are unlocking a versatile system of stitches that can be adapted for countless other projects. The unique shape of an owl, with its prominent expressive eyes and detailed textured feathers, requires a beautiful blend of core techniques that every crafter should know. By practicing these specific methods, you will notice a massive improvement in your stitch consistency, your ability to read complex stitch patterns, and your confidence when assembling separate pieces into a seamless finished toy.
This comprehensive guide is designed to be fully family-friendly and compliant with premium advertising standards, ensuring a safe, inspiring, and high-quality educational environment for makers of all ages and backgrounds. We believe that fiber arts should be accessible, well-structured, and easy to follow, which is why we have broken down this guide into clear, bite-sized chronological milestones. Grab your favorite colorful yarn skeins, select your preferred crochet hook, find a comfortable well-lit place to sit, and let us explore the wonderful world of handmade amigurumi together.
1. Understanding Your Materials and Essential Tools
Before starting your journey with our How to Make Crochet Owl – Tutorial, it is essential to gather the correct supplies to ensure your little bird turns out structurally sound and visually appealing. The choice of yarn is arguably the most critical decision you will make, as different fibers drastically alter the final size, crisp texture, and overall durability of your project. For beginners and intermediate crafters alike, a classic worsted weight medium cotton or premium acrylic yarn is highly recommended because it offers excellent stitch definition and does not split easily.
Your choice of crochet hook should directly complement the specific yarn thickness you select, but with a unique twist when it comes to making stuffed animals. In traditional crocheting, you want a loose drape, but for amigurumi owls, you need a slightly smaller hook than the yarn label suggests to keep your stitches tight and firm. This structural choice ensures that the polyester fiberfill stuffing inside does not peek through the tiny gaps, keeping your project looking professional and polished.
In addition to your main hook and vibrant yarn, you will need a few inexpensive but incredibly valuable notions to make the assembly process smooth and stress-free. A pair of sharp embroidery scissors is vital for clean yarn cuts, while a blunt-tipped metal tapestry needle will be your best friend when sewing the eyes, beak, and wings onto the main body. Stitch markers are also non-negotiable tools, as they help you keep track of the continuous spiral rounds without losing your precise place.
For the facial expressions, you can choose between plastic safety eyes or completely embroidered eyes using dark embroidery floss, depending on who the final toy is intended for. If you are creating this beautiful bird for an infant or a toddler, we strongly advise embroidering the facial features entirely to eliminate any potential choking hazards. On the other hand, if your project is meant for older children or adult home decor, plastic safety eyes provide a beautiful, glossy, and lifelike depth.
Lastly, you will need a high-quality bag of synthetic polyester fiberfill stuffing to give your handmade creation its plump, huggable shape and whimsical personality. When stuffing your project, moderation is the ultimate secret to success; too little stuffing will cause your bird to look wrinkled and deflated over time, while overstuffing can stretch out the stitches. Take your time during this creative phase, adding small tufts of fiberfill gradually to mold a perfectly balanced, symmetrical body shape.
By organizing your workspace beforehand and investing in these core materials, you eliminate unnecessary interruptions and set yourself up for a truly relaxing crafting experience. Understanding how your tools interact with each other gives you complete creative control over the final product, allowing you to experiment confidently with custom sizes and colors. Now that your crafting basket is fully prepared, we can move forward into mastering the fundamental foundational stitches required for the project.
2. Mastering the Core Stitches and Techniques
The secret to successfully executing this detailed How to Make Crochet Owl – Tutorial lies in mastering a few foundational stitches that form the building blocks of the entire project. The absolute foundation of almost every circular stuffed project is the magic ring, a brilliant technique that creates an adjustable loop that can be pulled completely tight. This clever opening method eliminates the unsightly center hole found in traditional chain loops, giving the top of your bird’s head a flawless, professional look.
Once your magic ring is established, the vast majority of your work will be done using the reliable single crochet stitch, which creates a dense, sturdy fabric structure. This specific stitch is favored globally because its compact nature prevents the internal stuffing from stretching the piece out of shape during everyday handling. Focus on maintaining an even, rhythmic tension as you loop your yarn, ensuring that every single stitch matches the size of the one before it.
To transform a flat circle into a beautifully curved three-dimensional body, you must learn the precise art of increasing and decreasing your stitches throughout the pattern. An increase simply means working two single crochets into the exact same stitch from the previous round, which smoothly expands the circumference of your fabric. Conversely, an invisible decrease blends two separate stitches together almost magically, tapering the shape inward without creating bulky ridges or noticeable gaps.
Working in continuous spirals is another hallmark technique of this style, meaning you will not join the end of each round with a traditional slip stitch. Instead, you simply keep crocheting directly into the first stitch of the previous row, creating a beautiful, unbroken spiral of color. Because there is no visible seam running down the back of your project, using a reliable stitch marker in the very last stitch of each round is vital to keep your counts accurate.
Color changing is where your personal creativity truly shines, allowing you to give your woodland creature a distinct belly patch or colorful feathers. To make a clean, seamless color transition, always introduce the new yarn color during the final pull-through of the very last stitch of your current color row. This advanced trick ensures that the top loops of your stitches remain perfectly uniform, preventing the new color from bleeding awkwardly into the previous section.
Taking the time to practice these fundamental movements on a small scrap piece of yarn before starting your official project will save you hours of potential frustration. When your hands become accustomed to the natural rhythm of increasing, decreasing, and managing yarn tension, the entire process becomes incredibly meditative. With these core techniques firmly under your belt, you are officially ready to begin shaping the main body of your elegant bird.
3. Step-by-Step Construction of the Owl Body
Now we are ready to begin the exciting hands-on portion of our How to Make Crochet Owl – Tutorial, starting directly with the creation of the main head and body structure. We begin at the very top of the head by forming a sturdy magic ring and working six single crochet stitches directly into the adjustable loop. Pull the short yarn tail firmly to close the center hole completely, and place your trusty stitch marker in the final stitch to mark your official starting line.
For the next several rounds, you will systematically expand the circle by following a mathematically balanced increase pattern to create the wide top of the head. In round two, work an increase into every single stitch around, bringing your total count to twelve stitches, before expanding further in subsequent rounds. By gradually increasing the space between your additions—such as alternating between a single stitch and an increase—your circle will grow perfectly flat without curling.
Once your head reaches the desired width, you will transition into the body section by working several consecutive rounds without any increases or decreases at all. This stage creates the straight, tubular height of the bird, and it is the perfect opportunity to relax into a smooth, rhythmic crocheting pattern. If you plan on using plastic safety eyes, this is the exact moment to position and secure them permanently between the designated increase rows.
As you progress toward the lower half of the body, you can choose to introduce a secondary yarn color to simulate a contrasting belly patch for your bird. Continue working down the length of the body until it is time to slowly reverse the shaping process using your neat invisible decreases. This step will gradually taper the bottom of your figure inward, perfectly mirroring the smooth roundness found at the very top of the head.
Before the opening becomes too small to work through, pause your stitching momentarily to fill the cavity with your high-quality polyester fiberfill stuffing. Use your fingers to gently push the stuffing into the upper corners of the head, ensuring the body feels firm yet comfortably squishy when squeezed. Once the stuffing is perfectly distributed, finish the final decrease rounds until you have only six remaining stitches left at the base.
To finish the body cleanly, cut your working yarn, leaving a generous ten-inch tail, and thread it onto your blunt metal tapestry needle. Carefully weave the needle through the front loops only of the remaining six stitches, pulling the strand tightly to close the bottom hole like a drawstring. Secure the yarn with a hidden knot, push the needle directly through the body to hide the remaining tail inside, and snip the excess close to the surface.
4. Crafting Details and Assembling Your Character
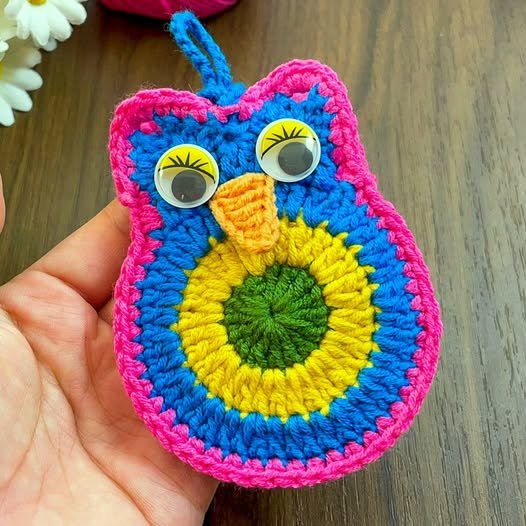
The true magic of this comprehensive How to Make Crochet Owl – Tutorial happens during the final assembly phase, where individual shapes are transformed into a character with a unique personality. To make the classic oversized eyes, create two simple flat circles using bright white yarn, working two quick rounds of single crochet stitches. Fasten off your work cleanly, leaving a long sewing tail on each circle, which you will use later to attach them symmetrically to the face.
The wings are crafted by creating small, teardrop-shaped pieces that mimic real feathers, usually using a slightly darker contrasting yarn color to add visual depth. You can easily achieve this natural organic shape by combining single crochets, half double crochets, and double crochets within a single short row. Make two identical wings, keeping your yarn tension consistent so that your finished bird looks perfectly balanced from both sides when viewed from the front.
For the prominent beak, attach a vibrant yellow or deep orange yarn directly to the center of the face, situated right between the two white eye circles. You can easily embroider a sharp triangular beak by wrapping your yarn needle horizontally across three stitches multiple times, building a solid three-dimensional shape. Alternatively, you can crochet a tiny independent triangle and sew it down securely, depending on which visual style you prefer for your project.
Before sewing any of the individual components down permanently, it is highly recommended to position all the pieces onto the main body using long quilting pins. This temporary setup allows you to look at your bird from multiple angles, adjust the placement of the wings, and ensure the eyes are perfectly level. A tiny millimeter change in the placement of an eye or a wing can completely transform your owl’s expression from sleepy to delightfully surprised.
When you are completely happy with the overall layout, use your tapestry needle and the reserved yarn tails to sew each piece down using a clean whipstitch. Sew slowly through the back loops of your details and the surface stitches of the body to keep your sewing line completely hidden from view. Take extra care to ensure every single accessory is attached firmly, especially if the finished item will be handled frequently by young children.
Once all the sewing is complete, you can add charming finishing touches, such as attaching tiny yarn fringes to the top corners of the head to represent ear tufts. Gently brush out these ear fringes with a comb to make them fluffy, or trim them with scissors for a clean, modern aesthetic. Step back, smooth out the fabric, and admire your brand new, handmade woodland companion brought to life through your dedication and patience.
Frequently Asked Questions
What is the best type of yarn for a beginner attempting an amigurumi project?
For beginners diving into their first toy project, a 100% cotton yarn or a high-quality acrylic yarn in a medium worsted weight is the absolute best choice. Cotton offers incredible stitch definition, making it very easy to see exactly where to insert your hook, and it holds its shape beautifully over time. Avoid highly textured, fuzzy, or dark-colored yarns for your first attempt, as they can obscure your stitches and make counting rounds unnecessarily difficult.
How do I prevent large, distracting gaps from showing up in my crochet work?
If you notice the white fiberfill stuffing peeking through your stitches, your hook size is likely too large for the yarn thickness you are using. The universal secret to flawless amigurumi is to drop down one or two hook sizes smaller than what is recommended on the commercial yarn wrapper. Additionally, practicing the invisible decrease technique instead of a standard decrease will completely eliminate the small gaps that traditionally form when tapering a piece.
Can I easily wash my handmade crocheted toy if it gets dirty over time?
Yes, you can absolutely wash your finished creation, provided you used washable cotton or acrylic yarn and secured all your yarn tails with tight, hidden knots during assembly. To preserve the shape and prevent fuzziness, it is highly recommended to place the toy inside a mesh laundry bag and wash it on a gentle cycle with cool water. Always allow the project to air dry completely in a well-ventilated area, gently reshaping the body with your hands while it is damp.
How long does it typically take to complete a project like this from start to finish?
For an intermediate crafter who is already familiar with reading patterns, a small owl can easily be completed in a single afternoon or roughly two to three hours of focused stitching. If you are a complete beginner, it might take you a few sessions spread across a weekend to comfortably master the tension and assembly steps. Remember that crafting is a relaxing journey, so take your time and enjoy the creative process instead of rushing to finish.
Why is my stuffed animal turning out much larger or smaller than the guide indicates?
Variations in final size are completely normal and are caused by your personal stitch tension and the specific yarn thickness you chose for the project. If you naturally wrap your yarn tightly, your finished bird will turn out smaller and firmer, whereas loose crocheters will produce a larger, softer toy. As long as your stitches are tight enough to keep the internal stuffing completely contained, the final dimensions of your owl do not need to match perfectly.
Conclusion
In this How to Make Crochet Owl – Tutorial, we have covered everything you need to create your very own charming woodland companion from scratch. We explored selecting the proper dense yarns and smaller hook sizes, mastering fundamental building blocks like the magic ring and invisible decrease, and walking through the complete shaping and assembly of your character.
By breaking the process down into manageable milestones, you can create a beautiful piece while refining skills applicable to countless future fiber arts projects.