How to Make Crochet Jellyfish – Tutorial is one of the most exciting and rewarding projects you can dive into, whether you are an absolute beginner or a seasoned crafter looking for a delightful, quick project. These whimsical marine creatures have taken the crafting community by storm, serving as adorable nursery decorations, unique keychains, or soothing sensory toys. In this comprehensive guide, we will break down every single step, ensuring you have a stress-free and joyful experience bringing your very own ocean friend to life.
Crocheting amigurumi—the Japanese art of knitting or crocheting small, stuffed yarn creatures—can sometimes feel intimidating if you are just starting out. However, a crochet jellyfish is arguably the perfect gateway project because it primarily uses basic stitches and a very forgiving structural shape. By following this carefully designed How to Make Crochet Jellyfish – Tutorial, you will master the foundational techniques required for 3D crochet while creating something absolutely beautiful.
Before we pick up our hooks, let’s understand why this project is so popular and how you can get the best results. By focusing on the right materials, understanding standard abbreviations, and mastering the ripple effects of the tentacles, your finished piece will look professionally made. Let’s explore the essential components of our How to Make Crochet Jellyfish – Tutorial and get your creative juices flowing.
1. Essential Materials and Tools for Your Crochet Jellyfish
Choosing the right yarn is the first and most crucial step when learning how to make crochet jellyfish – tutorial styles that last. For a soft, cuddly toy, many crafters prefer plush chenille or velvet yarn, while standard worsted weight cotton yarn is ideal if you want sharp stitch definition and a toy that can easily be washed. The texture of your yarn will completely dictate the final look, so pick a vibrant color that brings you joy.
Along with your yarn, you will need a matching crochet hook, typically a size or two smaller than what the yarn label recommends. This expert trick ensures your stitches are nice and tight, preventing the fiberfill stuffing from peeking through the gaps later on. A standard 3.5mm (E) hook works wonders for worsted weight yarn, keeping your crochet jellyfish firm and beautifully shaped.
Do not forget the small but essential notions that make the assembly process seamless and professional. You will need a pair of sharp scissors, a yarn needle with a large eye for weaving in loose ends, and some high-quality polyester fiberfill stuffing. If you are making this for an older child or adult, plastic safety eyes add an instant dose of personality, while embroidered eyes are safer for infants.
Safety should always be a priority when crafting handmade items, especially if they are intended for babies or pets. If you choose to use safety eyes, ensure they are securely locked into place before you close up the main body. For a completely baby-friendly alternative, a strand of black embroidery floss can be used to stitch on a sleepy, happy expression.
Stitch markers are another lifesaver that you will want to keep close at hand during this project. Because we work in continuous spirals without joining each round, it is incredibly easy to lose track of where a new row begins. Placing a marker in the first stitch of each round guarantees your counts stay accurate and your jellyfish dome stays perfectly symmetrical.
With your workspace cleared and all your materials neatly organized, you are officially ready to begin your crafting journey. Having everything within arm’s reach prevents interruptions, allowing you to get into a relaxing, meditative crafting flow. Let’s move forward in our How to Make Crochet Jellyfish – Tutorial to understand the foundational stitches you will be using throughout the pattern.
2. Understanding the Core Crochet Stitches and Terms
To successfully complete this how to make crochet jellyfish – tutorial, you need to familiarize yourself with a few fundamental crochet terms and abbreviations. The magic ring, often abbreviated as MR, is the absolute golden standard for starting any circular amigurumi project. It allows you to pull the center loop completely tight, leaving absolutely no hole at the top of your jellyfish’s head.
The single crochet (sc) is the workhorse stitch of this entire project, providing the dense structure needed to hold the stuffing inside securely. You will also use increases (inc), which means placing two single crochets into the exact same stitch to expand the circle. Conversely, decreases (dec) will invite you to combine two stitches into one, tapering the bottom of the dome.
Working in the front loops only (FLO) or back loops only (BLO) is a fantastic technique that creates distinct ridges in your work. In this crochet jellyfish pattern, we will use the front loops to create a beautiful ruffled skirt around the base of the body. This clever stitch manipulation gives the illusion of a complex design while remaining incredibly simple to execute.
Another wonderful term to know is the chain stitch (ch), which forms the foundational backbone of your jellyfish’s wavy tentacles. By chaining a long strand and then placing multiple stitches into each chain link, the yarn naturally twists and curls on its own. This organic curling effect mimics the natural, graceful movement of a real jellyfish floating through ocean currents.
If you happen to make a mistake or find your stitch count is off, do not feel discouraged or frustrated. Ripping out stitches, affectionately known as “frogging” in the crafting community, is a completely normal part of the learning process. Take your time to count your stitches at the end of every round to ensure your project stays completely on track.
Mastering these basic terms not only unlocks this specific How to Make Crochet Jellyfish – Tutorial but also opens the door to thousands of other amigurumi patterns. Once your fingers get used to the rhythm of the single crochet and the magic ring, your confidence will soar. Now, let’s dive straight into the step-by-step creation of the main body dome.
3. Step-by-Step Guide to Crocheting the Jellyfish Body
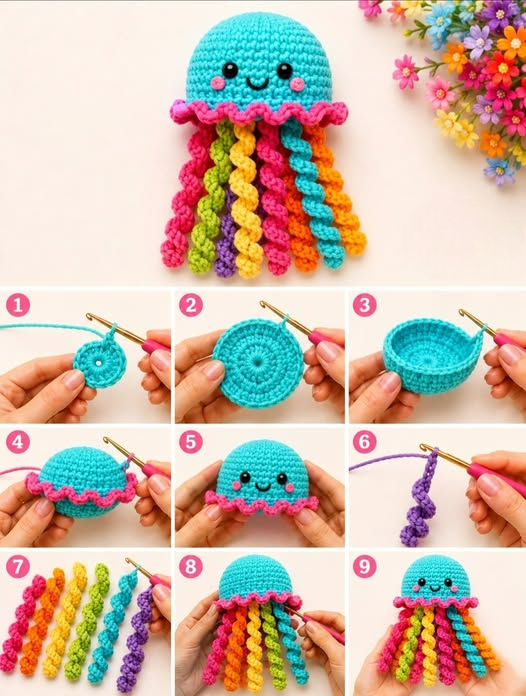
The journey of creating your crochet jellyfish begins at the very top of the head using your chosen main yarn color. Start by creating a magic ring and placing 6 single crochet stitches inside it, then pull the tail tight to close the center loop. For the second round, you will perform an increase in every single stitch around, leaving you with a total of 12 stitches.
To continue expanding the dome smoothly, follow a consistent mathematical increase pattern for the next few rows. Round 3 consists of repeating a sequence of one single crochet followed by one increase all the way around, resulting in 18 stitches. Round 4 follows with two single crochets and an increase, bringing your total count to 24 stitches, creating a flat circle.
Once your circle reaches the desired width, it is time to stop increasing and build the height of the jellyfish body. For the next 5 to 7 rounds, simply place one single crochet into every single stitch around without adding any increases. As you work these even rounds, you will watch the flat circle magically cup upward, forming a beautiful, smooth dome.
If you are planning to use plastic safety eyes, this is the perfect moment to install them before the opening becomes too narrow. Place them between rounds 7 and 8, leaving about 5 or 6 stitches of space between them to give your creature a cute face. Snap the washers firmly onto the back inside the dome, ensuring they are completely locked in place.
To create the whimsical ruffled bottom edge, change your focus to the front loops only for the very next round. In each front loop around the base, work a repetitive sequence of three double crochets to create a gorgeous, wavy skirt. This decorative edge gives your How to Make Crochet Jellyfish – Tutorial project its signature marine aesthetic and hides the flat bottom disc.
Finally, fasten off your yarn, leaving a long tail that you will use later to sew the bottom disc onto the main body. You now have a perfectly shaped jellyfish head ready to be stuffed and adorned with beautiful, flowing tentacles. Let’s move on to the most exciting and customizable part of the entire project: crafting the tentacles.
4. Crafting the Perfect Curled Tentacles and Assembly
The tentacles are what truly bring personality to your project, making this how to make crochet jellyfish – tutorial incredibly customizable and fun. To make a bouncy, curly tentacle, start by making a slip knot and chaining anywhere from 30 to 50 stitches, depending on how long you want them. The longer your initial chain, the longer and more dramatic the final curl will be.
To make the chain curl naturally, skip the first chain from your hook and place 2 or 3 single crochets into every single remaining chain link. As you cram multiple stitches into a tight space, the yarn will automatically begin to twist and coil into a beautiful spiral. Repeat this process to create 3 to 5 curly tentacles in contrasting or matching colors.
For a bit of visual variety, you can also create straight, elegant tentacles by simply chaining and skipping the multi-stitch expansion. Mixing curly spirals with straight strands gives your crochet jellyfish a wonderful, realistic texture that looks highly professional. Lay them all out together to see how the colors and lengths complement one another before assembly.
Next, you will want to crochet a small, flat circle using the back loops remaining from the bottom of your jellyfish body. This simple flat disc acts as a secure lid to hold all your polyester fiberfill stuffing inside the head. Before attaching it, securely knot or sew the tops of all your tentacles directly into the center of this flat disc.
With the tentacles securely attached to the bottom disc, it is time to bring all the components together into one finished piece. Take your yarn needle and use the long tail you saved from the body to whipstitch the flat disc to the remaining back loops of the head. Stuff the head firmly with fiberfill just before completing the final few stitches of your seam.
Once the opening is completely sewn shut, weave your remaining yarn ends into the inside of the body to hide them completely. Give your finished creature a gentle squeeze to distribute the stuffing evenly and fluff out the gorgeous curly tentacles. Congratulations, you have successfully completed our comprehensive How to Make Crochet Jellyfish – Tutorial and created a masterpiece!
FAQ – Frequently Asked Questions
Is this project suitable for an absolute beginner?
Yes, absolutely! This project is highly recommended for beginners because it uses basic stitches like the single crochet and simple increasing/decreasing techniques.
What is the best type of yarn for a crochet jellyfish?
Cotton yarn is excellent for beginners because it does not split easily and offers great stitch definition. If you want a softer, more modern plush look, velvet or chenille yarn works beautifully.
Can I make this toy safe for a newborn baby?
Yes, you can make it completely safe by embroidering the eyes with black yarn or embroidery floss instead of using plastic safety eyes, which can be a choking hazard.
How do I make the tentacles curl more tightly?
To get a tighter, more dramatic spiral, place 3 or 4 single crochets (or even half double crochets) into each chain stitch instead of just 2.
How long does it take to complete one jellyfish?
Because of its small size and simple construction, an intermediate crocheter can finish one in about 1 to 2 hours, while a beginner might take a bit longer.
Can I wash my finished crochet jellyfish?
If you used cotton or acrylic yarn and stuffed it with polyester fiberfill, you can gently hand wash it in cool water and let it air dry completely.
Conclusion
In this How to Make Crochet Jellyfish – Tutorial, we have covered everything from selecting the right materials and mastering core stitches to assembling the body and crafting gorgeous, bouncy tentacles.
This project is a fantastic way to sharpen your amigurumi skills while creating a delightful, handmade item that everyone will adore. By playing around with different yarn textures and color combinations, you can create an entire ocean family of unique jellyfish.