How to Make Lacy Leaf Bookmark Crochet – Tutorial is your ultimate guide to crafting a delicate, beautiful, and functional piece of art that any book lover will cherish. In a world dominated by digital screens, the charm of holding a physical book remains unmatched, and nothing complements a great novel quite like a handmade bookmark. This comprehensive guide will walk you through every single step required to create a stunning, intricate leaf pattern that looks complex but is surprisingly simple to master. Whether you want to clear out your yarn stash, create unforgettable gifts for your literary friends, or add a high-quality product to your online craft shop, this project is the perfect choice for your next creative endeavor.
Crochet is more than just a hobby; it is a therapeutic practice that allows you to slow down, focus your mind, and build something tangible with your own two hands. When you dive into this crochet leaf pattern, you will discover how easy it is to transform basic stitches into organic, flowing shapes that mimic the natural elegance of autumn foliage. This specific design balances open spaces with solid textures, creating a lace-like appearance that lies completely flat inside your favorite novels without damaging the spine or pages. By choosing the right materials and mastering a few fundamental techniques, you can easily elevate your crochet skills while producing a highly practical accessory.
In this detailed How to Make Lacy Leaf Bookmark Crochet – Tutorial, we are going to break down the entire process from start to finish, ensuring that even intermediate beginners can follow along with absolute confidence. We will discuss the best yarn weights, the ideal hook sizes for maximum stitch definition, and the exact stitch combinations that give this bookmark its signature airy layout. Additionally, we will share essential tips on blocking your finished project so it maintains its crisp shape for years to come. Grab your favorite hook, select a beautiful skein of cotton yarn, and let’s explore the wonderful world of lace crochet together.
1. Choosing the Best Materials for Your Lacy Leaf Bookmark
Selecting the correct yarn is the most crucial decision you will make when learning how to make lacy leaf bookmark crochet projects that look professional. For a lace design, a lightweight thread or a fine fingering weight yarn is highly recommended because it highlights the intricate details of the leaf veins. Cotton yarn is universally considered the absolute best choice for bookmarks because it is incredibly durable, inelastic, and can be easily blocked to hold its final shape. Avoiding fuzzy acrylics or bulky wools ensures that your stitches remain crisp, clean, and completely legible.
The size of your crochet hook plays an equally vital role in determining the final drape and density of your crochet bookmark tutorial project. If you are using a standard size 10 crochet thread, a steel hook ranging from 1.5mm to 2.25mm will give you the tight, controlled stitches necessary for fine lacework. If you prefer working with a slightly thicker sport or fingering weight yarn, a 2.5mm to 3.0mm hook will help maintain that desired open, airy aesthetic. Always check your personal tension, as looser crocheters may want to size down to keep the leaf structure from looking sloppy.
Beyond your yarn and hook, you will need a few basic notions to successfully complete this lacy leaf crochet pattern. A sharp pair of embroidery scissors is essential for making clean cuts without fraying your delicate thread or yarn ends. You will also need a fine tapestry needle or a steel yarn needle with a sufficiently large eye to weave in your tails securely. Lastly, gather some rust-proof blocking pins and a foam mat, as blocking is the secret step that transforms a curled piece of crochet into a perfectly flat masterpiece.
Color selection can completely change the vibe of your finished lacy leaf bookmark. Choosing vibrant greens can evoke the fresh feeling of springtime, while rich copper, deep burgundy, and mustard yellow tones create a stunning autumnal theme. Variegated yarns can also add a beautiful, shifting depth to the leaf, mimicking the natural transitions found in real plant life. However, solid colors are generally preferred for beginners because they make it much easier to count your stitches and see exactly where to insert your hook.
Before starting, it is highly beneficial to set up a clean, well-lit crafting workspace to protect your eyes from strain while working with small stitches. Lacework requires a bit more focus than chunky blankets, so having good overhead lighting or a dedicated craft lamp makes a massive difference. Make sure your hands are clean and free of lotions that could potentially stain lighter-colored cotton threads over time. Organization is key, so keep your small tools in a designated tray where they won’t roll away while you work.
Ultimately, investing a few minutes to carefully prepare your materials ensures a seamless, frustration-free crafting experience from the very first chain. High-quality materials don’t have to be expensive, as a single small ball of cotton thread can yield multiple beautiful bookmarks. By focusing on stitch definition and material durability, you guarantee that your finished project will withstand years of being tucked inside your favorite books. Now that your workspace is ready and your materials are gathered, you are fully prepared to dive into the core techniques of this beautiful project.
2. Step by Step Guide to the Lacy Leaf Stitch Foundation
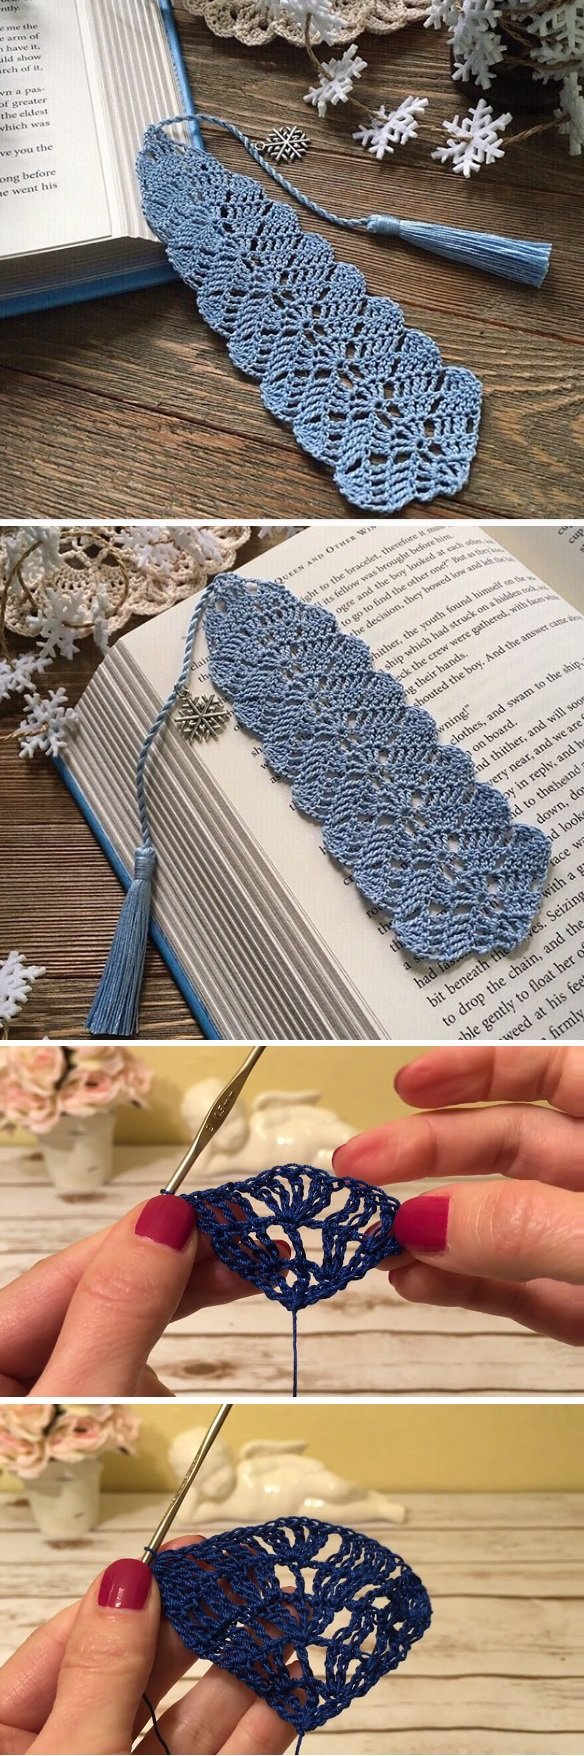
Every great crochet project begins with a solid foundation, and this How to Make Lacy Leaf Bookmark Crochet – Tutorial is no exception. To start the leaf, you will begin by creating a standard slip knot and chaining a specific base sequence, which usually consists of a short chain that will act as the central vein. Working along both sides of this initial chain is the secret technique used to create symmetrical botanical shapes in crochet. This allows the stitches to fan out beautifully on the left and right sides, mimicking a real leaf.
The first official round focuses on establishing the core shape by using a combination of short and tall stitches, such as single crochets, half double crochets, and double crochets. By gradually increasing the height of your stitches as you move toward the center, and then decreasing them as you approach the tip, you effortlessly form the natural curve of a leaf. To create the “lacy” effect, you will incorporate strategic chain spaces, skipping certain stitches to leave open windows that let the light pass through.
As you pivot around the tip of the foundation chain to work down the opposite side, you will create a small picot stitch or a cluster of chains to form a sharp, defined leaf point. This turning point requires precise tension so that the tip doesn’t curl upward or become distorted. Mirroring your stitches exactly on the return pass is critical for maintaining perfect visual balance. Take your time during this step to count your stitches carefully, ensuring that both halves of your leaf match perfectly.
The subsequent rounds build upon this framework, expanding the leaf outward while maintaining the delicate, openwork structure. You will be working into the chain spaces created in the previous row, which makes the construction fast and highly satisfying once you catch the rhythm. The combination of solid clusters and empty chain spaces creates a beautiful contrast that defines high-quality handmade crochet bookmarks. If your work begins to cup or ruffle excessively, it usually means your tension is either too tight or too loose, so adjust your hook size accordingly.
An optional but highly recommended feature to add during the foundation stage is a sleek, attached crochet cord to serve as the stem or tail of your bookmark. You can easily create this by leaving a long tail at the beginning or by chaining a long strand directly from the base of the leaf once the main body is complete. Adding a small tassel, a tiny accent ball, or a miniature secondary leaf to the end of this cord adds an extra layer of professional charm. This tail hangs elegantly out of the bottom of the book, making it easy to find your page.
Mastering the foundation of this lace crochet tutorial gives you the confidence to scale the pattern up or down depending on your specific needs. Once you understand how the increases and chain spaces work together to form the leaf contours, you can easily modify the size by adding more rounds or changing yarn weights. Practice makes perfect, so don’t feel discouraged if your first few stitches look a bit wonky. With a little patience, your hands will adapt to the fine thread, and you will watch a gorgeous, intricate leaf bloom right before your eyes.
3. Advanced Stitch Tips for Perfect Edge Definition
Achieving sharp, crisp edges is what separates an amateur craft project from a stunning, retail-ready boutique accessory. When working on a lacy leaf bookmark crochet pattern, maintaining consistent tension throughout your edging rows is paramount. If your tension slackens near the borders, the leaf will lose its crisp, organic points and look bloated or misshapen. To combat this, focus on pulling your loops firmly but smoothly, ensuring each stitch sits uniformly next to its neighbor without warping the fabric.
Using specific techniques like the extended single crochet or the slip stitch border can drastically improve the structural integrity of your leaf’s outer perimeter. A final round of slip stitches worked loosely into the back loops only creates a gorgeous, braided frame around your lacework, giving it a clean, modern finish. It also prevents the delicate cotton loops from stretching out out of shape over time due to frequent handling. Be careful not to pull these slip stitches too tightly, or the entire edge of your bookmark will bunch up.
Another fantastic pro-tip for crisp edges is mastering the picot stitch, which is frequently used to create the sharp points along the sides of a crochet leaf pattern. A standard picot involves chaining three, and then inserting your hook back into the front loop and vertical bar of the previous stitch before pulling through a slip stitch. This anchors the point securely to the main body of the work, preventing it from floppy or folding over. Ensuring these points are sharp is what gives the lacy design its distinct, recognizable botanical silhouette.
Mindful stitch placement is another critical factor that directly impacts the overall clarity of your lace design. Instead of inserting your hook haphazardly into spaces, make sure you are piercing the exact loops specified by the pattern, whether that means the front loop, back loop, or both. Working into the correct loops influences how the fabric bends and creates beautiful ridges that simulate natural leaf veins. Consistent placement ensures that the open spaces remain uniform, letting the intricate pattern shine effortlessly.
Weaving in your loose yarn ends properly is just as important as the stitches themselves when it comes to a clean presentation. Because lace crochet has many open gaps, hiding your yarn tails can be slightly tricky compared to solid projects. Use a fine tapestry needle to carefully weave the yarn through the densest parts of the leaf structure, changing directions at least three times to lock it in place. Trim the excess thread incredibly close to the fabric, ensuring no fuzzy ends peek through the delicate lace openings.
Finally, always keep an eye on your overall stitch count at the end of every single row to catch any mistakes early. Missing a single chain space or adding an extra stitch can throw off the entire symmetry of the leaf, forcing you to rip out your work later. By staying organized and double-checking your work frequently, you ensure that every edge, point, and curve turns out exactly as intended. These advanced details may take a bit more time to execute, but the flawless, high-end result is undeniably worth the extra effort.
4. The Essential Blocking Process for Flat and Durable Bookmarks
If you want your handmade item to look like a professional product, you absolutely cannot skip the wet blocking stage. Wet blocking is the magic process of soaking your finished crochet piece in water to relax the fibers, and then pinning it down to dry in its perfect shape. Because crochet lacework naturally tends to twist, curl, and bunch up right off the hook, blocking is mandatory to open up those beautiful chain spaces. It expands the pattern, allowing the intricate, lace-like details of your lacy leaf crochet pattern to fully emerge.
To begin the blocking process, submerge your completed bookmark in a small bowl of lukewarm water mixed with a drop of gentle, no-rinse wool wash or mild soap. Let it soak for about fifteen to twenty minutes until the cotton fibers are completely saturated through to the center. Gently press the excess water out of the bookmark by sandwiching it between a clean, dry towel—never wring, twist, or squeeze the delicate fabric, as this can permanently distort your hard work.
Next, place your damp bookmark onto a specialized foam blocking mat or a thick, clean towel laid over a flat surface. Starting from the central vein of the leaf, use rust-proof T-pins to pin the center down securely in a straight line. From there, gently stretch out the leaf points on either side, pinning each individual picot and curve into its ideal symmetrical shape. Use as many pins as necessary to ensure all the edges are straight, taut, and perfectly aligned with the natural design.
For bookmarks that need to be extra sturdy and resistant to curling inside heavy books, you can use a fabric stiffener or a traditional starch spray during the blocking phase. Simply spray the damp, pinned bookmark generously with liquid starch, or dip it into a diluted mixture of water and non-toxic school glue before pinning. This adds a wonderful, crisp structure to the cotton thread without making it feel overly sticky or plastic-like. It helps the bookmark retain its pristine, flat shape even after months of constant use.
Allow the pinned bookmark to air dry completely in a well-ventilated area away from direct sunlight, which usually takes anywhere from twelve to twenty-four hours. Unpinning the project before it is one hundred percent dry will cause the fibers to snap back into their curled state, ruining the effectiveness of the process. Once fully dry, carefully remove the T-pins, and you will be amazed at how crisp, flat, and professional your leaf looks. The openwork spaces will be perfectly defined, and the edges will hold their shape beautifully.
Properly blocked bookmarks not only look exponentially better, but they also last significantly longer and resist wear and tear. They slide effortlessly between book pages without creating bulky lumps that could damage old or delicate bindings. This simple extra step adds immense value to your work, making it perfect for gifting or selling at local craft fairs. Taking pride in the finishing touches reflects your true dedication to the craft, transforming a simple piece of thread into a treasured heirloom.
Frequently Asked Questions (FAQ)
What is the best yarn weight to use for a lacy bookmark?
The absolute best option for a crisp, detailed lace appearance is size 10 crochet thread or a high-quality fingering weight cotton yarn. These fine weights allow the delicate leaf veins and openwork spaces to stand out clearly. Thicker yarns can make the design look bulky and may prevent the bookmark from laying completely flat inside a book.
Do I absolutely have to block my finished crochet bookmark?
Yes, blocking is highly recommended for all lace crochet projects. When you finish crocheting, the leaf will likely be curled, wrinkled, and tightly bunched together. Wet blocking relaxes the cotton fibers, opens up the gorgeous chain spaces, straightens the edges, and ensures the bookmark lays perfectly flat without ruining your book pages.
Can a beginner complete this lacy leaf bookmark tutorial?
Absolutely! While lace crochet can look incredibly intimidating at first glance, this project uses basic stitches like chains, single crochets, and double crochets. If you have a solid grasp of tension control and know how to work into chain spaces, you can easily complete this pattern by taking your time and counting your stitches carefully.
How can I make my handmade bookmark stiffer so it doesn’t bend?
You can achieve a durable, stiff finish by using a commercial fabric stiffener, a heavy-duty laundry starch spray, or a simple mixture of equal parts clear school glue and water. Apply the solution to your bookmark during the pinning stage of wet blocking, and let it dry completely to give it a firm, resilient structure.
How long does it typically take to crochet one lacy leaf bookmark?
Because of its compact size, an intermediate crocheter can usually finish one leaf bookmark in about forty-five minutes to an hour. This rapid production time makes it a highly satisfying project for quick afternoon crafting sessions, last-minute holiday gifts, or stocking up inventory for your online store.
Can I wash my crochet bookmark if it gets dirty from use?
Yes, because it is crafted from durable cotton material, you can gently hand wash it in cool water with a mild soap. After washing, avoid twisting the fabric; instead, press the excess water out with a clean towel. You will need to pin it down and block it again to restore its original crisp, flat shape.
Conclusion
In this comprehensive How to Make Lacy Leaf Bookmark Crochet – Tutorial, we have explored everything from selecting the ideal cotton threads to executing advanced edging techniques and completing the essential blocking process.
Creating this delicate accessory is a wonderful way to express your creativity, refine your lacework skills, and produce a genuinely useful item that elevates the reading experience. By focusing on consistent tension, precise stitch placement, and professional finishing touches, you can easily create stunning pieces that look right at home in a boutique.