Learning how to make heart-shaped fabric pockets – tutorial style is one of the most rewarding sewing projects you can undertake to add a touch of personality to your textiles. Whether you are looking to revamp an old pair of jeans, customize a basic canvas tote bag, or create unique handmade gifts for your loved ones, this creative technique is the perfect solution. Pockets are not just functional components of clothing; they serve as excellent visual elements that can elevate a plain garment into a statement piece.
When you dive into this comprehensive guide, you will find that working with unique geometric shapes like hearts challenges your sewing skills in a fun and manageable way. Many crafting enthusiasts struggle with curved edges and sharp points, but this specialized guide breaks down the process into simple, actionable steps. By mastering this specific design, you expand your overall sewing repertoire while producing something incredibly charming and practical.
Throughout this guide, we will focus closely on the core concepts of how to make heart-shaped fabric pockets – tutorial methods that ensure professional-looking results every time. We will explore everything from choosing the right materials to executing the final stitches with high precision. Prepare your sewing machine, gather your favorite scrap fabrics, and let us walk through this engaging step-by-step journey together to create beautiful, durable pockets.
1. Selecting the Perfect Materials and Tools for Your Project
The foundation of any successful sewing project lies in selecting the right materials before you make your first cut. For this specific pocket design, you want to choose fabrics that offer structural stability while remaining easy to manipulate around tight curves. 100% quilting cotton is highly recommended for beginners because it does not slip or stretch excessively under the sewing machine foot.
In addition to your main fabric, you will need a few essential haberdashery items to ensure your work looks pristine. Gathering sharp fabric shears, fine sewing pins, a fabric marker or tailor’s chalk, and matching polyester thread will make the process infinitely smoother. Having a reliable iron and ironing board nearby is also crucial, as pressing your seams is the secret to achieving crisp, defined edges.
If you are planning to attach these pockets to heavier garments like denim jackets or canvas bags, consider using a lightweight fusible interfacing. Interfacing is an extra layer applied to the wrong side of the fabric using heat, providing additional strength and preventing the heart shape from distorting over time. This step is especially important if the pocket will hold actual items like keys or coins.
Exploring your scrap fabric bin is a fantastic, sustainable way to approach this project without spending extra money. Small remnants of flannel, linen, or even lightweight corduroy can yield beautiful results and give your garments a cozy, textured appearance. Just ensure that if you blend different fabric types, they share similar washing instructions so your final piece does not shrink unevenly.
Beyond the textiles, having a clear template is what sets an amateur project apart from a beautifully polished piece. You can easily draw your own heart template on a piece of sturdy cardboard or print a balanced digital pattern to use as your cutting guide. Taking your time during this preparation phase saves hours of frustration later when attempting to make the left and right sides match perfectly.
Ultimately, investing a few minutes to organize your workspace and select complementary colors will pay off significantly in the final look. Try pairing contrasting patterns, such as a polka dot pocket on a striped shirt, or a bright red heart pocket against dark blue denim. Now that your tools are neatly arranged and your fabric choices are locked in, you are fully prepared to move on to the next critical phase.
2. Preparing and Cutting Your Heart Pattern Accurately
Accurate cutting is the hidden backbone of high-quality garment construction, especially when dealing with symmetrical shapes like hearts. To begin, fold your chosen fabric precisely in half with the right sides facing together, ensuring the grainline runs completely straight. Placing your heart template along the fold or pinning it securely ensures that both halves of your finished pocket will be perfectly mirrored.
When tracing your pattern onto the fabric, remember to factor in a standard seam allowance of about one-quarter of an inch around the entire perimeter. Using your fabric marker, lightly draw this outer boundary line so you know exactly where your scissors need to travel. Cutting slowly with long, smooth strokes prevents jagged edges, which can severely complicate your sewing process later on.
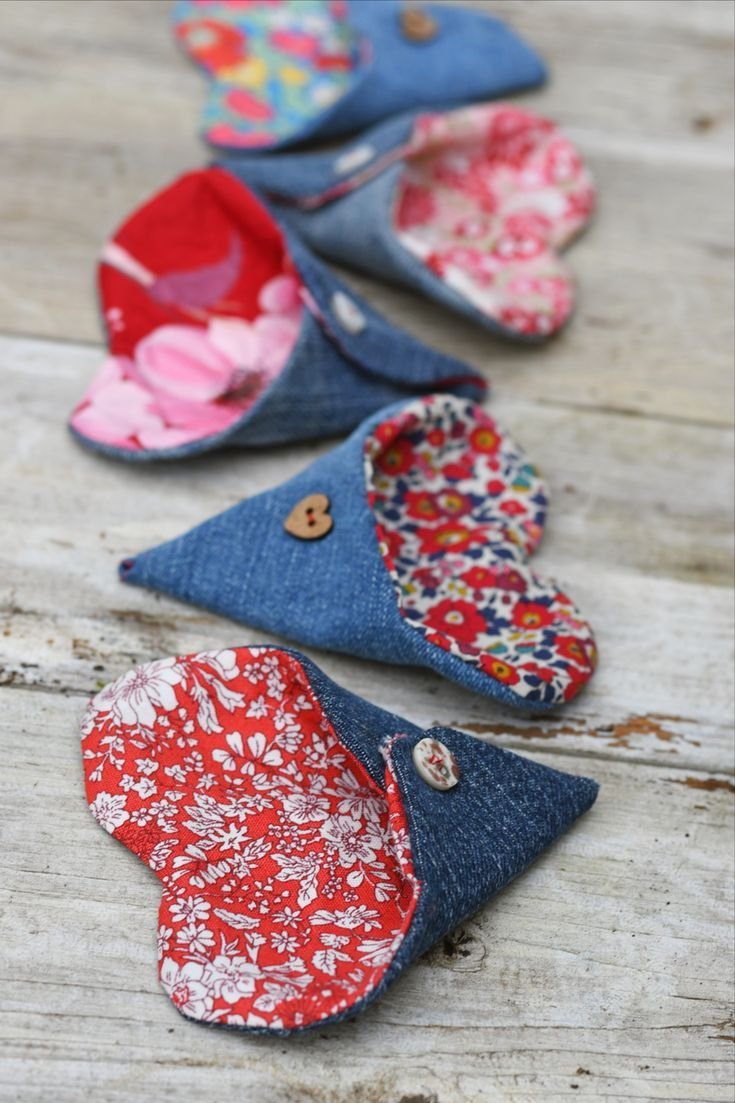
You will need to cut two identical heart pieces for each finished pocket: one piece serves as the exterior front, while the second acts as the clean lining. Utilizing a lining hiding all raw edges inside the structure is the best method for maintaining long-term durability and cleanliness. If you choose to use fusible interfacing, cut one additional heart from that material and iron it onto the wrong side of your exterior piece.
Pay close attention to the top center dip of the heart and the sharp bottom point during the cutting process, as these are the defining characteristics of the shape. A common mistake is rounding out the bottom point or making the top V-shape too shallow, which causes the final pocket to look like a generic oval. Keep your cuts deliberate, sharp, and true to your initial template design.
Once your pieces are neatly cut, lay them out on your worktable to inspect their symmetry and overall proportions before sewing. This is your last opportunity to make minor adjustments with your shears if one side appears slightly larger or misshapen. If everything looks balanced, stack your exterior heart and lining heart together with their pretty, right sides facing each other.
Properly aligning the edges at this stage prevents puckering and uneven feeding through your machine feed dogs as you sew. Pin the two layers securely together around the entire edge, placing the pin heads pointing outward so they are easy to remove. With your fabric pieces perfectly prepped, cut, and pinned, you are ready to transition over to the sewing machine station.
3. Sewing the Curves and Turning the Pocket Right Side Out
Now we arrive at the heart of the technical process, where patience and steady machine speed are your greatest assets. Set your sewing machine to a standard straight stitch with a medium length, ensuring your needle is sharp and appropriate for your fabric weight. Begin sewing along one of the straight sides of the heart, remembering to backstitch at the start to lock your threads securely.
As you approach the curved upper lobes of the heart, slow your sewing speed down and gently guide the fabric in a smooth arc. You may need to stop the machine with the needle down in the fabric, lift the presser foot, pivot the fabric slightly, and lower the foot to maintain control. This pivoting technique is essential for navigating tight curves without creating unwanted folds or pinches in the material.
When you reach the sharp central dip at the top of the heart, sew precisely to the lowest point of the V-shape. Stop with your needle completely down in the fabric, raise your presser foot, pivot the entire piece toward the second lobe, and resume sewing. Repeat this exact needle-down pivoting maneuver when you reach the very bottom point of the heart to keep it looking incredibly sharp.
Before closing the entire shape, you must leave a small opening of about two inches along one of the flatter sides of the heart. This unsewn gap is absolutely necessary because it allows you to turn the entire pocket right side out once you finish stitching. Backstitch firmly on both sides of this opening so the seams do not unwrap or tear during the turning process.
Before flipping the fabric right side out, you must perform a vital step called clipping your curves and grading your seam allowances. Take your scissors and cut small, microscopic V-shaped notches along the outer curved edges of the heart, being extremely careful not to cut through your actual stitches. Also, make a single straight clip directly into the center top V-dip to allow the fabric to expand smoothly.
Gently reach through the small opening you left unsewn and pull the right sides of the fabric out through the gap. Use a blunt turning tool, a knitting needle, or a chopstick to carefully push out the bottom point and the smooth upper curves from the inside. Once fully turned, take the piece to your ironing board and press it completely flat, ensuring the raw edges of the opening fold inward cleanly.
4. Attaching the Heart-Shaped Pocket to Your Garment Permanently
The final major structural step is securing your beautifully crafted heart pocket onto your target garment or fabric surface. Position your garment completely flat on your work table and place the heart pocket in your desired location, using a ruler to check alignment. Pin the pocket down thoroughly around its entire edge so it remains perfectly stationary during the final application process.
When attaching the pocket, you will only stitch around the left curve, down to the bottom point, and back up the right curve. The top lobes of the heart must remain completely open and unstitched, as this open area forms the actual functional mouth of your pocket. Mark these upper boundary endpoints clearly with pins or chalk so you do not accidentally sew the entire pocket shut.
Position your garment under the sewing machine foot and prepare to topstitch very close to the outer edge of the heart pocket, roughly one-eighth of an inch inward. An edge-stitching foot can be incredibly helpful here, helping you maintain a perfectly uniform distance from the edge. Take your time, sewing carefully over the thick layers and following the beautiful contours you created in previous steps.
Because the upper corners of the pocket experience the most stress when you slide your hands or objects inside, they require extra reinforcement. When you start and finish your topstitching at the top corners, sew a small triangle pattern or backstitch multiple times over the exact same spot. This simple reinforcing technique prevents the pocket from ripping away from the main garment during daily wear and tear.
Once your topstitching is complete, pull your thread tails through to the inside of the garment using a hand sewing needle and tie them off in secure knots. Snipping the threads close to the fabric surface creates a pristine, clean finish on both the outside and inside of your clothing. Give the entire area one final press with a hot steam iron to beautifully set the stitches permanently into the fiber.
Step back and admire your stunning handiwork, noticing how the clean lines and perfectly balanced curves add immediate visual value to your project. You have successfully navigated the intricate geometric challenges of this layout and created something genuinely wonderful. With your new skills, you can easily replicate this process across dozens of future creative sewing designs.
Frequently Asked Questions (FAQ)
What is the best type of fabric for a beginner attempting this project?
For individuals exploring how to make heart-shaped fabric pockets – tutorial instructions for the first time, stable woven fabrics are ideal. 100% cotton, lightweight canvas, linen, and denim are excellent choices because they do not warp, stretch, or slide around easily while you guide them through the sewing machine. Avoid highly slippery materials like silk, satin, or stretchy knits until you feel completely confident managing tight curves and sharp corner pivots.
Why does the bottom point of my heart pocket look blunt or rounded?
A blunt bottom point usually happens if you do not clip the excess fabric bulk inside the corner before turning the pocket right side out. To fix this, trim away the extra seam allowance near the tip, making sure not to cut your stitching thread. When turning it right side out, use a point turner or a dull chopstick to gently push the fabric point all the way out to form a sharp angle.
Do I absolutely need to use a lining for these pockets?
While you can technically make a single-layer pocket by folding the raw edges inward, using a lining is highly recommended for heart shapes. A lining completely hides all raw edges inside the pocket, preventing fraying during laundry cycles and giving the piece a clean look. It also makes achieving smooth, puckering-free curves significantly easier for sewists of all skill levels.
How can I make sure both sides of the heart are perfectly symmetrical?
The easiest way to ensure perfect symmetry is to fold your pattern paper or cardboard directly in half before drawing your design. Draw only one half of the heart shape along the folded edge, and then cut it out while keeping the paper folded. When you unfold the paper, you will have a perfectly balanced, symmetrical template that mirrors both sides flawlessly.
Can I sew these heart pockets onto clothes entirely by hand?
Yes, you can absolutely complete this entire project without owning a sewing machine. You can use a precise backstitch for the construction phase to create a strong, durable seam that holds up well over time. For attaching the completed pocket to your garment, a clean slip stitch or a decorative blanket stitch can add a gorgeous, hand-crafted aesthetic to your final piece.
Conclusion
In this detailed guide, we explored the wonderful art of how to make heart-shaped fabric pockets – tutorial style from start to finish. We covered how to select stable materials, cut highly accurate symmetrical patterns, navigate challenging curves on a sewing machine, and reinforce your pocket for long-term functional use.
By incorporating these step-by-step methods into your crafting routine, you can easily breathe fresh life into old clothes and create stunning custom gifts.