How to Make Crochet coat- Tutorial: If you have ever wanted to create a stylish, cozy, and completely custom wardrobe piece, learning how to make crochet coat styles is the ultimate rewarding project. Crafting your own outerwear allows you to choose the perfect yarn, customize the fit to your exact body shape, and flaunt a unique fashion statement that nobody else owns. This comprehensive tutorial will guide you through the essential steps, from selecting your materials to stitching the final seam, ensuring your journey into making a crochet coat is smooth and enjoyable.
Crochet has evolved from a traditional hobby into a high-fashion trend seen on runways and city streets worldwide. A well-made crochet coat is versatile, durable, and surprisingly easy to create once you understand the foundational techniques. Whether you are aiming for a chunky, oversized winter cardigan or a lightweight, breezy duster for spring, this step-by-step guide will provide you with the knowledge and confidence needed to master this beautiful craft.
Before diving into the stitches, it is important to approach this project with patience and enthusiasm. Making a full-sized garment takes time, but breaking it down into manageable sections makes the process incredibly fun. Grab your favorite hook, find a comfortable spot, and let’s dive into this ultimate how to make crochet coat – tutorial that will transform your yarn skeins into a wearable masterpiece.
1. Choosing the Right Yarn and Tools for Your Crochet Coat
When learning how to make crochet coat designs, your choice of yarn is the most critical decision you will make. The weight and fiber content of the yarn will determine the drape, warmth, and overall look of your finished garment. For a winter coat, a bulky or worsted weight wool blend works beautifully, while a cotton blend is ideal for lighter, transitional pieces.
Choosing the correct crochet hook size is equally important to achieve the perfect tension. Always check your yarn label for recommended hook sizes, but be prepared to adjust based on your personal stitching style. A hook that is too small will make your crochet coat stiff, while a hook that is too large might create loose, drafty holes.
In addition to yarn and hooks, you will need a few essential notions to complete this tutorial successfully. Gather a sharp pair of scissors, a sturdy tapestry needle for weaving in ends, and plenty of stitch markers. Stitch markers are absolute lifesavers when keeping track of your rows and panel measurements during long sessions.
Tension is everything when figuring out how to make crochet coat garments that actually fit. Before you begin the actual coat, always crochet a gauge swatch to ensure your stitches match the pattern guidelines. Skipping the gauge swatch is a common mistake that can result in a coat that is either way too small or completely oversized.
Consider the care instructions of your chosen fiber before committing to the project. A crochet coat is a labor of love, and you want to ensure it lasts for years to come. Superwash merino wool or high-quality acrylic blends are excellent choices because they are durable and often machine washable.
Take your time browsing colors and textures at your local yarn shop or online store. The aesthetic of your crochet coat should reflect your personal style, whether you love vibrant, bohemian colorways or classic, minimalist neutrals. Once you have curated your perfect materials, you are officially ready to start stitching.
2. Understanding the Basic Anatomy and Construction of a Crochet Coat
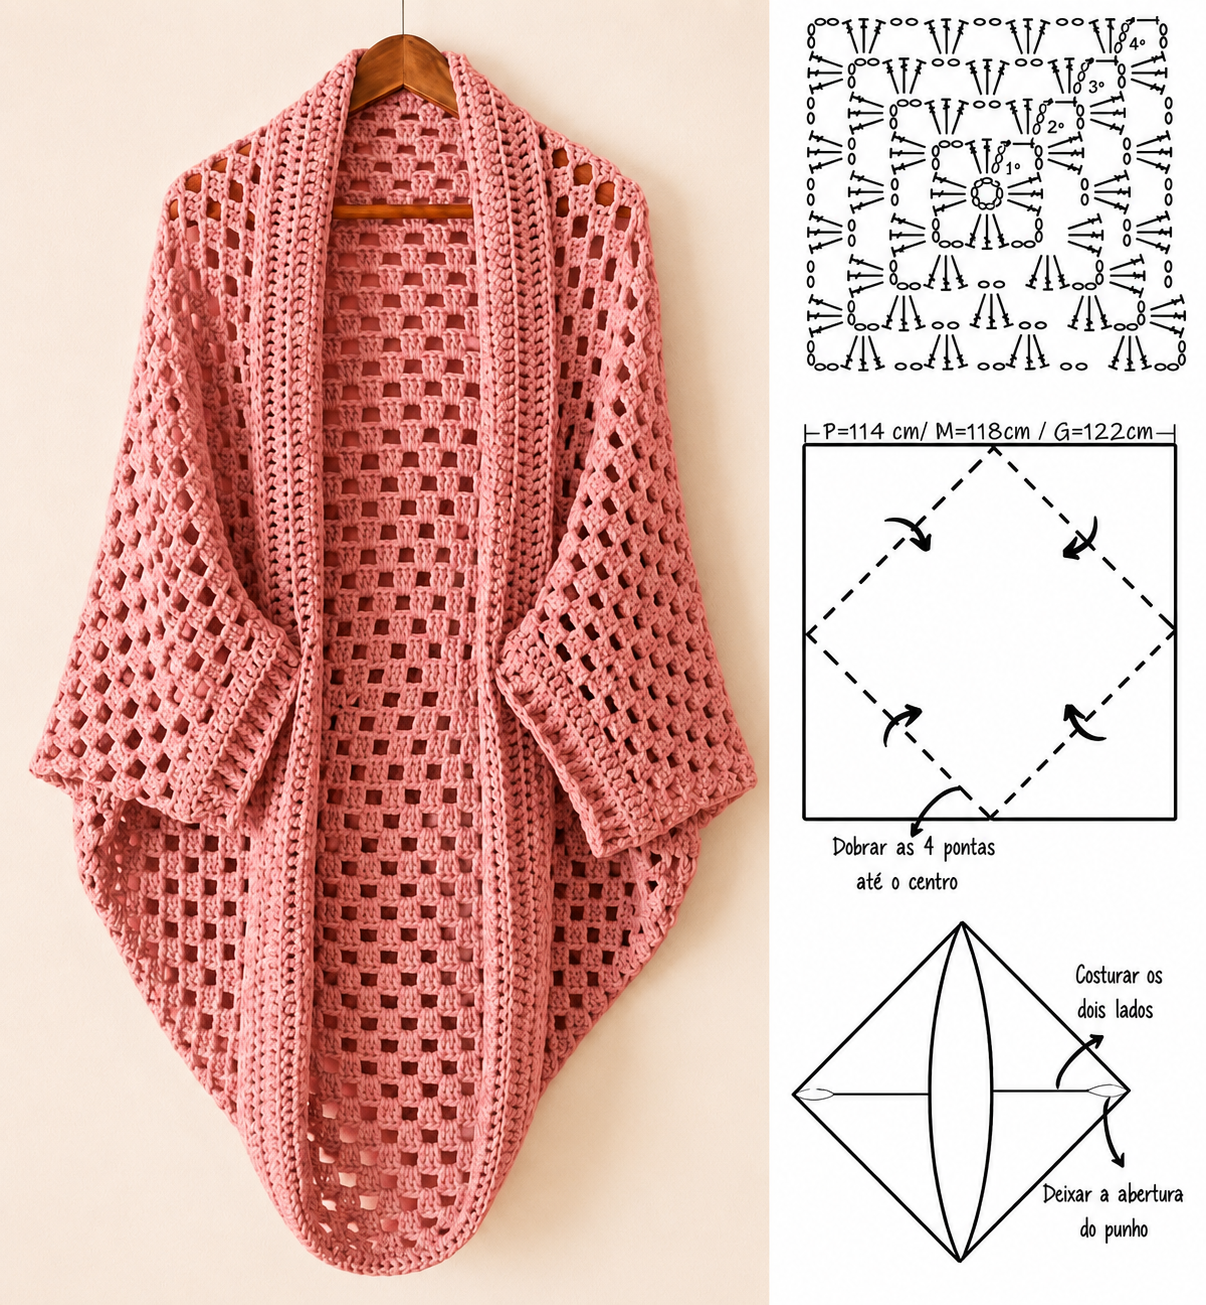
To successfully follow a how to make crochet coat – tutorial, you need to understand how the garment comes together. Most beginner-friendly crochet coats are constructed using flat panels that are later seamed together. This method involves creating one large back panel, two identical front panels, and two sleeve pieces.
The back panel forms the foundation of your coat and determines the overall width and length of the garment. You will start by chaining a width that matches your shoulder-to-shoulder measurement, adding a few inches for a comfortable, relaxed fit. From there, you stitch upwards until the panel reaches your desired coat length.
The two front panels are typically worked separately and are essentially narrower versions of the back panel. When placed side by side with a gap in the middle, they should match the width of your back panel perfectly. These panels can be customized with neck shaping or left straight for a classic, open-front cardigan style.
Sleeves can be crocheted as flat rectangles that taper slightly towards the wrist, or worked in the round directly onto the armholes. For this beginner tutorial, we highly recommend crocheting flat sleeve panels and seaming them later. This approach keeps the stitch counts simple and reduces the margin for error.
Understanding how to read your stitches and count your rows is vital during the construction phase. Keep a notebook handy or use a digital row counter app to ensure your left and right panels match perfectly. Consistency between panels is the secret to a professional-looking crochet coat.
Before joining any pieces together, it is highly recommended to block your individual panels. Blocking involves wetting or steaming your crocheted pieces to relax the fibers and set them to their final measurements. This simple step makes seaming much easier and gives your crochet coat a beautiful, polished drape.
3. Step-by-Step Stitching and Assembly Process
Now that your panels are ready, it is time for the most exciting part of our how to make crochet coat guide: assembling the pieces. Lay your back panel flat on a large surface with the right side facing up. Place the two front panels directly on top, aligning the outer edges and shoulders carefully.
Using your tapestry needle and a length of matching yarn, seam the shoulder joints together using the mattress stitch or a slip stitch join. The mattress stitch creates an invisible, flat seam that looks incredibly clean on garments. Ensure your stitches are secure but not pulled so tight that the seam puckers.
Once the shoulders are joined, open the coat flat and align the center of your sleeve panels with the shoulder seams. Pin them in place using stitch markers so they do not shift while you work. Seam the sleeves to the body of the coat, working carefully from one side to the other.
After the sleeves are attached, fold the coat inside out to seam the sides and the underarms. Start at the wrist cuff, sew up the sleeve to the armpit, and then continue down the side of the coat to the bottom hem. Repeat this exact process on the other side to complete the basic structure of your crochet coat.
With the main structure assembled, you can now add a beautiful ribbed border around the front opening and neckline. A simple front-post and back-post double crochet ribbing adds a professional touch and prevents the edges from curling. This optional step elevates the entire look of your handcrafted garment.
The final construction step in this how to make crochet coat – tutorial is weaving in all remaining yarn tails. Use your tapestry needle to weave the ends securely into the stitches, changing directions a few times to lock them in place. Trim the excess yarn close to the fabric, and your coat is structurally complete.
4. Customizing, Styling, and Caring for Your Finished Masterpiece
Learning how to make crochet coat projects allows you to express your creativity through custom embellishments. You can easily add functional elements like deep patch pockets, a cozy oversized hood, or elegant button closures. Pockets can be crocheted as simple squares and sewn onto the front panels before or after assembly.
Buttons or toggles can add both functionality and visual interest to your handmade outerwear. If you want to add buttons, plan your buttonholes during the ribbing phase by creating small chain spaces. Alternatively, a beautiful matching crocheted belt can be used to cinch the waist for a flattering silhouette.
Styling your new crochet coat is incredibly fun because it pairs effortlessly with so many outfits. Wear it over a simple t-shirt and jeans for a casual, bohemian weekend look, or drape it over a dress for a cozy evening out. The unique texture of crochet adds depth and personality to any ensemble.
Proper care is essential to maintain the shape and beauty of your handmade garment over time. Never hang your crochet coat on a traditional hanger, as gravity will pull the stitches and cause the coat to stretch out of shape. Instead, fold it neatly and store it on a shelf or in a drawer.
When it comes to washing, always refer to the care instructions of the original yarn you selected for this tutorial. Hand washing in cold water with a gentle wool wash is always the safest method for handmade items. Gently squeeze out excess water using a towel, and lay the coat flat on a drying rack to dry.
Every time you wear your handmade creation, you will feel an immense sense of pride knowing you built it from scratch. Share your crafting journey with friends, family, and the online maker community. Your new skills open up a world of endless wardrobe possibilities, proving that anyone can master the art of garment making.
Frequently Asked Questions (FAQ)
Is making a crochet coat suitable for absolute beginners?
Yes, absolutely! While a coat is a large project, many designs use basic stitches like the single crochet or double crochet and simple flat panel construction. If you can crochet a basic scarf, you have the skills required to follow a how to make crochet coat – tutorial.
How many skeins of yarn do I need to make a full-sized coat?
The amount of yarn depends heavily on the coat’s length, your size, and the yarn weight. On average, a standard adult-sized crochet coat requires anywhere from 1,200 to 2,500 yards of yarn. Always buy an extra skein from the same dye lot to ensure you don’t run out.
Can I alter a pattern to add a hood or pockets?
Definitely! One of the best things about learning how to make crochet coat styles is the ability to customize. You can crochet simple rectangles for patch pockets and sew them onto the front, or attach a rectangular hood piece directly to the neckline of your coat.
How long does it typically take to complete a crochet coat?
Because a coat is a larger garment, it can take anywhere from 20 to 50 hours of stitching time depending on your speed and the complexity of the stitch pattern. Working on it for a couple of hours each day makes it a relaxing project that you can finish in a few weeks.
Why is blocking my crochet panels so important for a coat?
Blocking relaxes the yarn fibers, evens out your stitch tension, and ensures your panels match the exact measurements of the design. Skipping this step can lead to uneven seams, a stiff drape, or an asymmetrical fit when assembling your crochet coat.
Conclusion
Mastering how to make crochet coat garments is a rewarding journey that blends creativity, patience, and fashion. Throughout this tutorial, we explored how to select the perfect yarn, understand flat-panel construction, assemble your pieces seamlessly, and care for your finished garment.
By breaking the process down into manageable steps, creating a stunning piece of wearable art becomes an achievable goal for crocheters of all skill levels.