Learning how to make a crochet butterfly bracelet is a delightful project that combines delicate artistry with wearable fashion. Whether you are a beginner looking to hone your skills or an experienced crafter seeking a quick and charming accessory, this crochet butterfly bracelet tutorial provides everything you need to create a stunning piece. With just a few basic materials and a bit of creativity, you can produce a unique, handmade accessory that adds a touch of whimsy to any outfit.
The beauty of choosing to make a crochet butterfly bracelet lies in its versatility and customizability. You can experiment with various yarn weights, vibrant color palettes, and even incorporate small beads or charms to elevate the design. This DIY endeavor is not only cost-effective but also offers a therapeutic escape, allowing you to focus on the rhythmic motion of the hook and yarn to manifest a beautiful, tangible object that reflects your personal style.
As you embark on this crochet butterfly bracelet guide, remember that patience is part of the process. Each loop and stitch contributes to the final fluttering shape that defines the aesthetic of this project. By following this detailed guide, you will master the necessary techniques to construct your own butterfly-themed wristband, ensuring a polished and professional look that is perfect for gifting or keeping for your own collection of handmade jewelry.
1. Essential Materials and Preparation
Before you begin to make a crochet butterfly bracelet, gathering the right supplies is essential for a smooth experience. You will need a fine-weight crochet thread or embroidery floss, as these materials offer the necessary delicacy to capture the intricate details of a butterfly’s wings. A small crochet hook, typically between 1.5mm and 2.0mm, is ideal for working with such fine thread.
In addition to the thread and hook, you should have a pair of sharp scissors and a tapestry needle on hand for weaving in your yarn ends. Having a measuring tape will ensure your bracelet fits perfectly, as you will need to adjust the length to wrap comfortably around your wrist. If you want to add a bit of sparkle, consider gathering some tiny seed beads or metallic thread to accent the wings.
Organization plays a big part in the success of your crochet butterfly bracelet tutorial. Prepare your workspace by ensuring you have adequate lighting and a comfortable seating position. Keeping your thread untangled and your hook within easy reach allows you to maintain a steady flow while you work through the pattern, preventing unnecessary frustration during the more delicate stages of assembly.
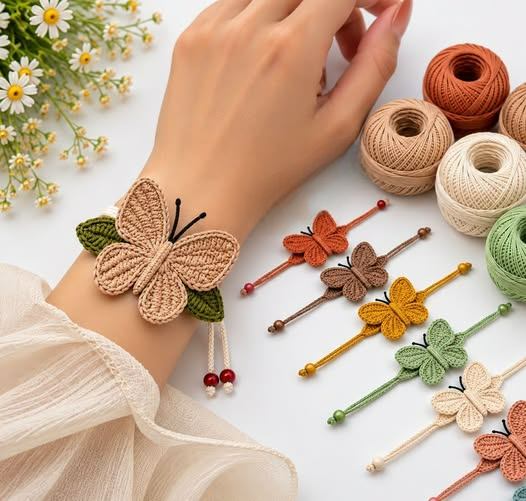
Choosing your color scheme is one of the most exciting parts of the preparation. You might opt for realistic colors like soft blues, oranges, or yellows to mimic nature, or go bold with bright neons or metallics. Consider how the colors will look when draped around your wrist, and don’t be afraid to combine contrasting colors for the center of the butterfly versus the wings to make the design pop.
If you are a beginner, it can be helpful to practice a few basic stitches before diving into the main project. Familiarizing yourself with chain stitches, slip stitches, and single crochets will make the actual process of crafting your butterfly much easier. If the thread feels too thin, you can try practicing with a slightly thicker yarn first to get a feel for the shape of the butterfly motif.
Finally, keep a notepad or a digital device nearby to track your progress or make notes on any adjustments you make to the pattern. Crafting is an iterative process, and documenting your steps helps if you decide to replicate your design in a different colorway later. With all your materials prepared and your mindset ready, you are set to start the actual stitching process.
2. Mastering the Butterfly Motif Construction
The core of this how to make a crochet butterfly bracelet project is the construction of the butterfly motif itself. You will typically start by creating a central ring or a small foundation chain, which serves as the body of the butterfly. From there, you will work in rounds to form the wings, alternating between different stitch heights to create the signature rounded shapes that make the butterfly look realistic.
Understanding the anatomy of the wings is crucial for this step. You will generally work larger stitches, such as double or triple crochets, on the upper parts of the wings to give them height, and smaller stitches like single crochets or slip stitches on the lower sections. This transition in stitch height is what naturally creates the curved edge of the butterfly’s wing, giving it that iconic, fluttery appearance.
Accuracy in your stitch count is vital when creating the motif. Because the design is small, even a single missed stitch can throw off the symmetry of the butterfly. If you find your wings looking uneven, carefully count your stitches per section to ensure that the left side matches the right side perfectly. This focus on detail is what turns a simple craft into a professional-looking accessory.
Do not be discouraged if your first attempt does not look exactly like a butterfly. Crochet motifs, especially those as intricate as a butterfly, often require a bit of shaping and stretching once they are finished. By gently pulling on the petals of the wings and blocking the piece if necessary, you can define the shape and make the butterfly look vibrant and alive.
As you gain confidence with the motif, you can experiment with adding picot stitches along the outer edges of the wings. A picot stitch, which is a small loop made of a few chain stitches, adds a decorative, scalloped texture that makes the wings appear more delicate and detailed. This is a simple advanced technique that significantly enhances the visual appeal of your finished piece.
Once you have mastered the butterfly motif, you will need to decide how many butterflies your bracelet needs. A single, larger butterfly can act as a stunning centerpiece for a delicate chain band, while multiple smaller butterflies linked together can form the entire length of the bracelet. This decision will dictate the next steps in your crochet butterfly bracelet tutorial.
3. Connecting the Butterflies and Finishing Touches
After successfully crocheting your butterfly motifs, the next phase is connecting them into a functional bracelet. If you have created a series of butterflies, you can join them by crocheting a small chain bridge between the wings, or by sewing them together with a matching thread. Ensure the connections are sturdy enough to withstand regular wear but delicate enough not to distract from the butterflies themselves.
For the band of the bracelet, you can choose between a simple crochet chain or a more intricate, woven cord. A simple chain with a slip stitch edge provides a clean, modern look that lets the butterflies take center stage. Alternatively, creating a picot-edged band adds a vintage flair that complements the intricate nature of the butterfly motif perfectly.
Securing the bracelet to your wrist is an important design consideration. You can incorporate a button loop on one end and a small decorative button on the other, or create long ties that allow you to wrap the bracelet around your wrist and tie it in a bow. Ties are often preferred for their adjustability, making them a great choice if you are gifting the bracelet to someone else.
Weaving in your yarn ends is a step that should never be skipped. Because bracelets are handled frequently, loose ends can easily become visible or start to unravel. Use your tapestry needle to run the ends through the back of the stitches, knotting them securely before trimming the excess. This ensures a clean finish that looks professional from all angles.
If you want to add an extra layer of durability, you can apply a light spray of fabric stiffener to the back of the butterflies. This helps the wings hold their shape even when worn throughout the day. Be sure to use a non-toxic stiffener and apply it sparingly so the bracelet remains comfortable against your skin without becoming overly rigid or scratchy.
Final inspection is the last step in your crochet butterfly bracelet journey. Check for any loose threads, ensure the symmetry of the wings, and try it on to make sure the fit is just right. If you used beads or other embellishments, double-check that they are securely attached. Your finished product is now ready to be worn, gifted, or even sold as a unique handmade item.
4. Care and Styling Your Handmade Accessory
Maintaining the quality of your crochet butterfly bracelet requires gentle care. Since it is made of fine thread, it is susceptible to snagging and stretching. Always remove your bracelet before swimming, showering, or engaging in vigorous physical activities to prevent damage to the delicate crochet stitches and any added embellishments like beads or charms.
If your bracelet does become dirty, spot-cleaning is the safest method. Use a soft cloth dampened with a mixture of mild soap and cool water to gently dab the soiled area. Avoid soaking the bracelet entirely, as this can weaken the structure and potentially cause the colors to bleed if the thread is not colorfast. Lay it flat to dry completely, away from direct sunlight.
Storing your bracelet properly will help it maintain its shape over time. A small jewelry box or a soft fabric pouch is ideal, as it protects the delicate butterfly wings from being crushed or tangled with other pieces of jewelry. If you have made several bracelets, consider storing them individually so they do not interlock and strain the stitches.
Styling your new accessory is where the fun truly begins. A single-butterfly bracelet looks elegant when paired with a watch or thin metallic bangles for a stacked look. For a more bohemian vibe, try wearing a multi-butterfly bracelet with layered necklaces or stacking it with colorful beaded bracelets. It is the perfect piece to elevate a casual outfit or add a subtle, handmade touch to a formal ensemble.
Consider the color of your clothing when deciding which bracelet to wear. Neutral-toned clothes make a bright, colorful butterfly pop, while a monochromatic outfit allows you to experiment with metallic or pastel threads for a more subtle, sophisticated look. The versatility of this accessory means it can transition seamlessly from day to night depending on how you style it.
Finally, remember that the value of your bracelet lies in the effort and love you put into it. Wear it with pride, knowing you created something beautiful from simple materials. Whether you keep it for yourself or give it as a thoughtful, handmade gift, your crochet butterfly bracelet is a testament to your skills and creativity, standing out as a truly unique piece in a world of mass-produced fashion.
FAQ
Can I make this bracelet if I am a beginner?
Yes, this crochet butterfly bracelet tutorial is perfect for beginners. While the butterfly motif may look complex, it is built upon basic crochet stitches. With a little practice, anyone can master the technique.
What kind of yarn is best for this project?
Fine crochet thread (sizes 10 or 20) or embroidery floss is recommended for the best results, as they provide the delicacy needed to capture the butterfly’s details.
How do I make the wings look more realistic?
You can improve the shape of the wings by adjusting stitch heights—using taller stitches like double or triple crochets for the top and shorter ones for the bottom—and by gently blocking or stiffening the finished motif.
Can I add beads to the design?
Absolutely! Incorporating seed beads into the wings or the body of the butterfly adds a lovely touch of texture and sparkle.
How long does it take to make one bracelet?
For a beginner, it might take a few hours to understand the motif. Once you are comfortable, you can create a complete bracelet in about an hour or less.
Conclusion
Creating your own crochet butterfly bracelet is a deeply satisfying experience that allows you to showcase your creativity through delicate, handmade fashion.
Throughout this tutorial, we have covered the essential materials needed, the step-by-step process of constructing the intricate butterfly motif, how to connect these pieces into a wearable bracelet, and tips for styling and maintaining your accessory. By focusing on your stitch tension and following the pattern carefully, you can produce a professional-quality piece that is uniquely yours.