Fabric chair cover tutorials are the perfect way to breathe new life into tired, worn-out furniture without breaking the bank. Whether you have inherited a set of vintage dining chairs that don’t quite match your decor, or your current seats have fallen victim to everyday spills and pet scratches, learning how to create your own custom casings is a game-changer. This comprehensive fabric chair cover tutorial will guide you through every single step of the process, ensuring you achieve a professional, snug fit that looks like high-end upholstery. By choosing to make these yourself, you gain complete control over the textile patterns, textures, and durability, allowing you to match your interior design vision perfectly.
Investing your time in a DIY chair cover project is both economically smart and deeply rewarding for anyone who loves home styling. Buying brand-new furniture can cost a fortune, and cheap mass-produced slipcovers often look baggy, slide around, and wear out after just a few washes. When you follow a structured fabric chair cover tutorial, you learn the fundamental skills of measuring, cutting, and pinning that can be applied to various furniture pieces around your home. It is an accessible craft project that bridges the gap between basic sewing and advanced upholstery, making it ideal for passionate creators looking to level up their skills.
In this detailed guide, we are going to break down the entire process into easy-to-follow, manageable stages so you never feel overwhelmed. From selecting the right heavy-duty upholstery fabric to mastering the art of the perfect corner seam, every detail is covered to ensure your success. We will explore the best tools for the job, how to calculate yardage accurately, and the secret techniques professionals use to get that crisp, tailored look. Gather your materials, clear off your sewing table, and let’s dive into this ultimate transformation guide.
1. Choosing the Right Materials and Tools for Your Project
Selecting the correct upholstery material is the most critical decision you will make in this entire process, as it dictates both the durability and the final look of your seating. For a high-quality result, you should look for medium to heavy-weight textiles such as cotton duck, canvas, linen blends, or sturdy jacquard. These options offer the necessary structure to hold their shape against daily wear and tear while still being pliable enough to feed through a standard home sewing machine. Avoid overly stretchy or slippery synthetic fabrics for your first attempt, as they can twist easily and create frustrating puckers along your seams.
In addition to your main textile, having the right sewing notions on hand will make the construction process significantly smoother and more enjoyable. You will need a pair of ultra-sharp fabric shears or a rotary cutter to ensure clean, fray-free edges when cutting through thick layers. A generous supply of heavy-duty quilting pins or sewing clips is essential for holding your panels securely in place during the fitting stage. Do not underestimate the power of a good fabric marking pen or tailor’s chalk, which allows you to trace precise lines directly onto your material without leaving permanent stains.
To ensure your finished piece can withstand constant use, you must pair your sturdy textile with a high-quality, heavy-duty sewing thread. A 100% polyester thread or a cotton-wrapped polyester core thread is highly recommended because it offers excellent tensile strength and won’t snap under pressure. You will also need to equip your sewing machine with a sharp denim needle or upholstery needle (size 90/14 or 100/16). Using a standard universal needle on thick canvas will likely lead to skipped stitches, broken threads, or even damage to your machine’s timing mechanism.
Before you begin cutting into your beautiful new material, it is absolutely vital to perform a proper fabric pre-washing routine. Many natural fibers, especially cotton and linen blends, undergo significant shrinkage during their very first cycle in the washing machine. If you skip this step, you run the risk of creating a gorgeous, perfectly fitted casing that shrinks drastically and becomes completely unusable after its first wash. Wash and dry the textile using the exact same settings you plan to use for the finished slips in the future.
Once your material is washed, dried, and thoroughly ironed to remove all wrinkles, you can prepare your workspace for the layout. A large, flat surface like a clean dining table or a hard floor is ideal for spreading out your yardage without any distortion. Keep a clear grid ruler and a flexible measuring tape within arm’s reach at all times, as precision at this stage saves hours of correction later. Having a reliable iron and ironing board set up right next to your sewing station will also allow you to press your seams flat as you sew.
Ultimately, taking the time to gather top-tier supplies sets a solid foundation for a beautiful, long-lasting handmade chair slipcover. When your tools are optimized for the weight of your material, your machine will glide through the layers effortlessly, resulting in beautiful, even stitches. Now that your workspace is organized, your textile is pre-shrunk, and your tools are ready, we can move on to the precise science of taking measurements and creating your custom layout.
2. Accurate Measuring and Pattern Cutting Techniques
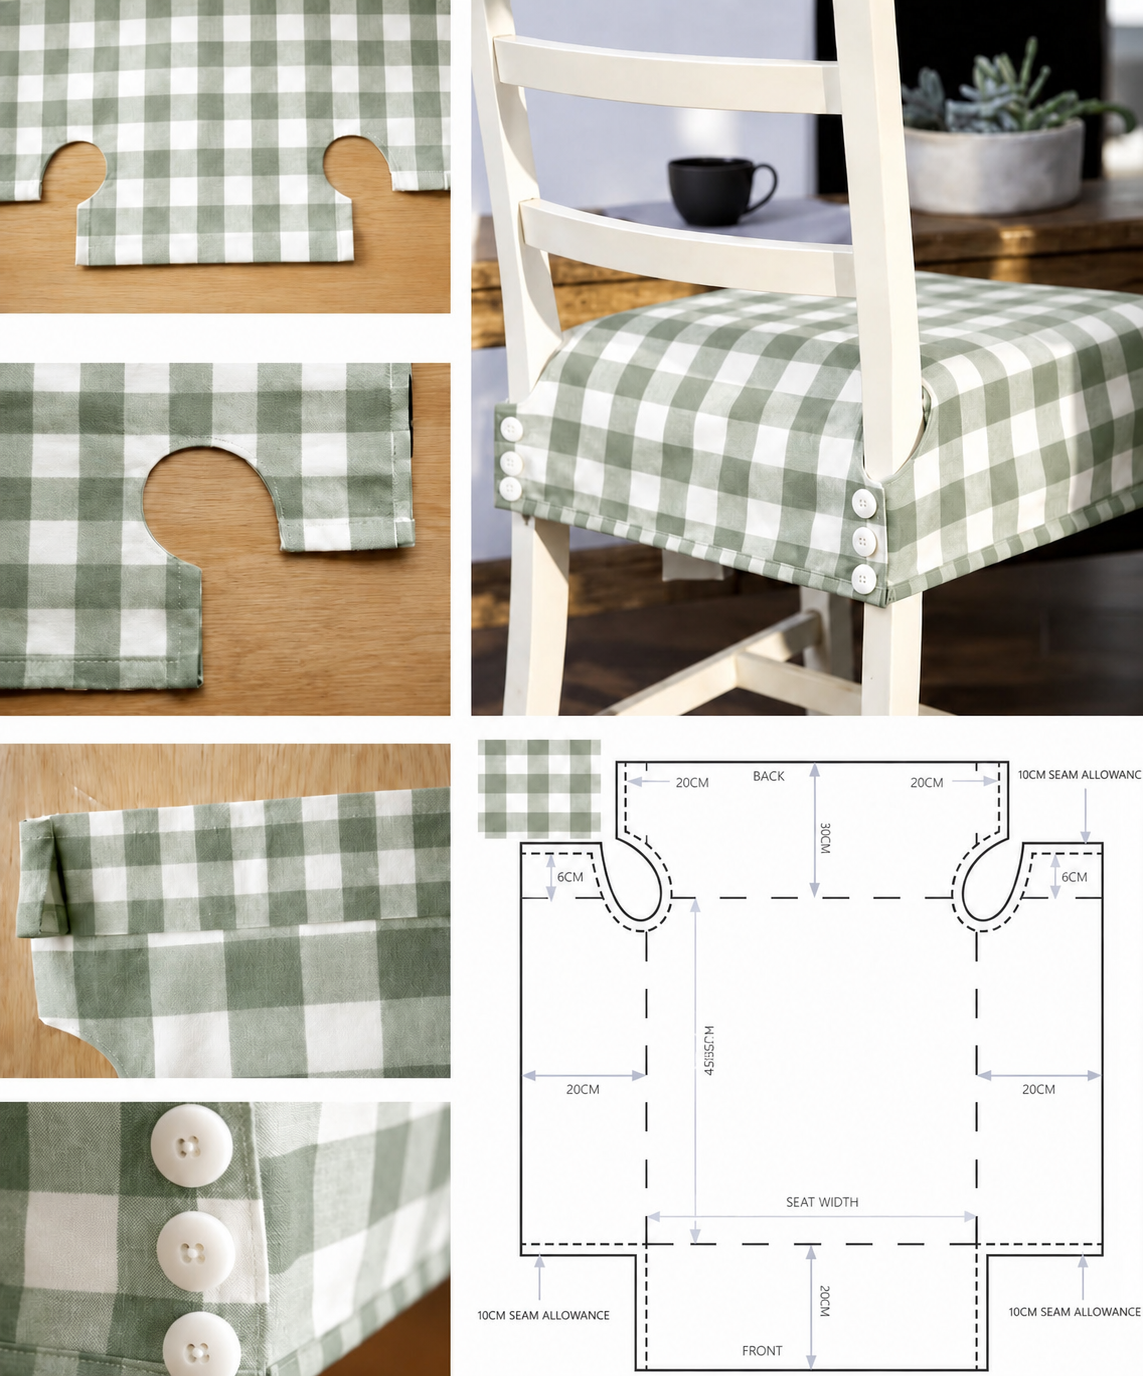
Achieving a flawless, tailored aesthetic relies entirely on how precisely you measure each individual section of your furniture piece. To start, treat your seat as a collection of distinct geometric panels: the front chair back, the rear chair back, the main seat cushion, and the skirt. Grab your flexible tailor’s measuring tape and record the maximum width and height of each section, always measuring at the widest points to account for any hidden curves. Write every single measurement down carefully on a sketch pad, labeling each part clearly to avoid any confusion during the cutting phase.
Once you have your exact dimensions, you must add a specific seam allowance calculation to every single edge before making any cuts. For a comfortable fitting experience, a standard allowance of 0.5 inches to 1 inch around every perimeter is the ideal sweet spot for home decor projects. Furthermore, if your design includes a tuck-in area where the seat meets the backrest, make sure to add an extra 2 to 3 inches of material to that specific junction. This extra allowance ensures that when someone sits down, the material can give naturally without straining or ripping out your freshly sewn seams.
Now it is time to transfer those carefully calculated dimensions directly onto your prepared, ironed slipcover fabric panels. Lay your material completely flat, ensuring the grainline runs perfectly vertical down the front and back of the chair for the best structural integrity. Use your ruler and tailor’s chalk to draw out the rectangular or contoured shapes based on your adjusted measurements. If your chosen textile features a prominent pattern, such as stripes, plaids, or large floral motifs, take extra care to center the design beautifully on the front backrest and seat.
Cutting into your material requires a steady hand and a pair of highly dependable, sharp upholstery scissors. Make long, smooth cuts rather than short, choppy snips to keep your edges incredibly straight and prevent fraying along the borders. If you are working with a highly complex shape or a chair with dramatic curves, consider creating a paper template using inexpensive craft paper or muslin first. This step allows you to test the basic shape against the frame, giving you a risk-free opportunity to make adjustments before cutting your final textile.
As you cut out each piece, use your marking pen on the wrong side of the material to label what each panel is, such as “Seat Top” or “Inner Back.” This simple organizational habit keeps your workflow incredibly efficient and prevents you from accidentally sewing a side panel upside down or backward. Keep your leftover scraps nearby, as these smaller pieces can be incredibly useful later on for testing your machine’s tension or creating custom piping and ties. Double-check all your cut pieces against your original master measurement list one last time to ensure absolute accuracy.
With all your individual panels cleanly cut and organized, you will immediately notice the puzzle pieces of your project starting to come together beautifully. Taking a methodical approach to this preparation phase eliminates guesswork and minimizes the risk of wasting expensive materials. You are now fully equipped with perfectly sized panels that are ready to be pinned, draped, and shaped directly onto your furniture frame for a true custom fit.
3. Pinning, Fitting, and Step-by-Step Stitching
The secret to a truly professional finish lies in the pin-to-fit method, which allows you to mold the panels directly to the contours of your chair. Start by draping your cut panels over the furniture piece inside out, ensuring the right side of the fabric faces the chair itself. Align the center lines of your material with the center lines of the frame, using a few strategic pins to anchor the pieces in place. Working your way from the top down, begin pinning the adjacent panels together along your marked seam lines, pulling the material taut but not overly tight.
As you place your pins vertically along the edges, aim to create a snug shell that mirrors the exact silhouette of the furniture. Use plenty of heavy-duty quilting pins placed close together, as this mimics an actual sewn line and shows you exactly how the final cover will drape. Pay close attention to corners and curves, gently pinching out any excess volume and pinning it down to create smooth, clean transitions. Once the entire chair is fully pinned, carefully slide the inside-out shell off the frame; if it is too tight to remove easily, leave one side seam partially unpinned to act as an opening.
Take your pinned shell over to your sewing machine, which should already be threaded and fitted with your thick upholstery sewing needle. Set your machine to a standard straight stitch with a slightly longer stitch length (around 3.0mm to 3.5mm), which works beautifully for heavier home decor textiles. Begin sewing slowly along your pinned lines, removing each pin right before your needle reaches it to avoid accidental needle breakages. Backstitch firmly at the beginning and end of every single seam to lock your threads securely and prevent unravelling during use.
After completing your primary structural passes, it is absolutely essential to reinforce the high-stress areas that will experience the most tension. The top corners of the backrest and the inner corners where the seat meets the back are prone to immense strain when people sit down or move the chair. Run a second line of stitching right next to your first line in these specific zones, or utilize a tight zigzag stitch pattern across the seam allowance. This extra step provides an incredible amount of durability, ensuring your hard work lasts for years without splitting open.
Once all the main seams are securely stitched, take the cover back to the chair for an all-important intermediate fitting check. Turn the fabric right side out, smooth it down over the frame, and evaluate the overall drape, checking for any unwanted bagginess or pulling. If you notice a loose area, simply mark it with chalk, take it back to your machine, and adjust the seam inward slightly to perfect the silhouette. When you are fully satisfied with the custom shape, use your scissors to trim away any excessively bulky seam allowances down to a neat half-inch.
To achieve that crisp, high-end look found on designer furniture, you must incorporate a thorough seam pressing technique between your sewing steps. Take your cover to the ironing board and press your freshly sewn seams open flat, or press them to one side depending on the direction of your fabric grain. Pressing sets the stitches into the fibers of the textile, eliminating any puckering and allowing the panels to lay beautifully flat against the furniture frame. Your chair cover is now fully assembled, structurally sound, and ready for the final professional touches, including finishing the bottom hem.
4. Professional Finishing and Hemming Methods
The bottom edge of your slipcover is the final detail that ties the entire project together, and finishing it cleanly prevents a messy, homemade appearance. There are several popular slipcover hemming styles you can choose from depending on your personal design aesthetic and the style of your room. A classic tailored look can be achieved with a simple, clean double-fold hem that sits perfectly parallel to the floor, exposing the chair’s wooden legs. Alternatively, you can opt for a dramatic, flowing ruffled skirt or a structured box-pleated skirt for a more traditional, elegant touch.
To create a flawless double-fold hem, start by placing your right-side-out cover onto the chair to determine the exact length you want. Use your ruler and tailor’s chalk to mark a straight line around the entire perimeter, exactly where the fabric should clear the floor. Remove the cover, fold the edge under by half an inch, press it with your iron, and then fold it under another full inch to completely enclose the raw edges. Pin this crisp fold securely all the way around, ensuring the height remains perfectly uniform from one side to the other.
Take the cover back to your machine and sew the hem in place using a topstitch that runs close to the inner folded edge. If you want to elevate the design even further, you can add beautiful decorative closures to the back opening of your slipcover. Incorporating functional elements like elegant fabric ties, oversized wooden buttons, or a hidden zipper adds immense visual charm while making the cover incredibly easy to remove for laundering. For an ultra-clean look, heavy-duty hook-and-loop tape can be sewn along the inside flap, providing a completely invisible closure method.
If your chair has a plush, padded seat cushion, you might find that the cover shifts slightly when people repeatedly sit down and stand up. To solve this common issue, consider sewing small interior anchor ties made of twill tape or scrap fabric into the inside corners of your seams. These hidden ties can be wrapped securely around the structural legs or frame underneath the seat cushion, anchoring the cover firmly in place. This smart adjustment keeps your slipcover looking perfectly taut and eliminates the need for constant smoothing and tucking throughout the day.
With your hem neatly stitched and your closures securely attached, give the entire project one final, thorough steam pressing. This ultimate press removes any remaining fold lines from your work session and relaxes the textile fibers so they mold perfectly to the chair. Slide your finished creation over the frame, secure your ties or buttons, and step back to admire your incredible transformation. You have successfully taken a plain piece of fabric and transformed it into a custom, stylish, and highly functional asset for your home decor.
Regular maintenance will keep your new creation looking brand new for a very long time, so always treat it with care during wash cycles. Since you pre-washed your material, you can confidently launder the cover on a gentle cycle with a mild detergent whenever it needs a refresh. Avoid high heat in the dryer; instead, air-dry the cover until it is just slightly damp, then pop it back onto the chair to finish drying naturally. This clever trick ensures the fibers dry perfectly to the shape of your furniture, maintaining that gorgeous custom-tailored look you worked so hard to achieve.
Frequently Asked Questions (FAQ)
What is the best type of fabric for a beginner making a chair cover?
For beginners, a medium-weight cotton duck, cotton canvas, or linen blend is highly recommended. These textiles are sturdy, do not slide around easily while pinning, and feed smoothly through standard home sewing machines without stretching out of shape.
How much fabric yardage do I typically need for a standard dining chair?
A standard dining chair generally requires between 1.5 to 2.5 yards of 54-inch wide material, depending on whether you want a full-length skirt or a short hem. It is always wise to buy an extra half-yard to account for pattern matching, seam allowances, and potential cutting mistakes.
Can I make a slipcover without a sewing machine?
While a sewing machine provides the strongest and most durable results for high-use furniture, you can create no-sew variations. This can be achieved by using premium heat-activated hem tape and an iron, or by utilizing strategic folding and fabric staples for a permanent upholstered look.
How do I prevent my custom chair cover from sliding off the seat?
To keep your cover perfectly in place, sew internal fabric ties or twill tape to the inside seams and secure them directly to the chair legs underneath. Alternatively, placing a small piece of non-slip rug pad on the wooden seat before putting the cover on works incredibly well.
How do I calculate the pattern layout if my fabric has stripes or large prints?
When working with patterned designs, you will need to practice pattern matching, which requires purchasing roughly 15% to 20% more material. Center the most prominent motif on the front of your backrest first, then align the adjacent panels so the patterns flow continuously across the seams.
Conclusion
In this comprehensive fabric chair cover tutorial, we have explored every essential step needed to completely transform your seating from basic to brilliant.
We covered how to select the ultimate durable materials and tools, the exact science of taking precise measurements, and the professional pinning methods that guarantee a stunning, custom-tailored fit. Finally, we looked into gorgeous hemming styles and durable closures that ensure your handmade creation can withstand the test of time and busy everyday life. With these foundational sewing skills in your toolkit, you can confidently refresh any room in your home with style and ease.