A unique crochet headpiece tutorial is the perfect way to combine your passion for yarn with the exciting world of handmade fashion accessories. Crafting your own hair accessories allows you to express your individual style while mastering a rewarding and mindful hobby. Whether you are aiming to create a vintage-inspired lace headband, a bohemian flower crown, or an elegant bridal hairpiece, this comprehensive crochet headpiece tutorial will guide you step-by-step through the entire creative process. With just a hook, some beautiful yarn, and a little bit of patience, you can design stunning wearables that stand out in any crowd.
Handmade hair accessories have seen a massive resurgence in recent years, making them highly searchable online and incredibly profitable for craft bloggers and digital creators alike. By following this detailed guide, you will learn not only the technical stitches required but also how to choose the best materials and finish your work professionally. This tutorial is structured to ensure that beginners can follow along easily while experienced crocheters can find unique inspiration to elevate their stitch work. Dive into the wonderful art of yarn styling and discover how simple it is to turn a skein of yarn into a gorgeous fashion statement.
Before diving into the actual stitches, it is essential to understand that creating a wearable headpiece requires a balance of tension, flexibility, and design. Unlike a standard scarf or blanket, a hair accessory needs to fit comfortably around the head without slipping or stretching out of shape over time. In the following sections, we will break down the essential materials, the foundational stitches, the step-by-step assembly, and the expert finishing techniques that will make your handmade items look like they came straight from a high-end boutique. Grab your favorite hook, find a cozy spot to sit, and let us begin this exciting crafting journey together.
1. Choosing the Perfect Materials for Your Project
Selecting the right yarn is the absolute foundation of a successful crochet headpiece tutorial, as the weight and fiber content directly affect how the final piece sits on your hair. For lightweight, breathable summer headbands or intricate lace designs, a high-quality mercerized cotton yarn is highly recommended because it offers excellent stitch definition and a beautiful subtle sheen. If you prefer a softer, warmer accessory for autumn or winter, a lightweight bamboo blend yarn or a premium acrylic yarn will provide the perfect amount of coziness without feeling too heavy on the head.
The size of your crochet hook must match your chosen yarn perfectly to achieve the correct gauge and ensure the accessory fits comfortably. Generally, using a smaller hook than what is recommended on the yarn label helps create tighter, sturdier stitches that keep their shape well during daily wear. A size 2.5 mm to 3.5 mm hook is often ideal for detailed accessory work, allowing you to create clean patterns without leaving large, accidental gaps in the fabric.
In addition to yarn and hooks, you will need a few essential notions to complete your work professionally and efficiently. A sharp pair of craft scissors and a sturdy tapestry needle are required for cutting the yarn and weaving in your loose ends cleanly at the very end. You should also keep a flexible measuring tape nearby to check the circumference of the headpiece as you work, ensuring a flawless fit for any head size.
For pieces that require extra security or stretch, incorporating an elastic hair band or a metal headband base into your design can make a massive difference. Crocheting directly around an elastic band allows the finished piece to stretch easily over various hairstyles without losing its original shape. If you want a more rigid or vintage look, a plain metal alice band can serve as an excellent structural skeleton for your yarn work.
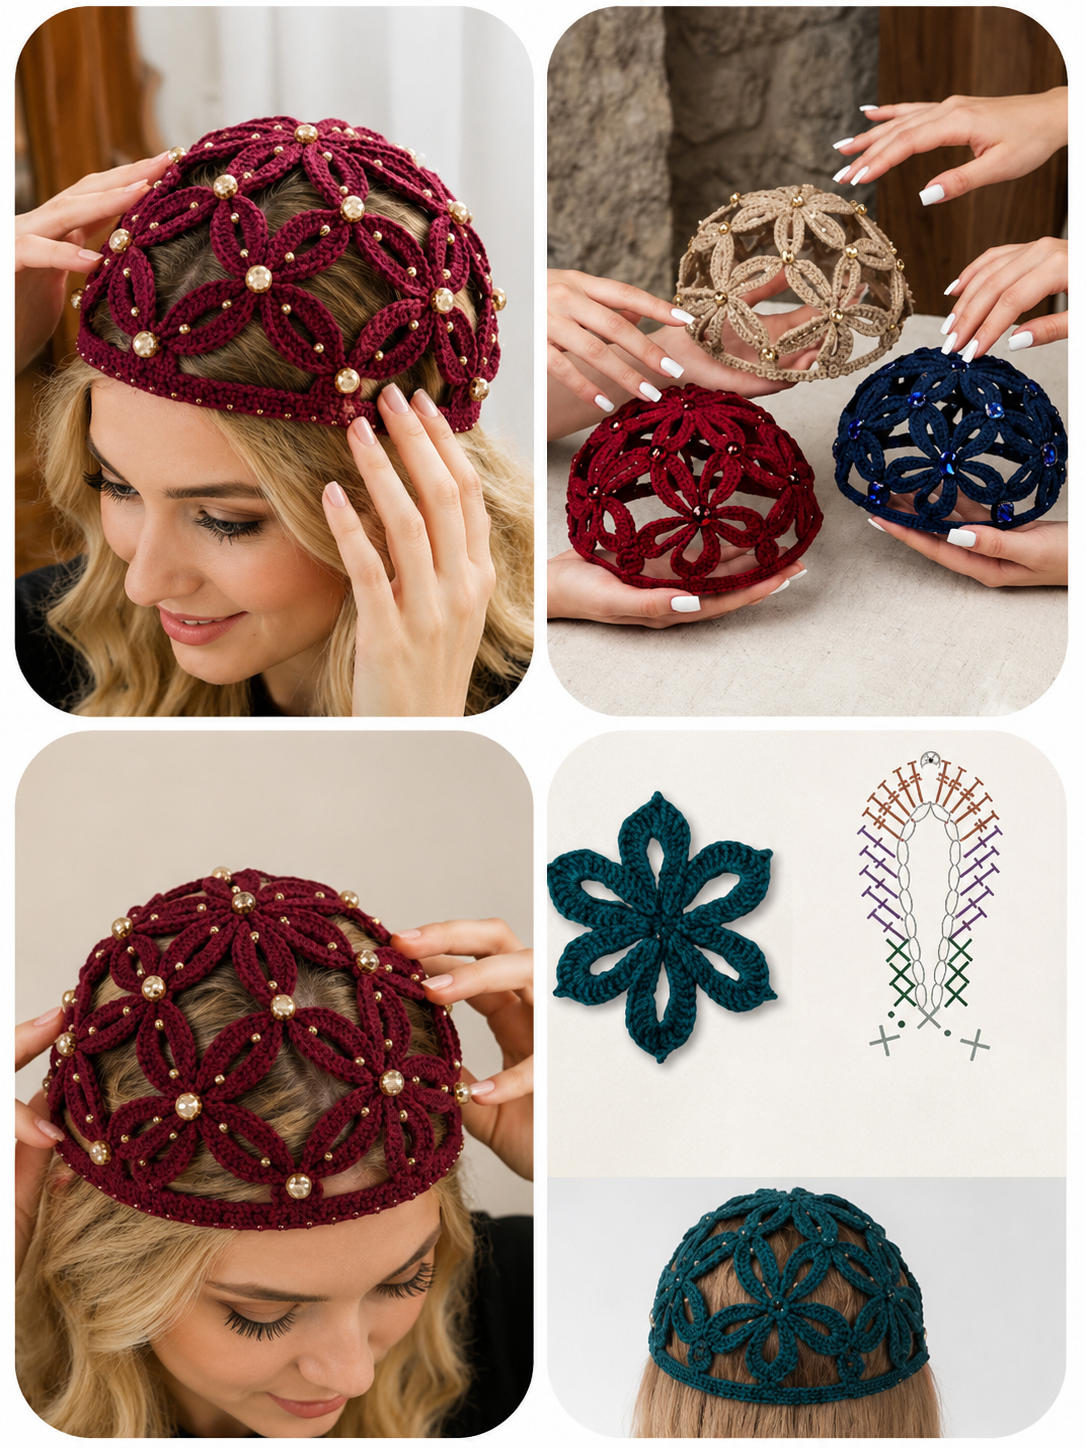
Do not forget to consider small embellishments that can truly elevate your finished project from simple to extraordinary. Adding delicate glass beads, tiny pearls, or colorful sequins directly into your stitches can give your accessory a festive, bohemian, or bridal appearance. Planning these decorative elements before you start stitching ensures that you can integrate them smoothly into your workflow without interrupting the pattern.
Ultimately, taking the time to prepare high-quality materials ensures that your handmade accessory will look professional, feel comfortable, and last for a very long time. Investing in good tools makes the entire crafting experience much more enjoyable and prevents common issues like yarn splitting or hand fatigue. Now that your crafting table is stocked with the perfect supplies, you are completely ready to move on to the core stitch work of this tutorial.
2. Mastering the Foundational Crochet Stitches
The beauty of a handmade hair accessory lies in the rhythm of its stitches, and this section of the crochet headpiece tutorial focuses on the core techniques you need. Every great project starts with a solid slip knot and a clean foundation chain, which establishes the overall length and width of your work. Keeping your initial chain stitches uniform and slightly loose will prevent the bottom edge of your hairband from curling or pulling too tightly against the forehead.
The single crochet stitch is the absolute backbone of structural accessory making because it creates a dense, durable, and highly secure fabric. Using single crochet rows ensures that your headband will not stretch out easily and will hold its shape even after multiple washes. This stitch is also perfect for wrapping around metal headbands or elastic bands because it covers the base materials completely and smoothly.
If you want to add a bit more texture, height, and flexibility to your design, the half double crochet is an incredible stitch to utilize. It offers a beautiful ridged appearance when worked into the back loops only, creating a wonderful faux-ribbed effect that mimics knitted fabric. This elasticity is highly beneficial for casual, everyday ear warmers or sporty headbands that need to stretch comfortably over thick hair.
For a more intricate, openwork, or vintage lace appearance, mastering the double crochet stitch and the triple crochet stitch is key. These taller stitches allow you to create beautiful filigree designs, delicate flower petals, and mesh patterns that look stunning in boho-style hair crowns. Combining these stitches with strategically placed chain spaces creates a gorgeous, breathable lace effect that is perfect for spring festivals and outdoor weddings.
Changing colors smoothly is another fantastic skill that can add immense visual appeal and personal flair to your handmade hair accessories. To change yarn colors seamlessly, always introduce the new color during the very last pull-through of the final stitch in your row. This advanced yet simple technique keeps your edges perfectly clean and allows you to create vibrant stripes, beautiful borders, or contrasting textures with ease.
Practicing your tension consistently is the absolute secret to achieving flawless results that look identical to high-end boutique items. If your tension is too tight, the fabric will feel stiff and uncomfortable; if it is too loose, the headpiece will slip off your hair easily. Take your time with each row, enjoy the creative process, and remember that consistent practice is exactly how beautiful handmade masterpieces are born.
3. Step by Step Assembly and Construction
Now that you have mastered the essential stitches, it is time to assemble your work and watch your crochet headpiece tutorial come to life. Start by measuring the head of the person who will wear the accessory, keeping in mind that crochet fabric naturally stretches about an inch over time. For a standard adult size, you will generally want to aim for a total finished length of nineteen to twenty inches before joining the ends together.
Begin your pattern by creating a foundation chain that matches your desired width, whether you want a thin, minimalist band or a wide, cozy ear warmer. Work your chosen stitch pattern evenly across each row, making sure to count your stitches at the end of every single row to maintain perfectly straight edges. Consistency is incredibly important here, as a missing stitch can cause your headband to narrow accidentally or look uneven when worn.
Once your main band reaches the perfect length, you can choose between a seamless permanent join or an adjustable closure system. To create a seamless loop, bring the two short ends of your band together, making absolutely sure the fabric is not twisted anywhere along the length. Use a slip stitch join or a mattress stitch with your tapestry needle to connect the edges cleanly, creating a smooth and nearly invisible seam.
If you prefer an adjustable option that can accommodate various hairstyles, adding crochet ties or elegant buttonholes to the ends is an excellent design choice. You can easily attach a new strand of yarn to the corners and crochet a long, sturdy chain of fifty stitches on each side to create beautiful bow ties. Alternatively, working a small chain space in the final row creates a natural buttonhole that can latch onto a pretty wooden or vintage button.
For those creating a floral crown style, this is the exact stage where you will craft and attach your individual crochet flowers and green leaves. Crochet several small roses or daisies separately, leaving long yarn tails on each piece so you can sew them securely to the main band. Arrange the flowers symmetrically along the front of the headband, using your tapestry needle to stitch them firmly in place so they do not flop over when worn.
Double-check the fit of your assembled piece by gently placing it on your head or a mannequin to ensure the placement of all elements is completely correct. The band should feel snug but comfortable, and any attached decorations should sit flatly and securely against the main crocheted structure. With the assembly phase successfully completed, you are now ready to apply the professional finishing touches that make handmade items truly shine.
4. Professional Finishing Techniques and Care
The final phase of this crochet headpiece tutorial involves refining your work so that it looks incredibly polished and lasts for many years to come. Start by using your tapestry needle to weave all your remaining yarn tails securely into the stitches on the wrong side of the fabric. Weaving in a zigzag pattern for at least two inches ensures that the ends will never pop out or unravel, even after heavy everyday use.
Wet blocking is an optional but highly recommended professional step that can completely transform the texture and drape of your finished hair accessory. Gently soak your completed headpiece in lukewarm water mixed with a drop of mild wool wash, then gently squeeze out the excess moisture using a clean towel. Pin the damp item onto a blocking mat to its exact final measurements and allow it to air dry completely, which flattens curling edges beautifully.
If your design involves an attached metal headband, ensure that the yarn wrapping is completely glued or stitched securely at the tips of the band. The ends of metal bands can sometimes be sharp, so adding a small drop of fabric glue or wrapping extra yarn around the tips prevents discomfort behind the ears. This small attention to detail dramatically increases the comfort level and overall quality of your wearable handmade art.
Proper storage and maintenance are essential to keeping your delicate yarn accessories looking brand new and free from accidental stretching or distortion. Always store your hairbands flat in a clean drawer or organized on a dedicated accessory stand rather than hanging them on sharp hooks. Keeping them away from direct sunlight and dust preserves the vibrancy of the yarn colors and prevents the fibers from weakening over time.
When it comes to cleaning your beautiful handmade creations, hand washing is always the safest and most effective method to prevent fuzziness or shrinkage. Submerge the piece in cool, soapy water, gently agitate it with your fingers without wringing or scrubbing, and rinse it thoroughly with clean water. Always dry the item flat on a fresh towel away from direct heat sources to preserve the elasticity and shape of the stitches.
By mastering these professional finishing and care techniques, you elevate your crafting skills and ensure that your beautiful creations can be enjoyed for generations. Sharing these care instructions with your friends, family, or customers adds incredible value to your handmade gifts and boutique products. You have successfully completed the entire creation process, and you should be immensely proud of your brand-new, stunning fashion statement.
5. Frequently Asked Questions (FAQ)
What is the best yarn weight for a comfortable hair accessory?
The ideal choice for a hair accessory is a lightweight yarn, such as sport weight, fingering weight, or a light worsted weight yarn. These smaller weights allow for intricate stitch details and prevent the piece from becoming too bulky or heavy on your head. Heavy yarns can cause the accessory to slide off easily, whereas lighter fibers stay securely and comfortably in place all day long.
How do I stop my handmade headband from slipping off my hair?
To prevent slipping, you can use a smaller hook size to create a tighter fabric, or weave a thin strand of elastic thread through the inside stitches. Creating your piece slightly smaller than your actual head measurement also ensures a snug fit that accounts for natural stretching. Alternatively, you can attach the yarn work directly onto a non-slip metal or plastic headband base.
Can a beginner complete this tutorial successfully?
Yes, this project is incredibly beginner-friendly because it can be completed using only basic stitches like the chain stitch and single crochet. Starting with a simple, flat rectangular headband allows beginners to practice their tension and stitch consistency without worrying about complex shaping. As your confidence grows, you can easily introduce advanced textures, color changes, and floral embellishments to your work.
How many yards of yarn do I need for a standard headpiece?
One of the best aspects of making hair accessories is that they are excellent scrap-buster projects, usually requiring less than 50 to 100 yards of yarn. A single standard skein of yarn is typically enough to make multiple beautiful pieces or a matching set of accessories. This makes the project highly cost-effective and a fantastic way to utilize leftover yarn from your larger crafting projects.
Is cotton or acrylic yarn better for wearable hair accessories?
Both options have unique benefits, but cotton is generally preferred for spring and summer items due to its breathability, strength, and crisp stitch definition. Acrylic yarn is wonderful for winter ear warmers because it provides excellent warmth, elasticity, and is incredibly soft against sensitive skin. Consider the season and purpose of your accessory when choosing between these two highly popular fiber types.
How do I adjust the pattern for a toddler or a child?
Adjusting the size is incredibly simple; you just need to reduce the number of chains in your foundation or work fewer rows to decrease the overall length. Always use a flexible measuring tape to check the child’s head circumference before you begin, and aim for a length that is roughly one inch smaller than the actual measurement. This ensures a comfortable, secure fit that will not press too tightly against a child’s gentle head.
Conclusion
This comprehensive crochet headpiece tutorial has explored everything from selecting the finest cotton and acrylic yarns to mastering essential foundational stitches and applying professional finishing techniques.
You have learned how to create a beautifully structured, stylish, and comfortable accessory that can be customized to fit any style, season, or special occasion perfectly. Crafting your own wearables is an incredible way to express your personal artistic vision while developing valuable design skills that can be applied to future yarn projects.