Fabric chair cover – tutorial projects are the ultimate game-changer for anyone looking to breathe new life into an outdated dining room, protect valuable furniture from everyday wear and tear, or infuse a space with a personalized touch of style. Whether you are dealing with worn-out upholstery, preparing for a special family event, or simply craving a seasonal decor refresh, learning how to construct your own custom seating solutions is an incredibly rewarding endeavor. Fabricating these slipcovers yourself not only saves a significant amount of money compared to buying mass-produced retail alternatives, but it also allows you absolute creative control over the textile patterns, textures, and exact tailored fit for your specific furniture pieces.
Stepping into the world of DIY home decor can feel a bit daunting if you are looking at a complex piece of furniture, but breaking the process down into manageable steps makes it entirely achievable for crafters of all skill levels. By choosing to dive into a comprehensive fabric chair cover – tutorial, you are equipping yourself with a sustainable crafting skill that promotes upcycling and mindful home styling. Instead of discarding structural chairs that have minor cosmetic imperfections, a perfectly fitted textile casing can completely mask flaws, instantly elevating the aesthetic value of your entire room while extending the lifespan of your furniture investment.
In this detailed step-by-step guide, we will walk through every single phase of creating a gorgeous, durable slipcover completely from scratch, ensuring your final product looks polished, professional, and uniquely yours. From choosing the ideal resilient textile to mastering the precise measurements, cutting layout, sewing assembly, and final fitting tweaks, this resource covers everything you need to know. Grab your measuring tape, dust off your sewing machine, and let us explore the precise art of custom upholstery preservation so you can transform your living space with confidence and ease.
1. Selecting the Right Textiles and Essential Sewing Tools
Choosing the perfect material is the foundational cornerstone of any successful fabric chair cover – tutorial project, as the weight and weave determine both durability and drape. For everyday dining chairs that endure frequent use, spills, and friction, you will want to prioritize medium to heavy-weight textiles such as cotton duck, canvas, linen blends, or sturdy denim. These tightly woven options provide the structural integrity required to hold their shape over time while offering excellent resistance to standard wear and tear.
Beyond the main body textile, gathering the correct specialized tools before you begin sewing will save you immense time and prevent unnecessary frustration down the road. You will absolutely need a high-quality, flexible measuring tape, sharp fabric shears that slice cleanly through thick layers, a bounty of heavy-duty quilting pins, and a reliable fabric marker or tailor’s chalk for precise labeling. Having these fundamental instruments neatly organized at your workstation ensures a fluid, uninterrupted drafting and assembly experience.
Thread selection is another critical element that amateurs often overlook when attempting a DIY fabric chair cover – tutorial. Because slipcovers experience significant structural tension whenever someone sits down or moves around, standard lightweight sewing thread simply will not suffice. Opt for a heavy-duty polyester or all-purpose dual-duty thread that matches or complements your textile color, ensuring your seams remain locked and completely split-proof under pressure.
If you are a beginner, it is highly recommended to steer clear of overly slippery materials like silk, intricate satin, or highly stretchy knits for your first few attempts. These temperamental textiles require advanced handling techniques and can easily warp during the stitching process, leading to an uneven, saggy fit. Stick to stable, non-stretch woven options that behave predictable under the presser foot of your machine, allowing you to focus purely on mastering the structural shape.
Don’t forget to factor in the care and maintenance requirements of your chosen textile, especially if the finished items will be used in high-traffic zones like kitchens or busy dining spaces. Selecting a machine-washable material means your gorgeous new creations can be easily stripped off, tossed into the laundry after a messy dinner party, and reinstalled looking brand new. Preshrinking your textile by washing and drying it prior to cutting is a crucial preventative measure to ensure your covers don’t shrink drastically later.
Lastly, consider incorporating complementary notions like functional piping, cording, hook-and-loop fasteners, or elegant ribbon ties to enhance both the aesthetic appeal and the utility of your design. Adding contrasting piping along the structural seams imparts a high-end, professionally manufactured appearance that elevates the entire room. Take your time browsing textile options, feel the weight of the weave in your hands, and select a pattern or solid color that seamlessly harmonizes with your existing interior design palette.
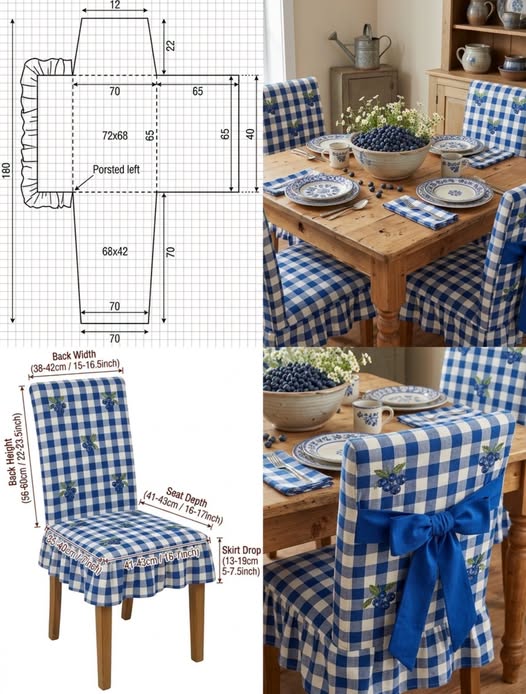
2. Accurate Measurements and Creating a Custom Paper Pattern
The secret to a flawlessly executed fabric chair cover – tutorial lies entirely in the precision of your initial measurements, as even a minor miscalculation can result in a cover that is either impossibly tight or unflatteringly baggy. To begin, break your chair down into distinct geometric zones: the top backrest height, the total width of the backrest, the depth of the seat cushion, and the distance from the seat down to the desired skirt hemline. Always measure at the absolute widest points of each section to guarantee the finished slipcover can slide effortlessly over the frame.
Once you have recorded these exact dimensional figures on a notepad, it is time to calculate your seam allowances and ease factors before cutting into your precious material. As a universal rule for this fabric chair cover – tutorial, you should add an extra one inch to every single measurement boundary to accommodate a standard half-inch seam allowance on all sides. Furthermore, adding a slight fraction of an inch for “ease” ensures the textile has just enough breathing room to slide onto the chair frame without stretching the seams to their breaking point.
To prevent costly cutting mistakes on your main textile, it is incredibly wise to construct a physical paper template using large butcher paper, pattern paper, or even inexpensive drafting grid sheets. Lay the paper directly over the individual sections of your chair, carefully tracing the contours with a pencil while explicitly factoring in your calculated seam additions. Label each distinct paper piece clearly, noting designations such as “Inner Back,” “Outer Back,” “Seat Cushion,” and “Skirt” so you never lose track of your layout.
If your furniture piece features complex curves, a tapered backrest, or unusual angles, a flat paper pattern might require a bit of intuitive three-dimensional draping to get right. You can pin the paper directly onto the chair padding, folding small darts where the furniture naturally curves to create a sleek, contoured silhouette that mirrors the underlying framework. Mark these dart locations clearly on your paper template, as they will dictate exactly where you need to pinch and stitch your textile later for that custom-tailored look.
When laying your finalized paper templates onto your spread-out textile, pay extremely close attention to the direction of the grainline and any specific pattern repeats in the design. If your material features a distinct floral motif, geometric stripes, or a directional nap like velvet, you must orient all pattern pieces in the exact same direction. Failing to align the grainline can cause the finished panels to twist awkwardly or reflect light unevenly, instantly ruining the professional look of your hard work.
Secure your paper templates to the material using heavy pattern weights or sharp pins, then carefully cut along the marked perimeters using your dedicated textile shears. Take your time during this phase, making slow, long, deliberate cuts rather than quick, choppy snips to ensure the raw edges remain perfectly straight and completely fray-free. Once all your individual textile panels are neatly cut out and systematically organized, you are officially ready to transition over to the assembly and construction phase.
3. Step-by-Step Sewing Assembly and Seam Finishes
With all your individual textile panels accurately cut, you can now begin the exciting process of assembling your project as outlined in this fabric chair cover – tutorial. Start by pinning the “Inner Back” panel to the “Outer Back” panel along the top and side perimeters, ensuring the right sides of the textile are facing directly toward each other. Use an abundance of sewing pins to keep the aligned edges perfectly flush, pointing the pin heads outward so they are easy to pull out as you navigate the machine.
Take the pinned backrest assembly to your sewing machine and stitch along the top and side edges using a durable straight stitch and your designated half-inch seam allowance. Always remember to backstitch at the very beginning and the absolute end of every single seam to lock the threads firmly in place and prevent unraveling. Once the backrest hood is stitched, gently trim the excess material at the top corners to reduce internal bulk, allowing for crisp, sharp points when the hood is turned right-side out.
Next, you will attach the “Seat Cushion” panel to the bottom edge of the newly created “Inner Back” panel, matching the center registration marks perfectly to keep the alignment straight. Pin the pieces securely with right sides together, then execute a precise horizontal stitch across that critical intersection where the seat meets the vertical backrest. This specific junction bears a significant amount of physical stress when the chair is occupied, so consider reinforcing this seam by running a second parallel row of stitching right next to the first.
Now it is time to address the side edges of the seat cushion, pinning them carefully to the remaining lower sides of the backrest assembly to form the basic structural box shape. If your chair design dictates a sleek, modern look without a flowing skirt, you will simply extend these side panels down to the bottom of the seat frame and prepare for hem creation. If you prefer a traditional skirted look, leave the bottom perimeter raw for now and focus on prepping your long, rectangular skirt panels.
Before moving to the final assembly steps, it is highly recommended to finish all your raw internal edges to prevent the textile from fraying to pieces inside the wash machine. If you own a serger, run all the internal seam allowances through the machine to completely encase the raw threads in a clean, professional overlock stitch. Alternatively, you can use a classic zigzag stitch on a standard domestic sewing machine, or utilize pinking shears to cut a decorative, fray-resistant zigzag pattern along all internal borders.
Slide the partially assembled casing over your chair for a quick mid-point fitting check, observing how the textile behaves over the frame and identifying any areas that might require minor adjustments. If you notice any unsightly bagging or loose pockets of material, simply use your pins to pinch out the excess textile directly on the chair, mark the new line, and adjust your machine stitch accordingly. This interactive fitting process ensures your DIY creation achieves that enviable, high-end look typically reserved for professional upholstery shops.
4. Creating the Skirt, Finishing Hems, and Final Fitting
The lower portion of your project provides an incredible opportunity to showcase your personal style, whether you prefer a clean tailored look or a series of elegant pleats. If you choose a minimalist tailored style for this phase of the fabric chair cover – tutorial, you will simply cut straight panels that match the exact width of each side of the seat frame. For a more dramatic, traditional aesthetic, you can create box pleats at the corners, which allow the skirt to flare out gracefully while providing extra legroom for guests sitting down.
To construct a basic tailored skirt, sew your individual skirt panels together at the sides to create a continuous fabric band that matches the total perimeter of your chair seat. Once the band is formed, pin the top edge of this skirt assembly to the lower raw edges of your seat cushion assembly, ensuring right sides are together. Carefully stitch this continuous boundary all the way around the chair, taking your time around the corners to maintain a perfectly uniform line.
Hemming the bottom edge of your skirt is the final structural step, and it plays a massive role in determining how beautifully the finished project sits on the floor. With the slipcover pulled completely taut over the actual chair, use a ruler to mark a perfectly level hemline roughly one half-inch above the surface of the floor. This tiny clearance gap prevents the bottom of your gorgeous textile from dragging on the ground, gathering household dust, or becoming a tripping hazard.
Remove the cover from the furniture piece one last time and fold the bottom raw edge up by a half-inch toward the wrong side of the textile, pressing the fold crisp with a hot iron. Fold it over a second time by another half-inch to completely hide the raw edge inside a clean, double-fold hem structure, pinning it securely all the way around the perimeter. Use a straight stitch on your machine to sew close to the inside folded edge, creating a polished, durable border that will withstand years of use.
Give your entire completed slipcover a thorough press with a steam iron to remove any wrinkles, creases, or rumpled textures that accumulated during the intensive sewing process. Pressing your seams flat not only improves the overall drape of the textile but also locks the stitches into the weave, giving the project a professional finish. Carefully slide the freshly pressed masterpiece over your chair frame, smoothing out the surface with your hands to settle the panels into their final positions.
To ensure your new creation stays perfectly anchored in place without shifting around during daily use, consider tucking small foam grip rollers or tightly rolled fabric scraps into the deep crevices where the seat meets the backrest. These hidden anchors apply continuous friction, keeping the textile pulled taut and preventing unsightly wrinkling when people stand up. Step back, admire your handiwork, and celebrate the incredible transformation you have achieved through patience, precision, and your own creative hands.
Frequently Asked Questions (FAQ)
What is the best type of material to use for a beginner attempting this project?
For beginners tackling a fabric chair cover – tutorial for the very first time, medium-weight 100% cotton duck, sturdy canvas, or stable linen blends are the absolute best options. These materials are incredibly easy to cut, do not slip or stretch out of shape while being sewn, and hold a crisp iron crease beautifully. Avoid stretchy knits, delicate silks, or heavy velvets until you feel completely confident with your pattern-making and machine-handling skills.
How much extra material should I buy to ensure I have enough for patterns?
It is a highly recommended practice to purchase roughly 20% more material than your initial basic geometric calculations indicate. This extra yardage provides a crucial safety cushion for pattern matching, accommodating fabric shrinkage during the pre-wash phase, and correcting any accidental cutting mistakes. Having extra textile on hand also ensures you can create matching accessories, such as custom piping or matching dining napkins, to tie the whole room together.
Do I absolutely need to pre-wash my textile before cutting out the panels?
Yes, pre-washing your textile is an absolutely non-negotiable step if you ever plan on washing your finished slipcovers in the future. Many natural woven fibers like cotton and linen shrink significantly during their first cycle through a hot washer and dryer. If you skip this step and sew your covers to a precise fit, they will likely shrink so drastically after the first wash that you will no longer be able to fit them back onto your furniture frames.
Can I make a custom slipcover for a chair that has rounded or sloping arms?
You can certainly create custom covers for complex armchairs, though it requires an advanced variation of the basic fabric chair cover – tutorial. Instead of relying purely on flat geometric measurements, you will need to utilize a process called “muslin draping.” This involves pinning an inexpensive scrap fabric directly onto the armchair, tracing the exact curves of the arms with a marker, and cutting out those custom shapes to use as your final template pattern.
How do I clean and maintain my custom DIY dining room slipcovers?
The maintenance routine depends entirely on the specific textile you selected during the material gathering phase of your project. If you used machine-washable cotton or canvas that was properly preshrunk, you can easily strip the covers off, wash them on a gentle cycle with mild detergent, and tumble dry on low heat. To maintain a crisp, professional appearance, remove them from the dryer while they are still slightly damp and iron them before slipping them back onto the frames.
Conclusion
In conclusion, mastering this fabric chair cover – tutorial empowers you to completely redefine your living space while preserving your furniture with stylish, budget-friendly, and sustainable custom textiles.
Throughout this comprehensive guide, we have explored the essential journey of selecting heavy-duty machine-washable materials, taking flawless multi-angle measurements, drafting accurate custom paper templates, and executing robust sewing finishes to ensure long-lasting durability. By investing your time and creativity into this DIY project, you successfully breathe vibrant new life into old furniture pieces, saving them from landfills while creating a tailored look that perfectly reflects your unique aesthetic taste.