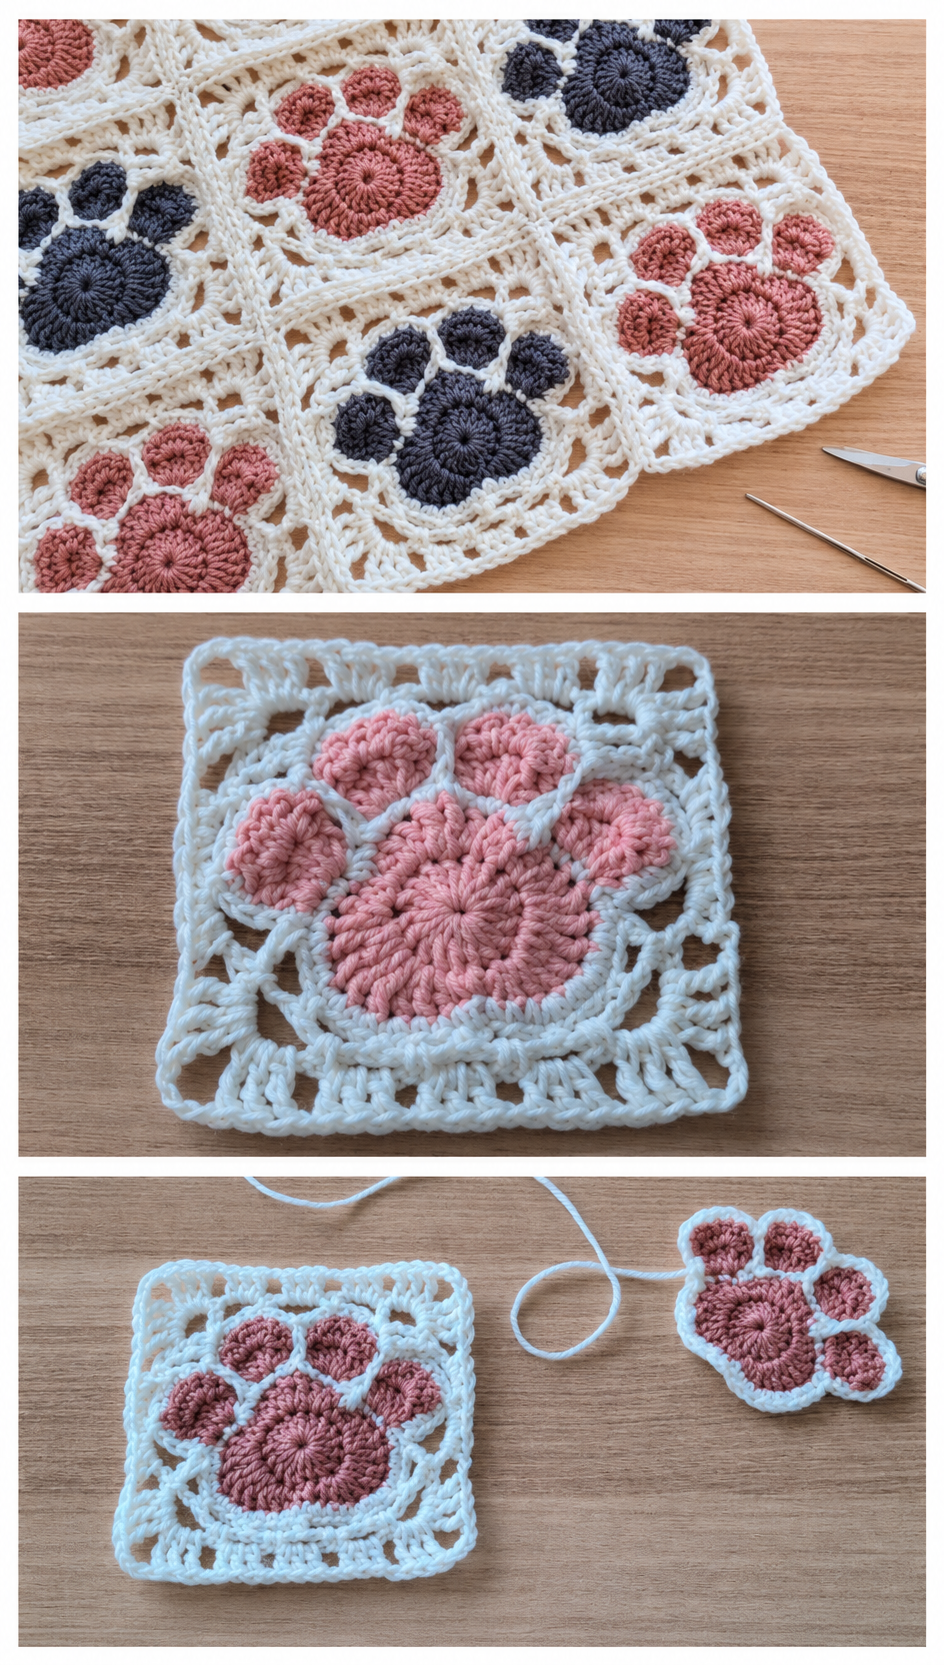
If you are a craft enthusiast who loves combining a passion for yarn with a deep affection for furry friends, mastering the Paw Print Crochet Square – Tutorial is the absolute perfect next project for your crochet hook. There is something incredibly heartwarming about creating handmade items that celebrate our pets, and this specific pattern beautifully merges the timeless charm of a classic granny square with a cute, textured animal track right in the center. Whether you want to honor a beloved cat, commemorate a loyal dog, or simply add a whimsical, cozy touch to your stitching repertoire, this comprehensive guide will walk you through every single step with ease.
Crocheting is much more than just a relaxing hobby; it is a powerful form of self-expression that allows you to transform simple skeins of yarn into functional, beautiful pieces of art that last for generations. The beauty of learning how to complete a Paw Print Crochet Square – Tutorial lies in its incredible versatility, making it a fantastic stash-buster project for using up those leftover yarn scraps you have accumulated in your craft basket. You can easily join multiple finished squares together to assemble a large, cozy afghan, a charming pet blanket, a trendy tote bag, or even a set of absorbent coasters that will instantly spark joyful conversations with any guest who visits your home.
As you dive into this step-by-step Paw Print Crochet Square – Tutorial, you will discover that achieving a crisp, clean animal track design requires just a tiny bit of color-work planning and some basic knowledge of fundamental stitches. In this ultimate guide, we are going to break down the entire process from start to finish, ensuring that even intermediate beginners can follow along without feeling overwhelmed or confused. We will cover the essential materials you need to gather, provide a clear breakdown of the stitch patterns, offer expert color-changing tips for flawless results, and share creative ideas on how to assemble your final squares into breathtaking home decor.
1. Essential Materials and Tools for Success
Before you jump into the actual stitching process for this project, gathering the correct supplies will ensure your crafting experience is smooth, enjoyable, and completely stress-free. For this specific Paw Print Crochet Square – Tutorial, we highly recommend selecting a worsted weight yarn (medium category 4) because it offers excellent stitch definition, making the central motif pop beautifully. You will need at least two contrasting colors: a solid main shade for the background of the square and a distinct, contrasting color for the actual animal track so that the shape remains highly visible and crisp.
When it comes to selecting your crochet hook, a standard 5.0 mm (H-8) or 5.5 mm (I-9) hook generally works beautifully with worsted weight yarn, depending entirely on your unique personal tension. If you tend to crochet very tightly, you might want to size up your hook slightly to prevent the central motif from bunching up or puckering as you work. On the other hand, if your stitches are naturally loose, sizing down will help keep the overall structure of your square neat, firm, and uniform.
In addition to your colorful yarn and favorite crochet hook, you will want to keep a few basic notions right by your side throughout the creation process. A sharp pair of craft scissors is absolutely necessary for trimming yarn tails during your frequent color changes, and a sturdy yarn needle is essential for weaving in those loose ends securely. We also highly recommend using a couple of locking stitch markers to help you easily keep track of your corner spaces and round transitions without losing your count.
Lastly, do not underestimate the power of a proper blocking board and rust-proof T-pins when finishing your handmade textile projects. Acrylic yarns can benefit greatly from a light steam blocking, while natural fibers like cotton or wool respond wonderfully to a traditional wet blocking method. Taking the extra time to block your finished work ensures that every single edge is perfectly straight, making the final assembly process incredibly simple.
Choosing the right fiber content for your project is also a vital step that depends on how you plan to use the finished squares in your daily life. If you are designing a rugged, heavy-use pet blanket that will need to be tossed into the washing machine frequently, a premium acrylic or a durable cotton-acrylic blend is your absolute best bet. If you are making decorative throw pillows, you can indulge in softer wool blends that offer a luxurious feel and wonderful warmth.
2. Step-by-Step Stitch Guide for the Main Motif
To begin the exciting foundation of your Paw Print Crochet Square – Tutorial, you will start by creating a magic ring (also known as a magic circle) using your chosen contrast color to form the main pad. If you struggle with the magic ring technique, you can easily chain four and slip stitch into the very first chain to form a workable base ring instead. Inside this ring, you will work a series of stitches, including half double crochets and double crochets, to form an intentional oval shape that mimics a real animal pad.
Once the large central pad of your motif is fully formed, it is time to create the distinct, adorable toe pads around the top edge of your work. These smaller shapes are typically created by working a combination of slip stitches, chains, and clusters of half double crochets or treble crochets directly into the previous round’s stitches. Precise spacing between these toe elements is crucial, so be sure to count your stitches carefully to ensure the shape looks balanced and natural.
After completing the central track shape, you will need to seamlessly fasten off your contrast yarn and attach your primary background color to begin squaring off the round design. Squaring a circle requires using stitches of varying heights, such as single crochets along the flat sides, half double crochets as you move upward, and tall double or treble crochets in the designated corners. By placing two tall stitches, a chain of two, and two more tall stitches into the exact same space, you effortlessly create a sharp, distinct 90-degree corner.
As you continue to build outward with your background color, each subsequent round will become a straightforward repetition of standard granny square stitches or solid double crochet rows. Working along the straight sides of the square is incredibly relaxing, as you simply place one stitch into each corresponding stitch from the previous row until you reach the next corner space. Remember to consistently place your corner clusters into each of the four chain spaces to maintain the perfectly square shape of your project.
Maintaining consistent tension during the color transition rounds is one of the biggest secrets to achieving a highly professional-looking final product. When you transition from the dense, shaped motif in the center to the open, airy rows of the background, avoid pulling your yarn too tightly across the back of the work. If your carried yarn is pulled with too much force, it will cause the center of your square to warp inward, making it difficult to flatten out later.
Once you reach your desired dimensions—typically around six to eight inches for a standard motif size—you will finish the outer edge with a clean row of single crochets. This final bordering row provides a beautiful, stable framework that makes joining multiple individual pieces together an absolute breeze later on. Fasten off your yarn neatly, leaving a generous tail of about eight inches, which you can use for sewing or weaving in later.
3. Master Color Changes and Neat Finishes
Achieving seamless color transitions is a critical skill that will truly elevate the overall quality of your Paw Print Crochet Square – Tutorial project. To ensure there are no awkward, visible steps or jogged lines where your colors meet, always introduce your new yarn color during the final pull-through of the very last stitch. For example, when completing a double crochet, insert your hook, pull up a loop, yarn over, pull through two loops, then drop the old color and pull the new color through the remaining two loops.
Because this specific pattern requires switching back and forth between your background color and your accent shade, you will find yourself dealing with several yarn tails. To minimize the amount of tedious weaving you have to do at the very end, try crocheting directly over your yarn tails along the back of your stitches as you work. This clever technique traps the loose ends securely inside the fabric of your project, saving you hours of meticulous hand-sewing when the crocheting is finished.
If you prefer not to carry your yarn across the back because you worry about the dark color showing through a light background, you can utilize the intarsia method. This technique involves using separate, smaller bobbins of yarn for each individual section of color, ensuring the back of your work remains incredibly neat and lightweight. Intarsia prevents the finished fabric from becoming bulky, making it ideal for lightweight garments, delicate baby blankets, or seasonal scarves.
After your beautiful square is completely stitched, taking the time to weave in any remaining loose ends with a yarn needle is a step you should never skip. Thread each yarn tail onto your needle and carefully weave it back and forth through the dense center of your stitches in three alternating directions. This secure, multi-directional method ensures that your hard work will never unravel, even after undergoing multiple cycles through a washing machine or heavy everyday wear.
To truly make your handmade craft look like it was purchased from a high-end boutique, we strongly recommend blocking every single square before assembling them. You can use a dedicated foam blocking grid, pin the corners of your squares to the exact same measurements, and mist them lightly with clean water from a spray bottle. Allow the pinned items to dry completely at room temperature, and you will be amazed at how crisp, flat, and perfectly uniform your shapes become.
Proper storage of your finished squares before assembly is also important if you are working on a massive project like a full-sized bed afghan over several months. Keep your blocked pieces stored flat inside a clean, breathable storage bin or a canvas bag to protect them from dust, pet hair, or accidental spills. This keeps your yarn looking fresh, vibrant, and clean, ensuring that your final assembled blanket looks absolutely flawless from corner to corner.
4. Creative Ways to Assemble Your Finished Squares
Once you have crocheted a gorgeous stack of individual pieces following this Paw Print Crochet Square – Tutorial, the creative possibilities for your final project are virtually endless. One of the most popular ways to showcase these adorable motifs is by assembling a custom patchwork blanket for a cherished dog or cat. You can alternate the themed blocks with solid, brightly colored traditional granny squares to create a vibrant, balanced aesthetic that adds a cozy touch to any living room.
If you are looking for a quicker, highly practical project, you can easily join just two completed squares together along three sides to create a trendy tote bag. Simply add a sturdy, crocheted strap to the top corners, line the inside with a piece of durable cotton fabric, and you have an adorable accessory. This makes a wonderful, thoughtful gift for local veterinarians, hard-working animal shelter volunteers, or any passionate pet owner in your life.
For an effortless and invisible joining method, the mattress stitch is an exceptional hand-sewing technique that creates a completely flat, hidden seam between your pieces. Align two squares with their right sides facing upward, and use your yarn needle to catch the inner loops of the edge stitches, zig-zagging back and forth. When you gently pull the yarn tail taut, the two separate pieces magically glide together, creating a perfectly smooth transition that is comfortable to the touch.
If you want to add an extra layer of beautiful texture and visual interest between your assembled blocks, you can join them using a single crochet join on the right side. This specific method creates a raised, decorative ridge along the borders of each square, framing the animal track motifs beautifully and giving the project a modern look. You can even use a completely different, contrasting yarn color for this joining border to make the patchwork layout pop visually.
Beyond blankets and bags, these versatile blocks can easily be transformed into wonderful, functional kitchen accessories, such as absorbent hot pads or decorative table runners. If you plan to use them as hot pads for warm dishes, just ensure you use 100% natural cotton yarn, as synthetic acrylic fibers can melt when exposed to high heat. Doubling the thickness by stitching two identical pieces back-to-back will protect your delicate wooden tabletops from heat damage.
Finally, finishing your completely assembled project with a cohesive outer border will tie the entire design together beautifully and give it a polished appearance. A simple border consisting of a few rows of moss stitch, classic half double crochets, or a delicate scallop edge works wonders to frame your hard work. This final touch cleans up any minor inconsistencies along the outer edges of your project, leaving you with a masterpiece you can display with pride.
Frequently Asked Questions (FAQ)
What is the best type of yarn to use for this paw print project?
For the best overall results, a premium acrylic or 100% cotton yarn in a worsted weight (category 4) is highly recommended. These fibers provide excellent stitch definition, which is essential for making the central animal track shape stand out clearly. They are also incredibly durable, budget-friendly, and very easy to wash regularly.
Can a complete beginner successfully tackle this specific pattern?
Yes, an ambitious beginner can absolutely complete this project if they are already familiar with fundamental stitches like single, half double, and double crochet. The pattern requires a basic understanding of working in a magic ring and changing yarn colors. Following this guide slowly and practicing your color-work beforehand will guarantee your success.
How do I prevent the carried yarn from showing through my light-colored background?
To prevent a dark contrast yarn from shadowing or bleeding through a light-colored background, try using the intarsia crochet method instead of carrying the yarn. This means you will drop the accent color completely when not in use and pick up a separate bobbin of yarn when you return to that specific section, keeping the back clean.
How many individual squares do I need to make a standard baby blanket?
For a standard, cozy baby blanket measuring roughly 30 by 30 inches, you will need approximately 16 to 25 squares, depending on the exact size of your individual blocks. Arranging them in a balanced 4×4 or 5×5 grid layout creates a beautiful format. You can alternate the themed blocks with simple, solid color blocks to save yarn.
Why is my finished square curling at the corners, and how can I fix it?
Curling is a very common issue that usually happens due to tight stitch tension or a slight imbalance in the number of stitches placed in the corner spaces. You can easily fix this common issue by adjusting your tension, using a slightly larger crochet hook, or properly blocking your completed pieces with water or steam once you finish.
Conclusion
In this comprehensive Paw Print Crochet Square – Tutorial, we have explored everything you need to create a beautiful, pet-themed project from scratch.
We covered the ideal materials to gather, detailed the step-by-step process of shaping the central animal track, shared expert secrets for flawless color changes, and discussed creative ways to join your finished blocks together into gorgeous, practical items.